![]() In this post, I will show you how to import Activity Code values from Excel into Oracle Primavera P6 without having to type them in or resort to programming in Java.
In this post, I will show you how to import Activity Code values from Excel into Oracle Primavera P6 without having to type them in or resort to programming in Java.
It is a fairly common request and is nearly always met by someone offering their Java code or suggesting the use of the ODBC flavor of the Primavera SDK. Both can be difficult and time-consuming to do and involves having to install either the Primavera SDK or installing the Primavera Java API. Here I will show you how to import Activity Code values using nothing but Excel and some simple formulas.
I will be loading a list of UK Train Stations which have a 3 letter code and their name. The full list can be found on the National Rail Enquiries site.
The technique shown here is accomplished by amending an XER file and importing the resulting Activity Code values into Primavera P6. The general steps are:
1. Create an empty Project in Primavera P6, add and assign an activity code, then export into an XER file
2. Open the XER file in Microsoft Excel
3. Insert the rows to define the Activity Code and Activity Code Values
4. Save the Microsoft Excel worksheet as an XER file
5. Import the XER file into Primavera P6
This whole routine can usually be done in a few minutes.
Creating The XER File
An XER file is required to provide a place to add data about the Activity Code values. One day I will write a little more about the XER file. For this post, it is just a text file where values are separated by a tab character. This means it easy to open in Excel where changes can be made to it before saving again.
 A Single Activity Code Value Needs Assigning
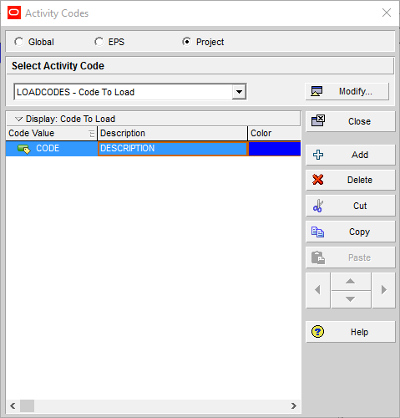
The first step is to create a brand new project in Oracle Primavera P6 and add an Activity into it. The Activity needs an Activity Code assigned to it, so create a Project Level Activity Code with one Activity Code Value and assign it to the Activity. Export the project to an XER file.
This is done to avoid changing any configuration other users rely on and it also provides the correct set of columns no matter which version of Oracle Primavera P6 is being used. Earlier versions do not have the color value used by the Visualizer.
Open The XER File In Excel And Add Activity Code Values
The XER file is just a tab-delimited text file that can be opened and edited using Microsoft Excel but the file extension has to be changed from .xer to .txt for this to happen. Change the extension from .xer to .txt, then start up Microsoft Excel and open the XER file posing as a .txt file.
The Microsoft Excel Text Import Wizard is displayed. Verify the Delimited file type is selected and My data has headers is not checked. Click the Next > button to move to page 2.
Verify Tab is the only Delimiter selected and click the Finish button to import the XER file into Excel.
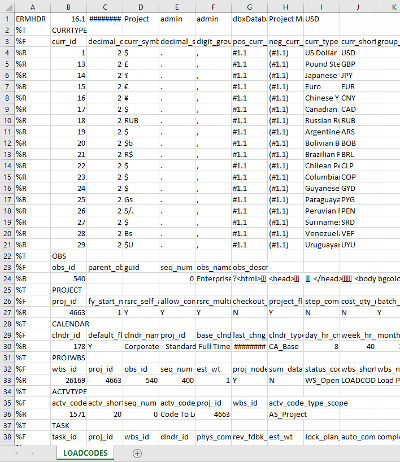
It will look something like this.
XER File As It Appears In Microsoft Excel
A Little XER Diversion
The value in column A indicates what can be found in the row. The first row is the header row and so it has ERMHDR in column A. The last row, which is not shown on the screenshot, contains %E indicating it is the end row. There are three other rows:
- %T is a Table Header and contains the name of the table in Column B. There is one for each table.
- %F is a Field row and contains the list of table field names in subsequent columns. there is one for each table and it comes immediately after the %T row.
- %R is a Record row and contains the data for the record. There is one for each record and the first one comes after the %F row and all the others follow it one by one.
Creating The Activity Code Record
The Activity Code record is held in a table called ACTVTYPE and so you need to find the %T record for this table and then we need to update the %R record to create the Activity Code we want to import our batch of values for. The %T record is on row 34 in the screenshot and the %R row is in row 36.
Let’s assume we are creating a global Activity Code representing each train station in the UK. This is going to be a flat list for now where the Code Value contains the short code for the train station and the Description holds as much as the full name as P6 allows.
The list of fields in my v16.1 of Oracle Primavera P6 are:
- actv_code_type_id – the unique internal identifier for the ACTVTYPE table.
- actv_short_len – the maximum length of the Activity Code value.
- seq_num – determines where it appears in the list of Activity Codes when displayed in P6.
- actv_code_type – the name of our code.
- proj_id – the internal project id which is used for Project and EPS Activity Codes, but not Global Activity Codes.
- wbs_id – the internal WBS id only used for EPS Activity Codes.
- actv_code_type_scope – contains AS_Global, AS_EPS or AS_Project and indicates whether this is a Global, EPS or Project code respectively.
The value in actv_code_type_id shouldn’t matter for the creation of the Global Activity Code, but I always set it to 1. The maximum length of any Code Value for our trains is 3 so I will set the actv_short_len column to 3. I’ll leave the seq_num as it is and move it manually after it is created. Location is the name of our Activity Code so I will enter that in the actv_code_type column. This is a Global Activity Code so I will clear both proj_id and wbs_id as they are not required and change actv_code_type_scope to AS_Global. At this point, we have provided all the information required to create our brand new Global Activity Code and it looks like this.
The ACTVTYPE Record For A Global Activity Code

Creating The Activity Code Values
Creating the Activity Code Values is much the same approach as creating the Activity Code record, except of course there are many of them. I normally create the values in another Excel worksheet and just insert them here in place of the existing %R row for the ACTVCODE table. The columns in this table are:
- actv_code_id – the internal unique id for the Code value. I set the first to 1 and use a formula to increment the rest so each subsequent record goes up by 1.
- parent_actv_code_id – this is the actv_code_id value for the parent of an Activity Code record. It is left blank for a flat list.
- actv_code_type_id – this is the ACTVTYPE internal id and defines which Activity Code this Activity Code Value belongs to. It is set to 1571 for this example.
- actv_code_name – is the Description of the Activity Code Value.
- short_name – is the Code Value for the Activity Code Value.
- seq_num – defines the order of the code value and I usually set it to the same value as the actv_code_id.
- color – this is the hexadecimal colour code for Visualizer. If I am not bothered about this I set it to the default of 0000FF.
- total_assignments – I am assuming this is supposed to be a count of assignments but it is usually blank and so I leave it as blank as well.
Preparing The Activity Code Values
The CSV file containing the list of UK Train Stations has a column for the name and a column for the code, which just so happens to be the required order. I opened this file in Microsoft Excel.
I inserted a column before the Station Name column and put 1 in the first row of data and 2 in the second roe. I selected both cells and doubled clicked the bottom right of the 2nd cell. This increments the value for each row and now I have my actv_code_id value.
I inserted another two columns before the Station Name. the first of these is the empty parent_actv_code_id column. The other is the actv_code_type_id column that I filled down with 1571 to match what appears in the ACTVTYPE record.
The next two columns are the actv_code_name and short_name and already hold the correct data. I did the same for the seq_num as I did for actv_code_id and I then filled the following column with 0000FF for the color columns.
I then removed the top row and the following shows the first few rows of the CSV file as it now is. This whole process took less than a minute.
The ACTVCODE Records For A Global Activity Code
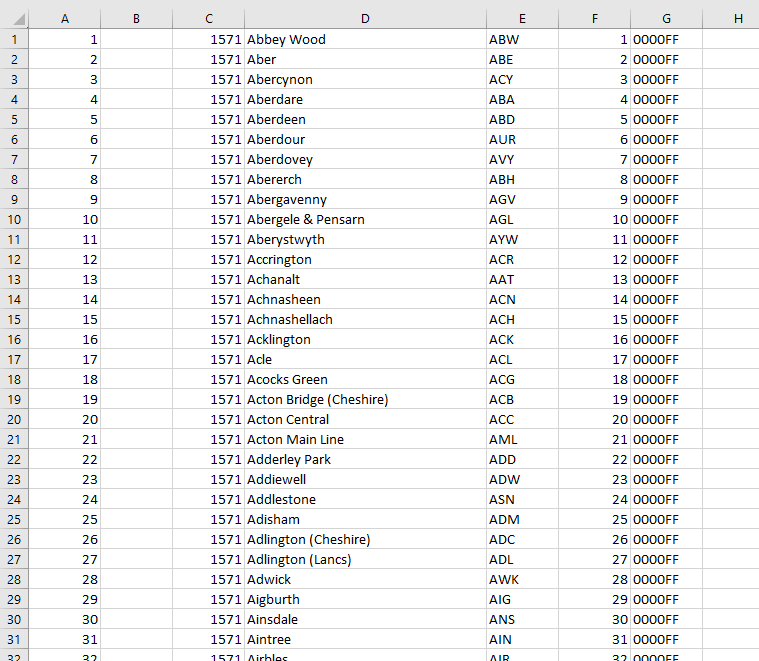
I then copied all the cells from the CSV file and pasted them into my XER file from column B in the row after the %F row and filled down column A with %R. Finally, I put %E in what is the final row.
Save The Excel File As An XER And Import Into P6
I then saved the XER file as a tab delimited text file, exited Excel and changed the extension to .xer before importing it into Primavera P6 where it created the list of 2,568 Stations. The whole process took me less than 10 minutes.
About Barrie Callender
 For 30 years, Barrie has worked exclusively in the Project Management industry. He has considerable experience, knowledge and skills implementing enterprise project management systems across many industries. His experience in fulfilling numerous roles includes, mentoring, training, workshops, project support, process and tool implementations, working through a PMO right up to full-blown Change Management Programs. He has in-depth knowledge of Primavera P6, Microsoft Project, Deltek Cobra, Oracle Projects. He is a member of the APM Thames Valley Branch and, both the Governance SIG and the Planning, Monitoring & Control SIG.