Why Use Microsoft Project Custom Fields? Once you have all your project schedule tasks defined, management may request reports from you displaying all the tasks associated with a particular phase, construction site location, and/or type of work. Providing these reports is not hard, but requires you to know the basics of using Microsoft Project’s custom fields.
Microsoft Project custom fields opens the door to a plethora of code values that can be used to further define and organize tasks and/or resources. The name custom fields sounds esoteric, but the most basic features in custom fields enables you to simply add text to further describe your tasks. Once applied these text values allow you to sort and/or filter your tasks to produce reports according to your stake holder’s requests.
This article discusses the basics of custom fields in Microsoft Project and describes how to create and apply text values to your Microsoft Project schedule tasks to support the production of schedule reports.
We have in Figure1 our demonstration project.
 Figure 1
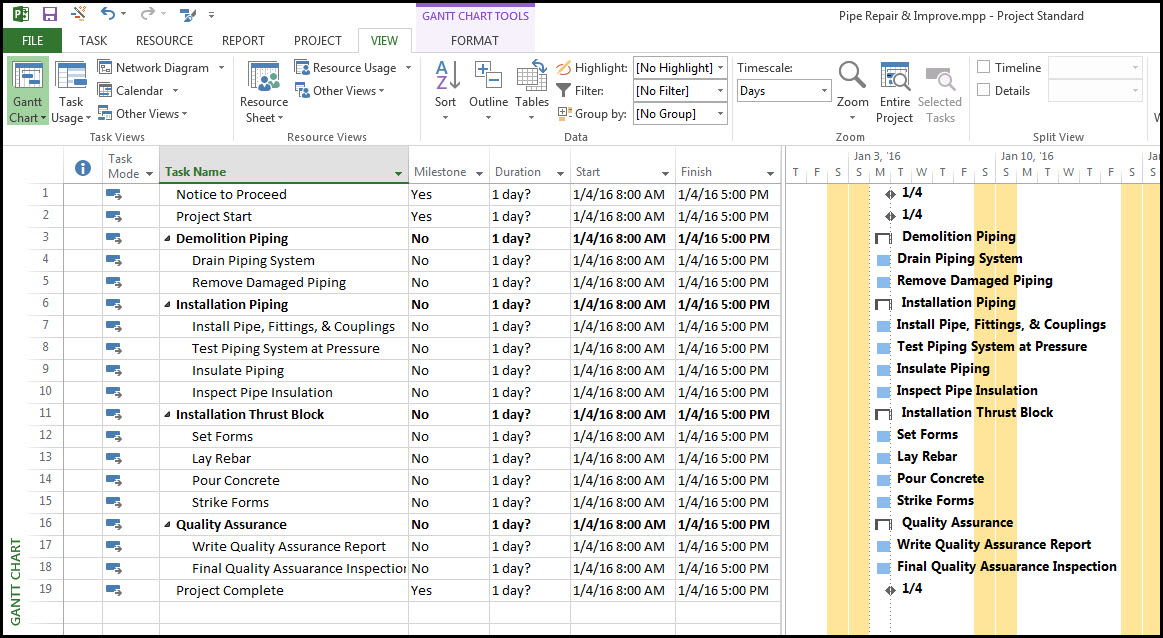
This is a pipe repair and improvement project. The schedule has summary tasks and tasks, but stops short of defining task relationships. Our stakeholder’s have requested reports showing tasks and the associated subcontractors performing the work. These reports can readily be produced by using the custom fields feature in Microsoft Project.
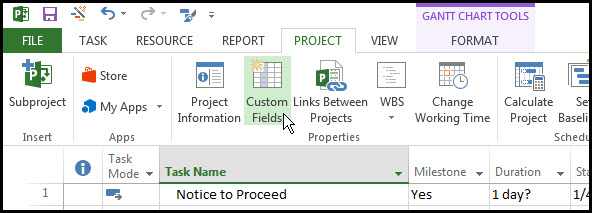
We start by selecting Custom Fields in the Project tab and Properties ribbon group, Figure 2.
Figure 2
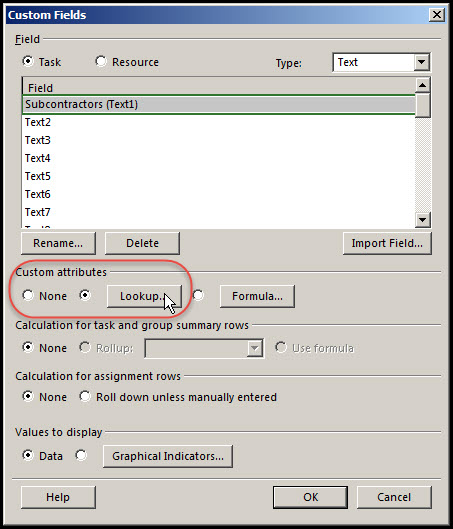
This brings up the Custom Fields dialog, Figure 3, where we can create field values for tasks and/or resources.
Figure 3

We want to create text fields for subcontractors and assign them to our tasks, so we toggle tasks and select Text in the custom fields dialog, Figure 3. Further, we select text field Text1 to store all our subcontractors. We also rename Text1 field, “Subcontractors”, Figure 4.
Figure 4

At this point we are ready to display the Text1 column, labeled Subcontractors, in our task sheet. We, however, do not want to have to type the same subcontractor in multiple times to assign it to multiple tasks. This would quickly get repetitive and laborious. We therefore toggle and select Lookup in the Custom Attributes section of the custom fields dialog, Figure 5.
Figure 5
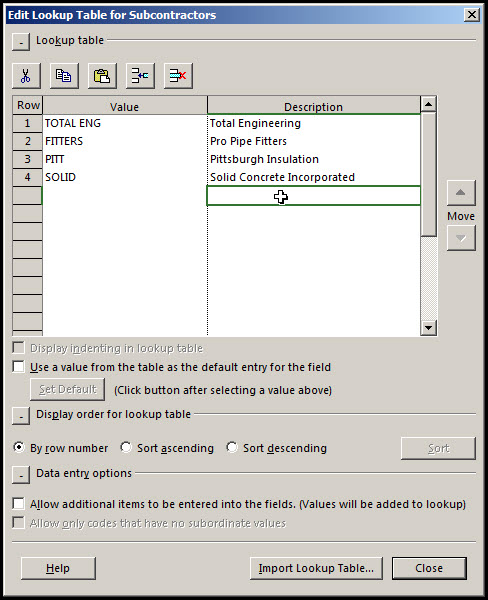
This brings up the Edit Lookup Table, Figure 6, where we enter a code value and description for each subcontractor.
Figure 6
We can also set one of our subcontractors as the default, Figure 7.
Figure 7
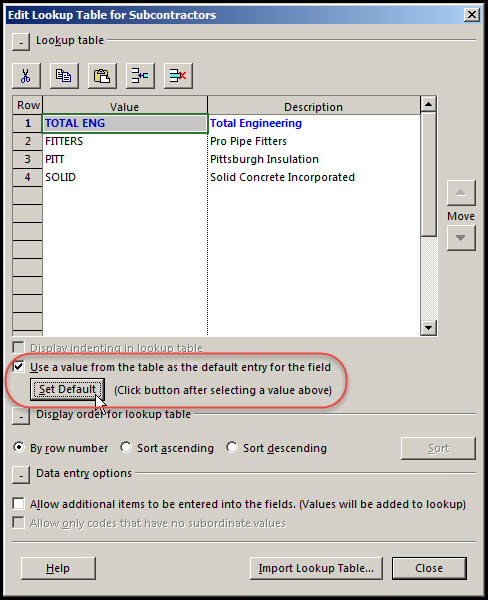
We toggle “use a value from the table as the default entry for the field”, highlight TOTAL ENG (the primary subcontractor), and click the Set Default button. Now every time we insert a new task it will automatically assign TOTAL ENG as the subcontractor for that task. Note the default subcontractor has a blue font.
The beauty of having of having our subcontractors defined in the Edit Lookup Table for Subcontractors is that every time a cell in the Subcontractors task sheet is selected a menu appears listing all our subcontractors. These subcontractors may be listed in the order you enter them in the Edit Lookup Table. You can also put them in your desired order with the Move up and down buttons, Figure 8.
Figure 8
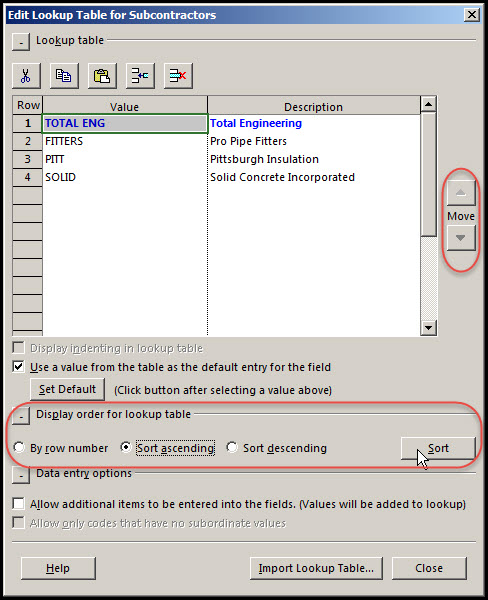
Further, you can sort them ascending or descending, Figure 8. We have them sorted ascending in Figure 9.
Figure 9

Before leaving the Edit Lookup Table dialog we toggle “allow additional items to be entered into the fields”, Figure 10.
Figure 10
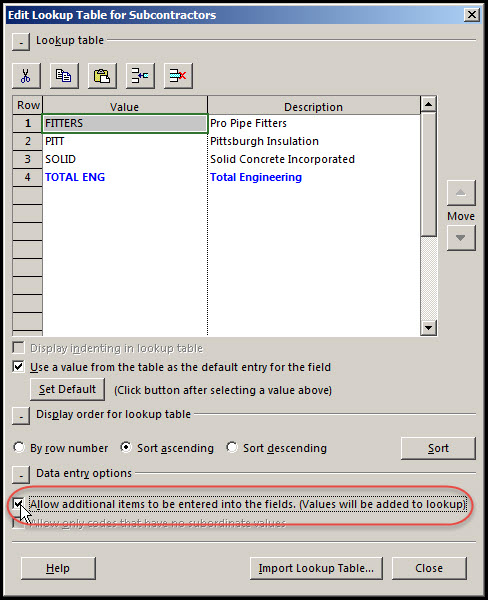
With this toggle set we can type in new subcontractor names directly into the task sheet, and these subcontractors will be automatically inserted as text in our subcontractors’ column and drop down menu, i.e. the edit lookup table. So now we have both our drop down menu to select contractors and the ability to type in additional subcontractors directly in the subcontractors’ cell.
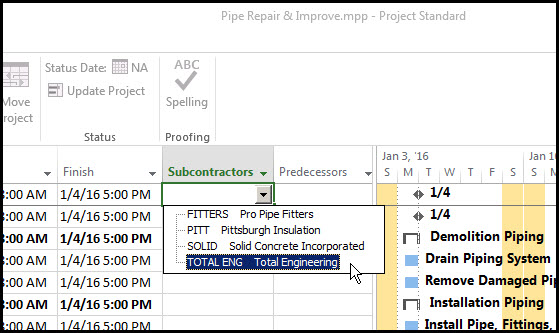
In Figure 11 we have inserted the Subcontractors column, and we are selecting TOTAL ENG for the first task in our schedule.
Figure 11
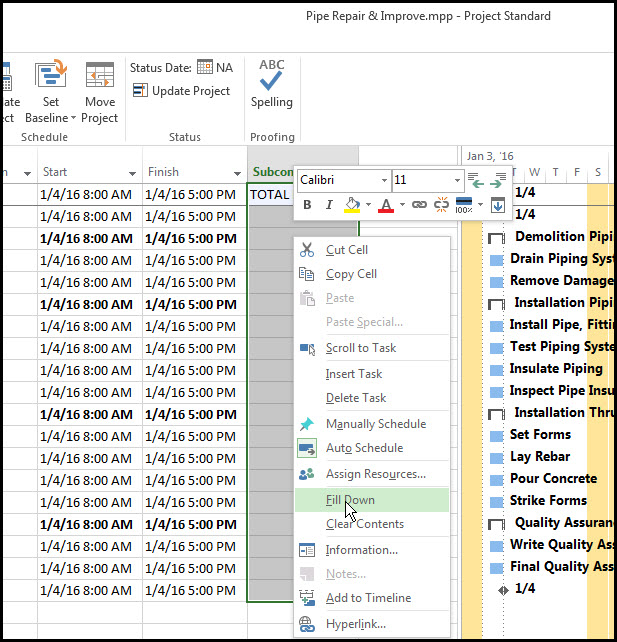
Because most of our tasks are performed by the TOTAL ENG subcontractor we use fill down, Figure 12, to copy TOTAL ENG to all our tasks.
Figure 12
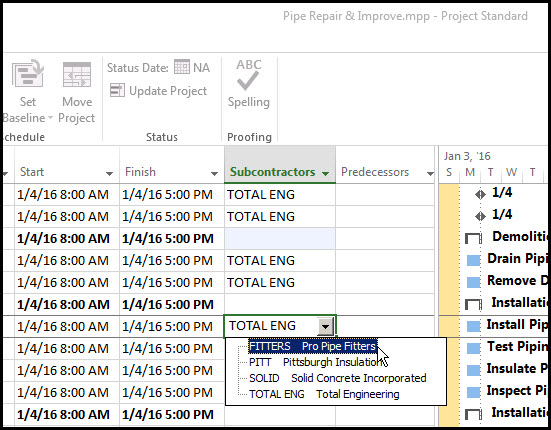
We later go back and make changes to respective tasks, accordingly. In Figure 13, we change the subcontractor from TOTAL ENG to FITTERS for one particular task.
Figure 13
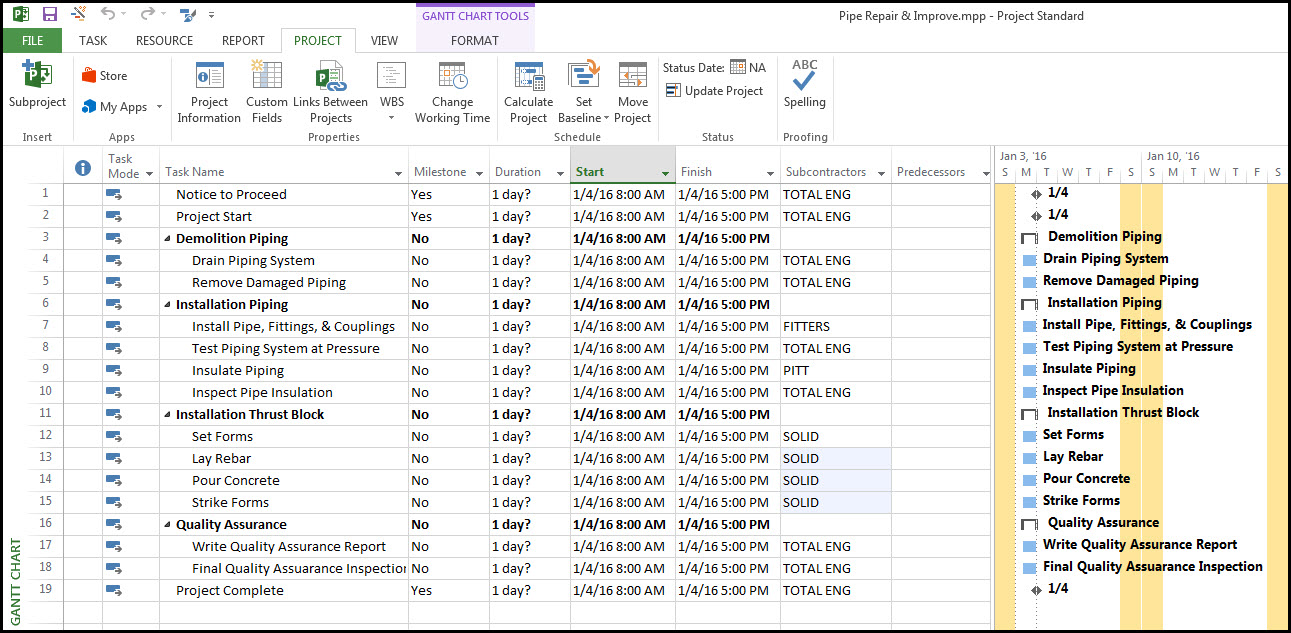
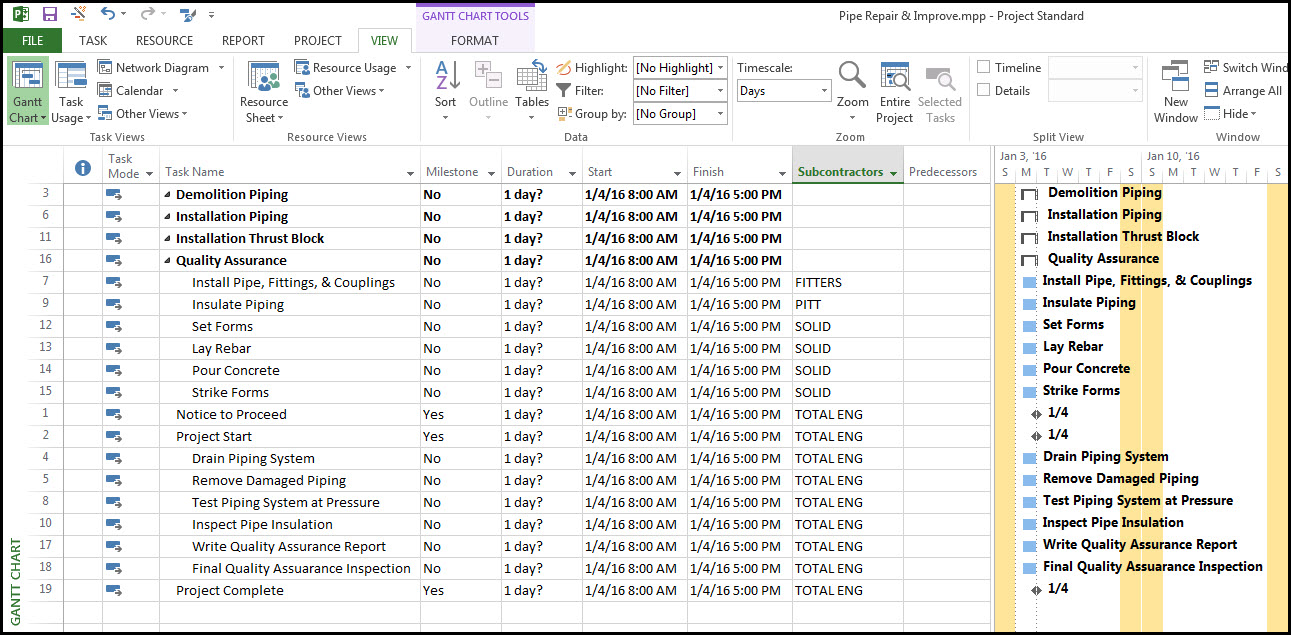
Note that we have removed the subcontractor labels from the summary tasks. Our schedule with subcontractor assignments appears as in Figure 14.
Figure 14
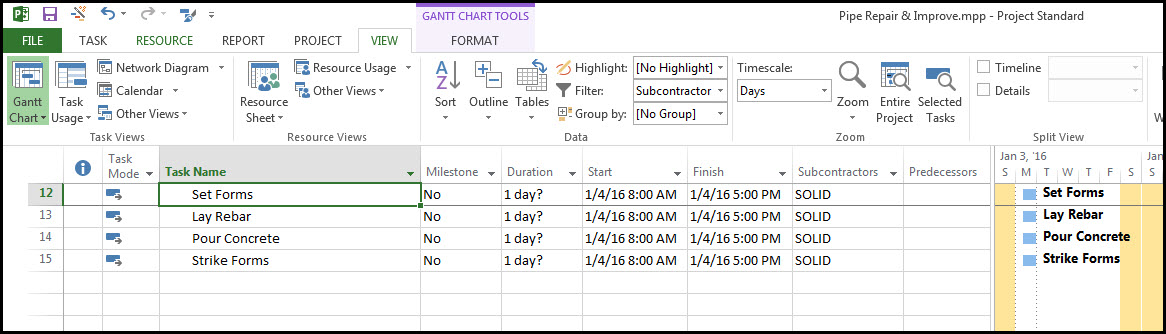
Now that we have our subcontractors assigned to all our tasks we can create filters to make reports only showing tasks assigned to a certain subcontractors, as we do in Figures 15, 16, and 17.
Figure 15
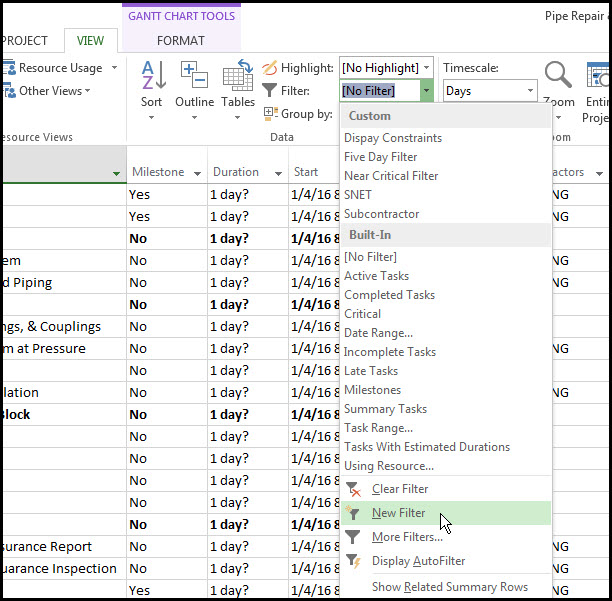
Figure 16
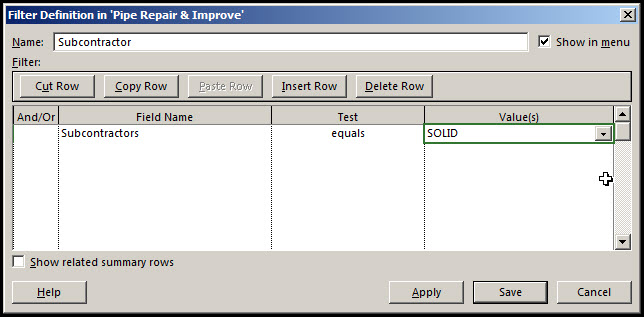
Figure 17
We can also use the sort feature to sort all our tasks as we do in Figures 18, 19, and 20.
Figure 18
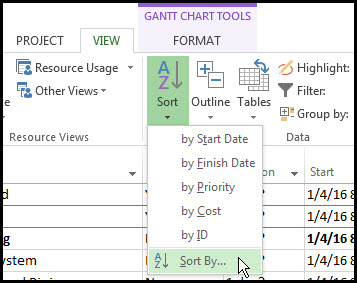
Figure 19
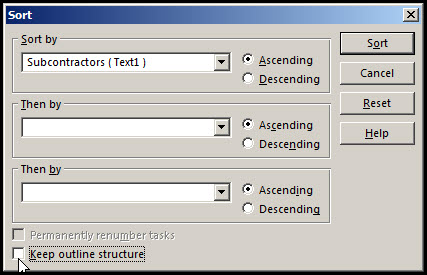
Figure 20
Be sure to toggle off “keep outline structure” in the Sort dialog, Figure 19. In Figure 20 we have our schedule sorted by subcontractors in ascending order. To go back to our original layout sort by ID and toggle on “keep outline structure”, Figure 21.
Figure 21

Summary
We have here discussed the basics of custom fields in Microsoft Project and what amounts to the tip of the iceberg. Microsoft Project has a wealth of custom field and associated reporting features.
Our discussion only addressed text data types, but Microsoft Project has numerous other data types: Cost, Date, Duration, Finish, Flag, Number, Start, and Outline Code.
We also only discussed the simplest of filters. Microsoft Project is capable of more complex filters. You may additionally want to experiment with the Highlight and Group by features to help produce suitable reports. Finally, custom fields appear in the Tables feature, which is a whole topic of discussion for another day.