Suppose you want to model the time required to cure concrete. There is more than one possible way to do this in Primavera P6. The simplest approach is to create a unique activity that is assigned a 7-day workweek calendar and that uses the schedules standard hours per day.
You could also model the cure time as a lag with a corresponding 24-hour calendar. If you do this, however, Primavera P6 will describe all your lags using this 24-hour calendar. What if you have other lags in your schedule that were not on a 24-hour calendar that you want to model as well. Is there another way to model your concrete cure time? Yes, there is. You could model your cure time as a separate activity that is assigned a 24-hour a day 7-day per week calendar and no resources. A simpler method is to use a standard hours per day calendar that has been adjusted for a 7-day workweek.
This article describes how to model your cure time as a separate activity using standard hours, a 7-day work week, no resources, and a unique Gantt chart bar. It also explains some of the challenges in defining a 24-hour “round the clock” activity cure time.
The Situation
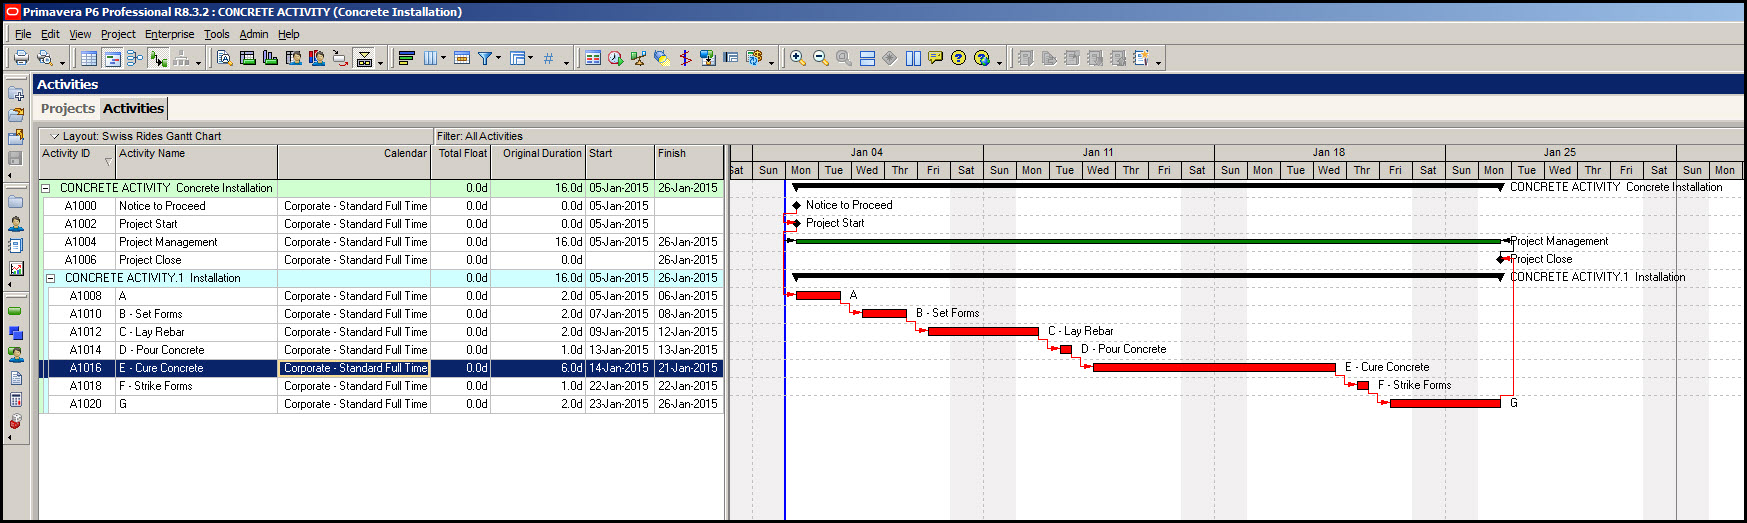
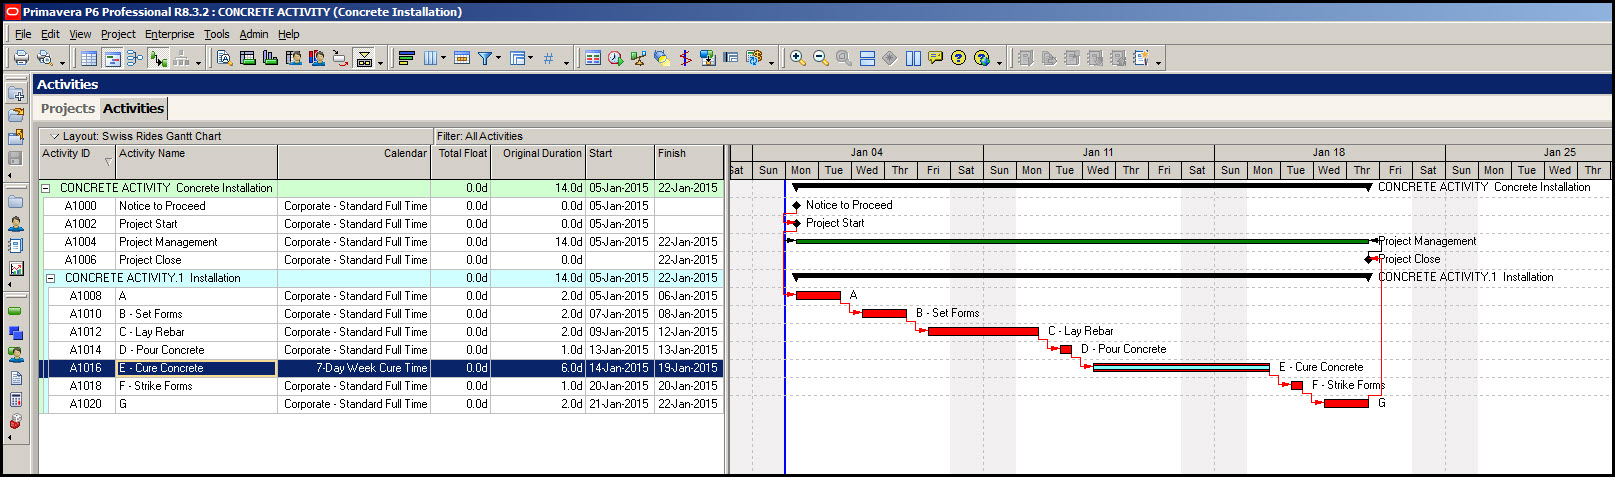
Our schedule is the concrete installation project displayed in Figure 1.
 Figure 1

The activities are all sequential and have the standard Finish-to-Start relationship. The only outstanding issue is how to model the cure concrete activity E. Currently, this activity is assigned the Corporate – Standard Full Time calendar, which is 8-hours per day 5-days per week calendar.
Note that the cure concrete activity has an original duration of 6-days, but is scheduled to take 8 calendar days. This is because the activity spans across the weekend, which is not considered working time. In reality, however, the concrete continues to cure over the weekend. So this schedule does not accurately describe the continuous curing of concrete throughout the work week and over the weekend.
24-Hour Lag
You could define the concrete cure time using a 24-hour lag. However, let’s assume the schedule in Figure 1 is only the first phase of a project that will include numerous additional activities, some of which require standard business day lags. You, therefore, do not want to define a 24-hour lag because then all your lags would be modeled using the 24-hour option. Instead, it’s better to define a concrete cure activity assigned to a unique 7-day per week calendar.
24-7 Activity
The remaining question is whether it is necessary to make this calendar a 24-hour “round the clock” calendar. The 24-hour calendar is a valid approach, however, for several reasons it is much simpler to use the standard work day 8-hour or, perhaps, 10-hour calendar. What you are trying to avoid is non-work periods such as weekends adding unwanted days to your cure time duration. It, however, is not required and somewhat more complex to describe the concrete cure process as occurring 24-hours “round the clock”.
24-Hour Activity Issues
The first issue associated with the 24-hour activity calendar is that your cure time activity will most likely have residual total float. This is because your 24-hour activity will commence immediately after the predecessor, and continue for the specified number of days. The residual float or gap in work space occurs because the 24-hour cure concrete activity can proceed directly up to the beginning of the following activity. Most likely, it won’t.
This residual float means that the cure concrete activity will not be on the critical path, which is an issue. If your activities are all sequential and have the standard Finish-to-Start relationship then they all should be on the critical path. The solution is to lengthen the cure concrete activity by adding to it the available residual total float. This more accurately describes the concrete cure activity and puts it back on the critical path, which is what we want.
However, it is difficult to accurately define the total available “round the clock” cure time between the adjoining activities. Even defining it to two decimal places is insufficient. If your cure time is slightly too short than you will have residual total float. And your cure time activity will not be on the critical path. On the other hand, if your cure time is minutely too long than it pushes the finish of the successor activity to the following day, and throws off the entire schedule from that point.
Again, I have found that defining the 24-hour concrete cure activity to two decimal places is insufficient. The only viable solution is to manually adjust the finish time of the cure time activity so it completes at exactly the same time that the successor activity commences. This means that you will have to set your user preferences to display the time of day. But, never-the-less, when you manually adjust the finish time and recalculate the schedule all the activities after and including the cure time activity will fall into place.
So the 24-hour elapsed time activity requires two important steps: 1) add the residual total float to the cure time activity duration and 2) set the end of the cure time activity to complete at exactly the same time the successor activity commences. This solves the issues with the 24-hour activity. It is a valid approach. However, it requires added steps and complexity. Is there a simpler way to describe the cure time activity? Yes there is.
7-Day Workweek
An easier approach is to define a 7-day workweek that utilizes the daily time of the standard workweek calendar. In other words, if your workweek daily hours is 8-hours than make 8-hours one days’ cure time. If your workweek daily hours is 10-hours than make 10-hours one days’ cure time. The main component we want to model is the 7-day per week nature of the cure time process. Cure time takes place on the weekends in addition to the week days. So it is most important to model the 7-day workweek nature of the concrete cure process. It is not as necessary to model the 24-hour “round the clock” occurrence of the cure time process. Of, course, if your material requires knowing the cure time down to the hour that is different. But for most materials, and, in particular, concrete, cure time may be measured in days.
Defining a 7-Day Workweek
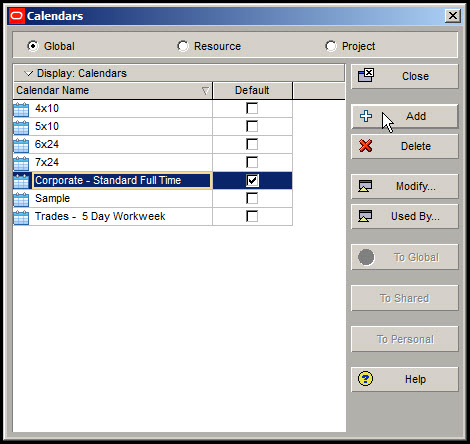
You decide to define your weekly concrete cure time using an 8-hour per day calendar. This is done by selecting Enterprise | Calendars from the drop down menu at the top of the screen. In the resulting Calendars dialog, Figure 2, select the + Add button to create a new calendar.
Figure 2
Next, in the ‘Select Calendar to Copy From’ dialog highlight the Corporate – Standard Full Time calendar and click select, Figure 3.
Figure 3

In the Global Calendar dialog select the Workweek button, Figure 4.
Figure 4

Now here is where you define the 8-hour 7-day per week calendar, Figure 5.
Figure 5
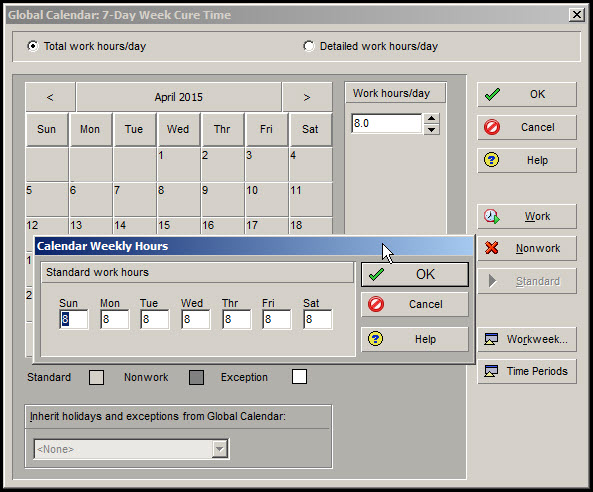
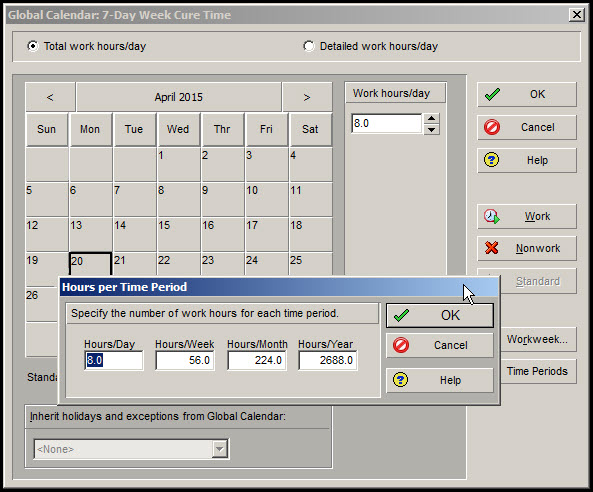
As displayed in the Figure enter 8 for every day from Sunday through Saturday. Click OK, then select Time Periods. In the corresponding Hours per Time Period dialog set the Hours/Day to 8, Hours/Week to 56, Hours/Month to approximately 224, and the Hours/Year to approximately 2688, Figure 6.
Figure 6
Now that your cure time calendar is fully defined let’s proceed by assigning it to activity E – Cure Concrete. Highlight the activity E – Concrete Cure, Figure 7.
Figure 7
Double click on activity E – Cure Concrete. In the corresponding dialog, Figure 8, select 7-Day Week Cure Time.
Figure 8

Recalculate the schedule and the project will appear as displayed in Figure 9.
Figure 9

Cure Time Gantt Chart Bar
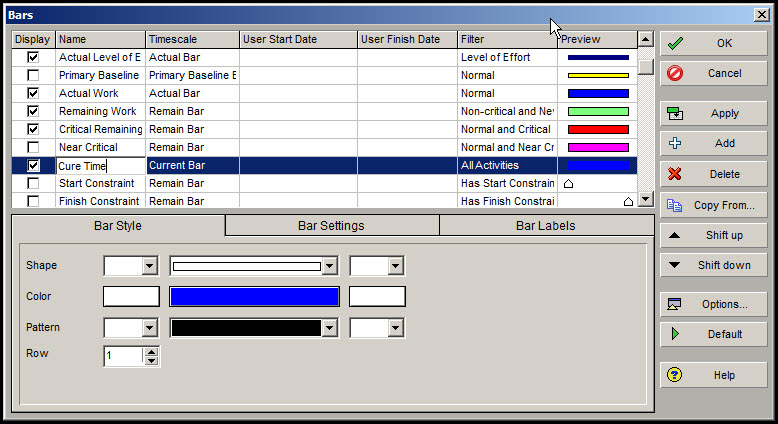
Now we want to create a special Gantt chart bar, so that we can see on the Gantt chart when our activity is assigned to a 7-Day per week calendar. Click on the Bars icon in the layout tool group at the top of the screen or select View | Bars. In the corresponding Bars dialog click + Add and type in Cure Time for the name, Figure 10.
Figure 10
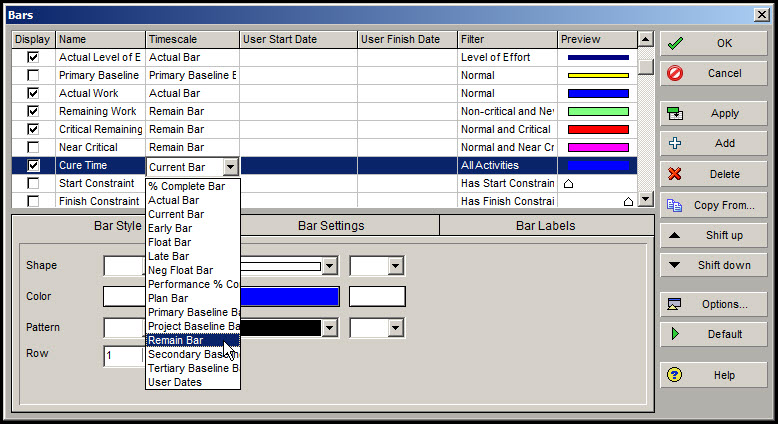
From the drop down menu choose Remain Bar for the Timescale, Figure 11.
Figure 11
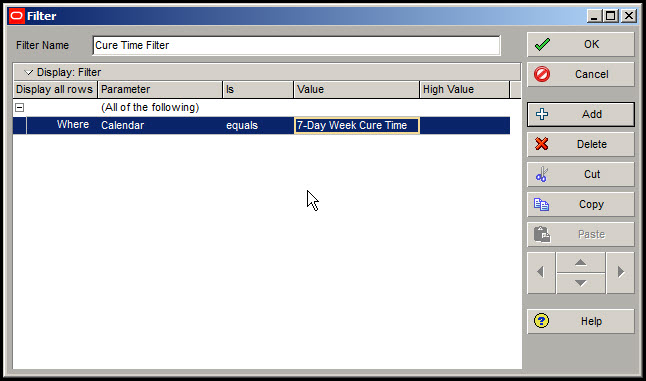
Click in the Filter column and then + New to create a new filter for the Cure Time bar. In the resulting Filter dialog enter the Filter Name: Cure Time Filter. Set the Parameter to Calendar, the equivalency to equals, and the value to 7-Day Week Cure Time calendar, Figure 12.
Figure 12

The filter should look similar to Figure 13.
Figure 13
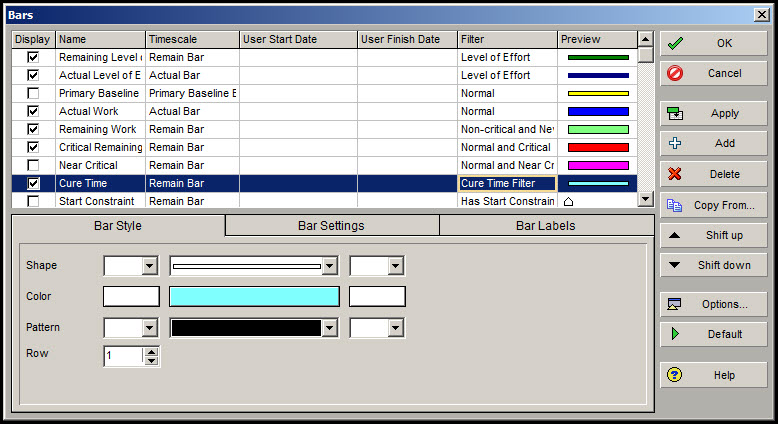
Select a distinctive Bar Style shape and color, Figure 14.
Figure 14
And you schedule will look similar to Figure 15.
Figure 15
Note that activity E – Cure Concrete has distinctive red and light blue strips signifying that it is on the critical path and assigned a 7-day per week calendar.
Summary
Creating a cure time calendar and corresponding activity assignment that will reserve the lag feature for other calendar assignments is a feasible proposition in Primavera P6.
Although materials, such as concrete, cure on a 24-7 “round the clock” basis it is more difficult to define a 24-hour calendar for the curing of concrete. This is because the 24-hour calendar will most likely generate residual total float due to end of shift deltas among the mixed calendars and, therefore, the associated activity will not appear on the critical path.
To prevent this you must add the residual total float to the original duration of the associated activity. Also, you must manually enter the end time of the 24-hour a day cure time activity to prevent Primavera P6 from pushing its successor to the following day, which throws off the entire schedule from that point.
Instead, the simpler approach is to define a 7-day workweek calendar that utilizes the standard day of the project calendar. Create a distinctive Gantt chart for your cure time 7-day workweek calendar and you are done.
The last item to be aware of is that your 7-day workweek activity will have no costs associated with it, and, therefore, no associated resource assignments. Well, that makes sense, since concrete cures all on its own once it is poured into the forms. The only cost for concrete curing is time, which is modeled with our 7-day workweek calendar activity.