One of the first steps in planning a project is to break down the project into its major deliverables i.e. major product or service components. This is known as the Work Breakdown Structure (WBS). After you have created the WBS, you can then create the activities required to achieve those deliverables.
This article discusses the WBS, and demonstrates how to create a simple WBS in Primavera P6.
Top Down Approach In Primavera P6
Unlike some scheduling software programs that are somewhat of a bottom up approach, Primavera P6 encourages you to create a work breakdown structure (WBS) at the beginning of the project. This is known as a top down approach. Primavera P6 recognizes the importance of the project management team keeping their “eye on the ball” throughout the project life cycle. This means that you maintain a focus on the end product or service, which is the whole purpose of the project.
The WBS helps you maintain this focus on the product. At its heart the WBS is a deliverable-oriented decomposition of the project into smaller components. So the WBS focuses on the deliverables, and it is simply a breakdown of all the components making up the product in a hierarchical fashion. Primavera P6 has you create the WBS first, so that the activities on the project schedule flow from the WBS in a top down method, and not the other way around.
Sample WBS
Before creating a WBS let’s take a look at a sample one. Figure 1 displays a sample WBS based on the military spec MIL-STD-881 which you can also download here in CSV format.

Figure 1
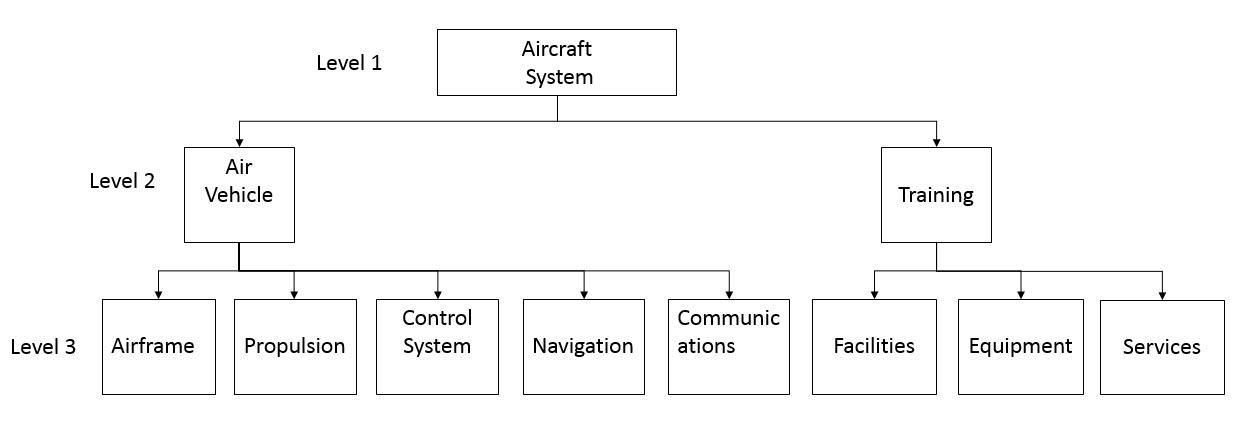
You can see that the Aircraft System is broken down into smaller systems and smaller components. The ideal WBS breaks down the deliverable into bite sized product chunks necessary to define detailed activities. In our example, Figure 1 only goes down to level three. Some project WBS would have more levels and smaller components than that displayed in our example.
Creating a WBS – Air Vehicle and Children
Let’s look at how you create a WBS in Primavera P6 using our sample WBS in figure 1. In our example, we start by creating a shell project named Air Craft System. Then, select Project | WBS from the main drop down menu at the top of the screen. This will display the WBS view in Figure 2.
Figure 2
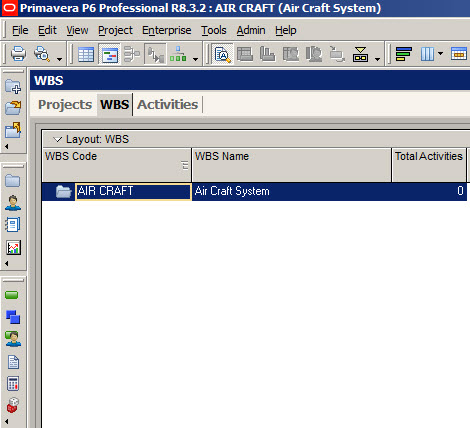
With the Air Craft database folder highlighted, Select Edit | + Add from the main drop down menu at the top of the screen. This will create a child of the Air Craft System project.
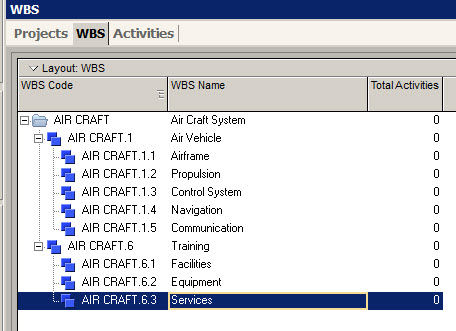
Type in the name of the WBS element, Air Vehicle, in the WBS Name column. Note that the WBS Code identification is automatically entered by the software program. Now with the Air Vehicle element highlighted select Edit | + Add again, which will create a child of the Air Vehicle element. Type in the name of the WBS element Airframe. With the Airframe element highlighted select Edit | + Add. This will create a child of Airframe. Name this child Propulsion.
But we do not want Propulsion to be a child of Airframe, so select the left arrow button in the move tool group all the way on the right hand side of the screen. This will make Propulsion a sibling of Airframe and a child of Air Vehicle, which is what we want. Repeat the process of adding a WBS element until all the children of Air Vehicle are entered as displayed in Figure 3.
Figure 3

Creating a WBS – Training and Children
Now you can add the training element of the WBS, which is a sibling of Air Vehicle and not a child of Communications. With the Communications element highlighted select Edit | + Add. This makes Training a child of Communications; not what we want. So click twice on the left arrow key in the move tool group to make Training a sibling of Air Vehicle and a child of Air Craft.
Repeat the steps you used to create the children of Air Vehicle to enter the children of Training. When all is entered you should have a WBS similar to what is displayed in Figure 4.
Figure 4
Summary
Some folks may find the concept of a WBS a bit confusing. Focus on breaking the deliverables down into component product elements that are small enough so that work activities can be clearly defined and assigned to these elements.
The WBS elements are not activities, but they help define the activities necessary to achieve the WBS deliverables. Once the WBS is sketched out, it is a straightforward process to input the WBS into a Primavera P6 project.
There is also more than one method available for adding WBS elements in Primavera P6. In addition to the drop down menus, you can use the + Add icon in the edit toolbar on the far right hand side of the screen.