 Before labor resources can be added to activities in Primavera P6, they must be added to the resource pool. As with many things in P6, this can be done in a couple of different ways.
Any over allocation or under-utilization of these resources can seriously affect the outcome of any project.
Here we look at a couple of options in Primavera P6 for adding labor resources to the schedule.
Option 1
In the Activities table, we select ‘Resources’ on the left side of the page as shown below in Figure 1.
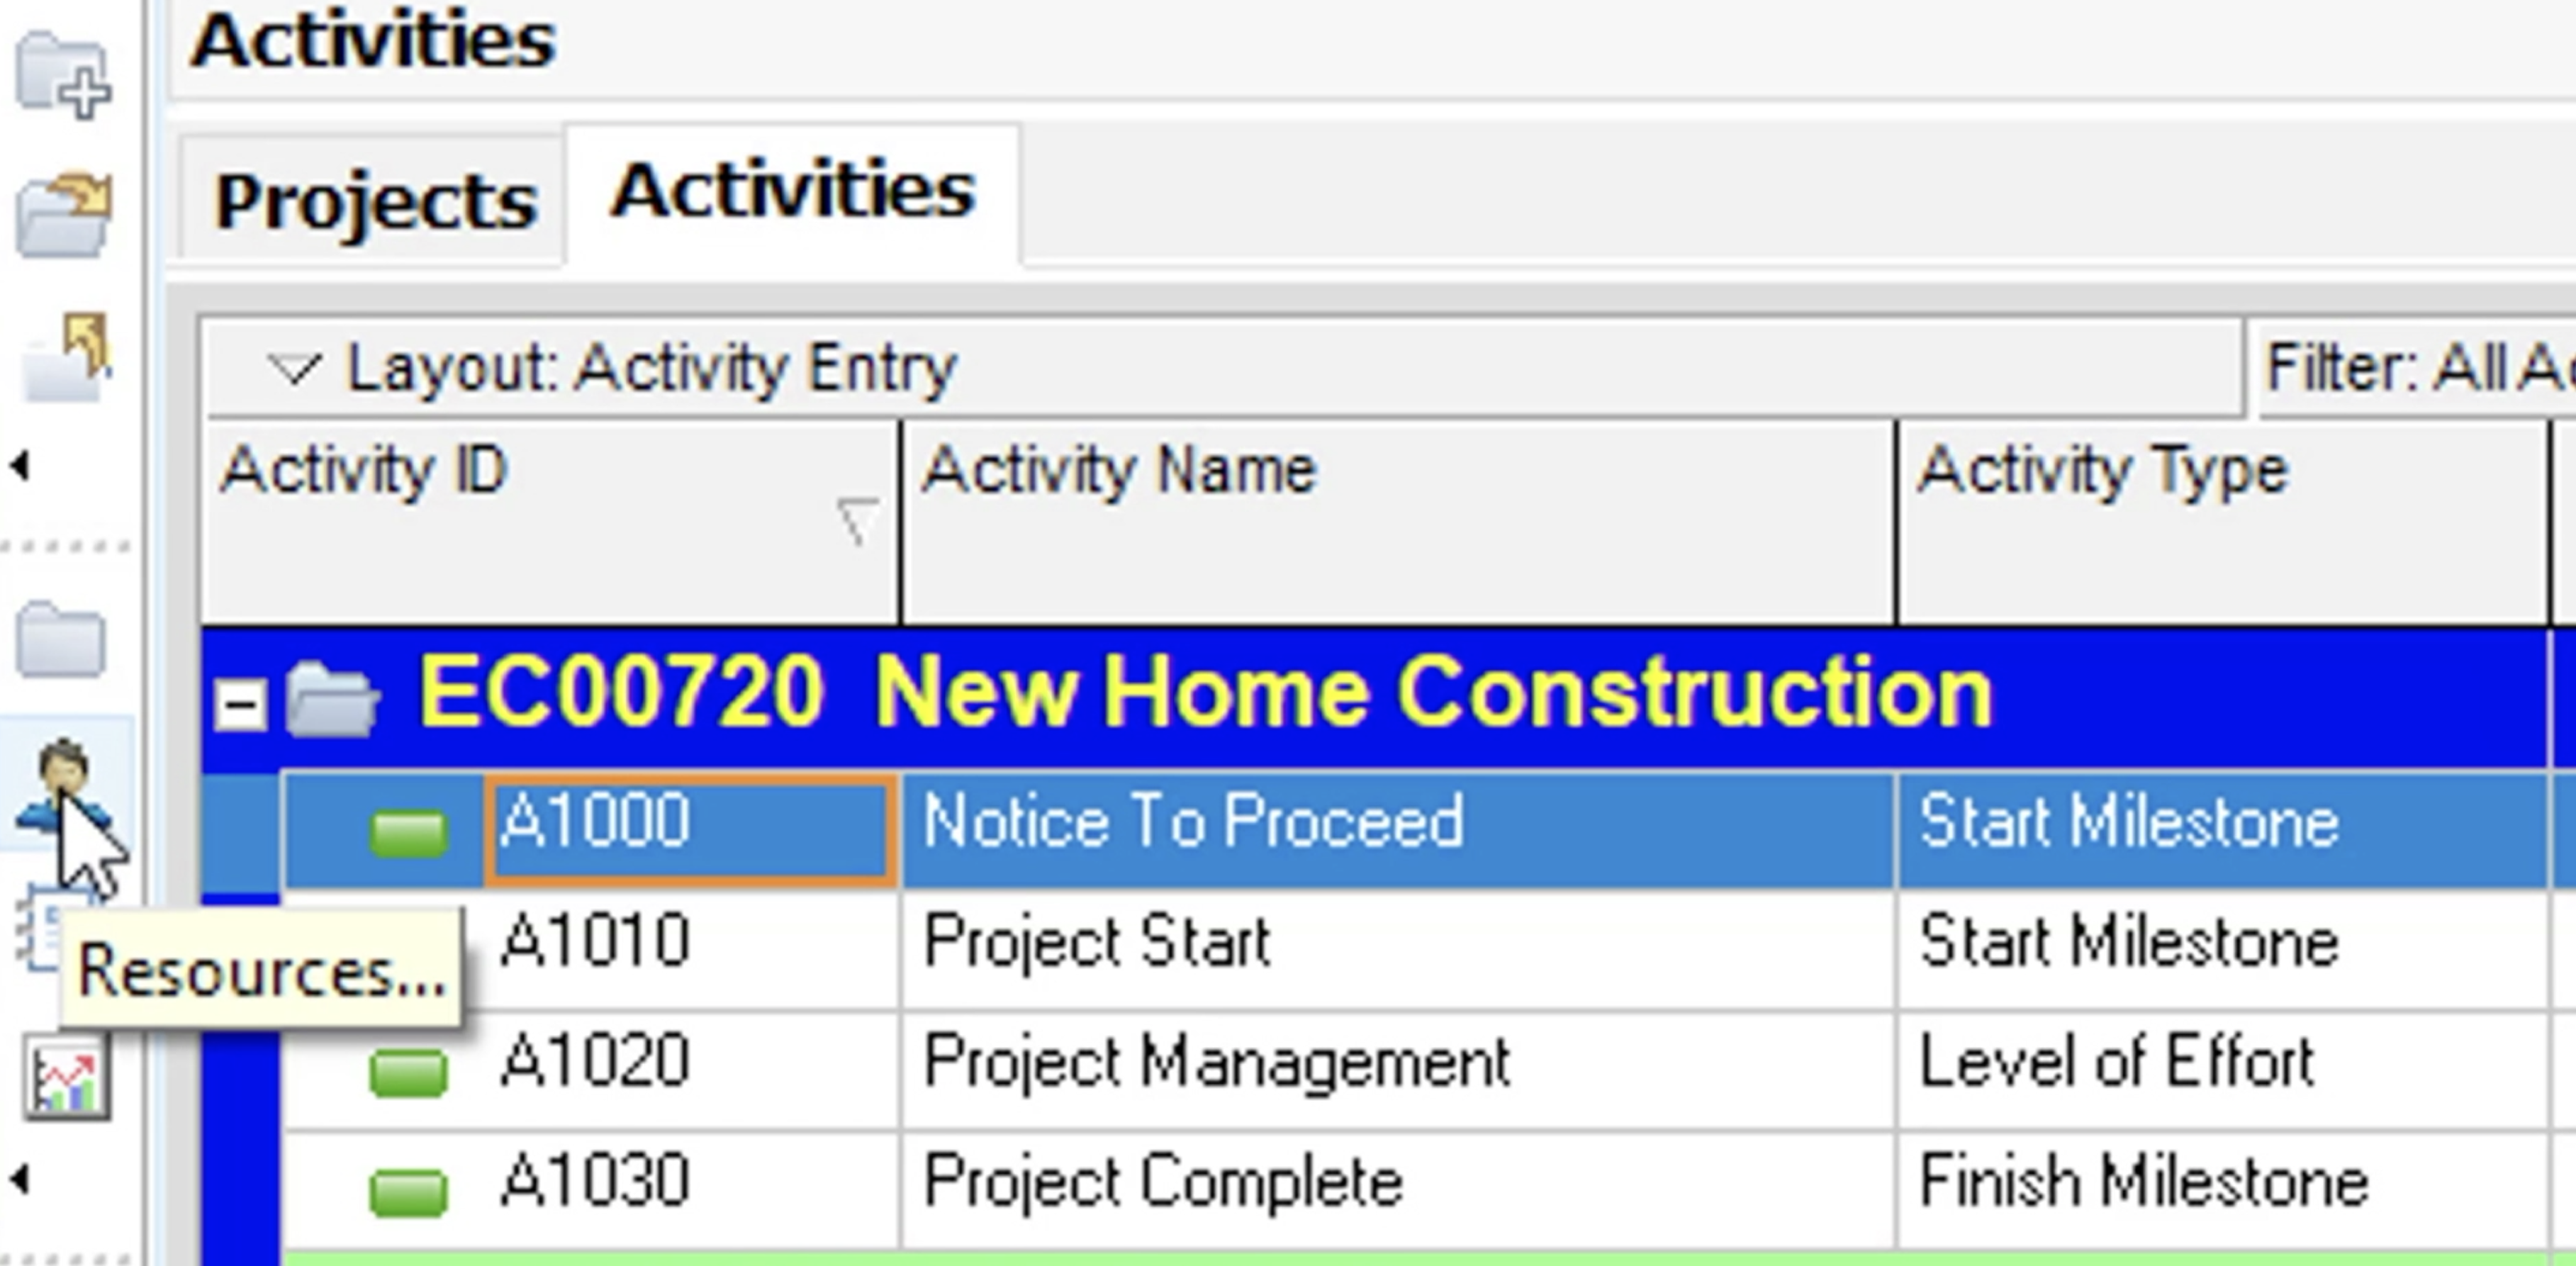 Figure 1
This takes us to the Resources view. In our sample data, we already have a good hierarchy that we can add resources to for our project. Under the ‘E&C Resources’ trades parent resources we will add a few resources, as shown in Figure 2.
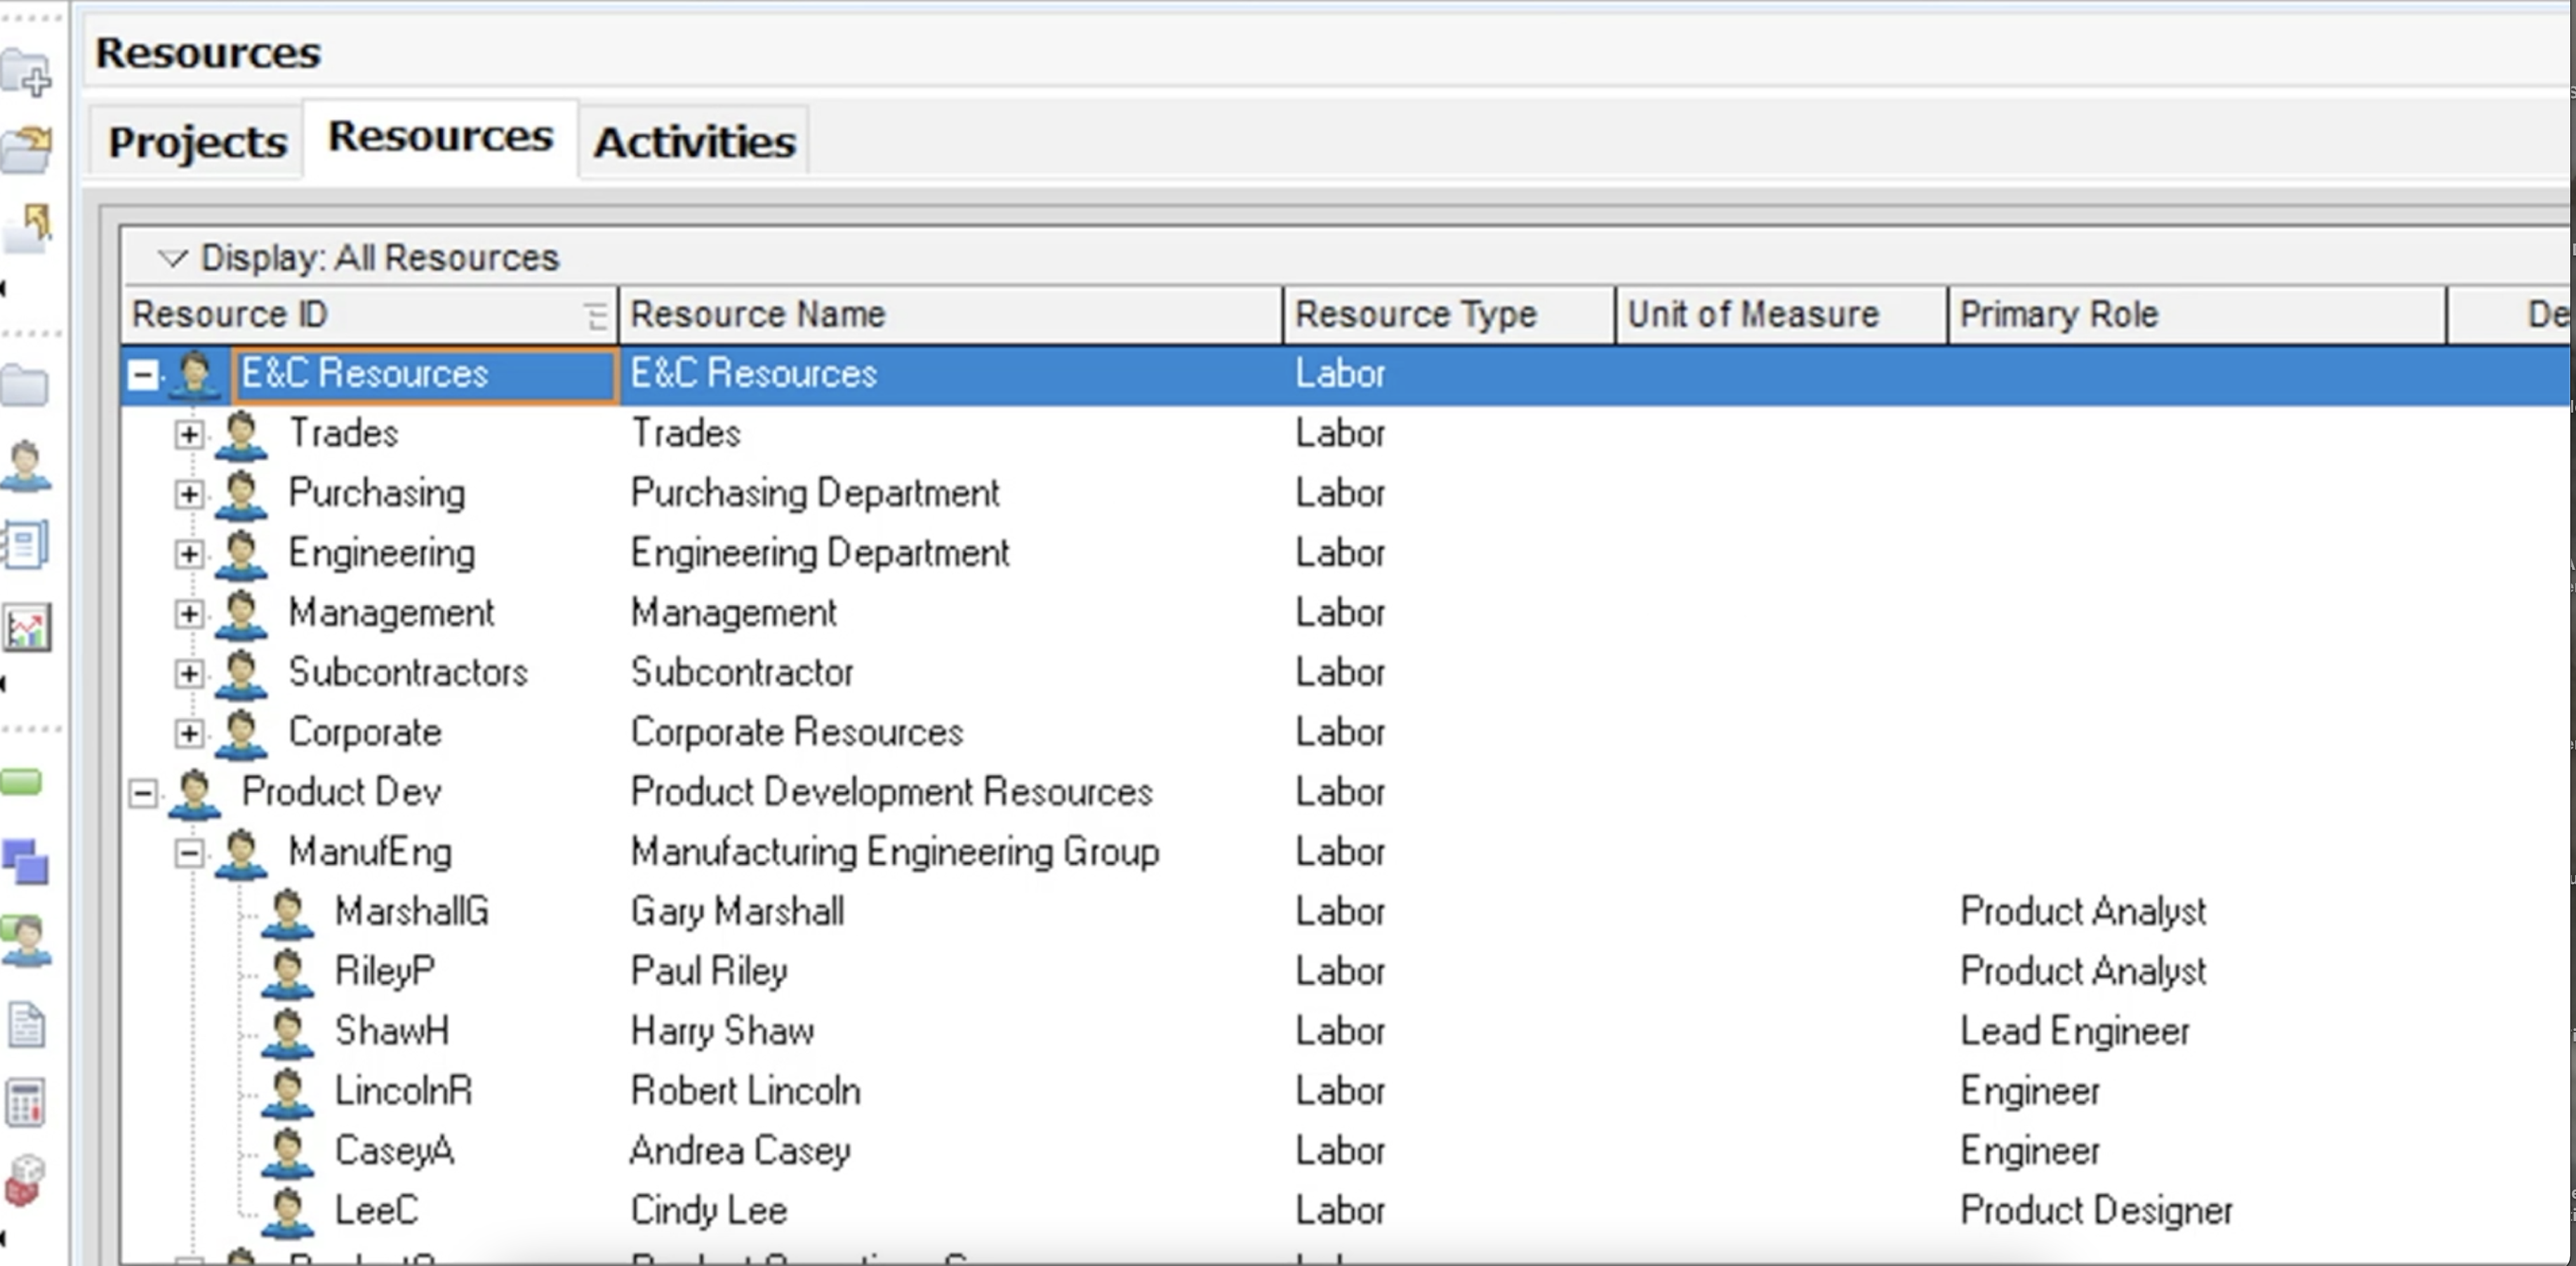 Figure 2
First, we click on the ‘Trades’ resource just below the ‘E&C Resources’ and select the + button on the right-hand toolbar. This runs a ‘New Resource Wizard’ as shown, below in Figure 3. We type in ‘HVACEng’ as our ‘Resource ID’ and ‘HVAC Engineer’ as our ‘Resource Name’.
We also checking the ‘Do not show this wizard again’ box on the bottom left, as we won’t require the resource wizard for Option 2.
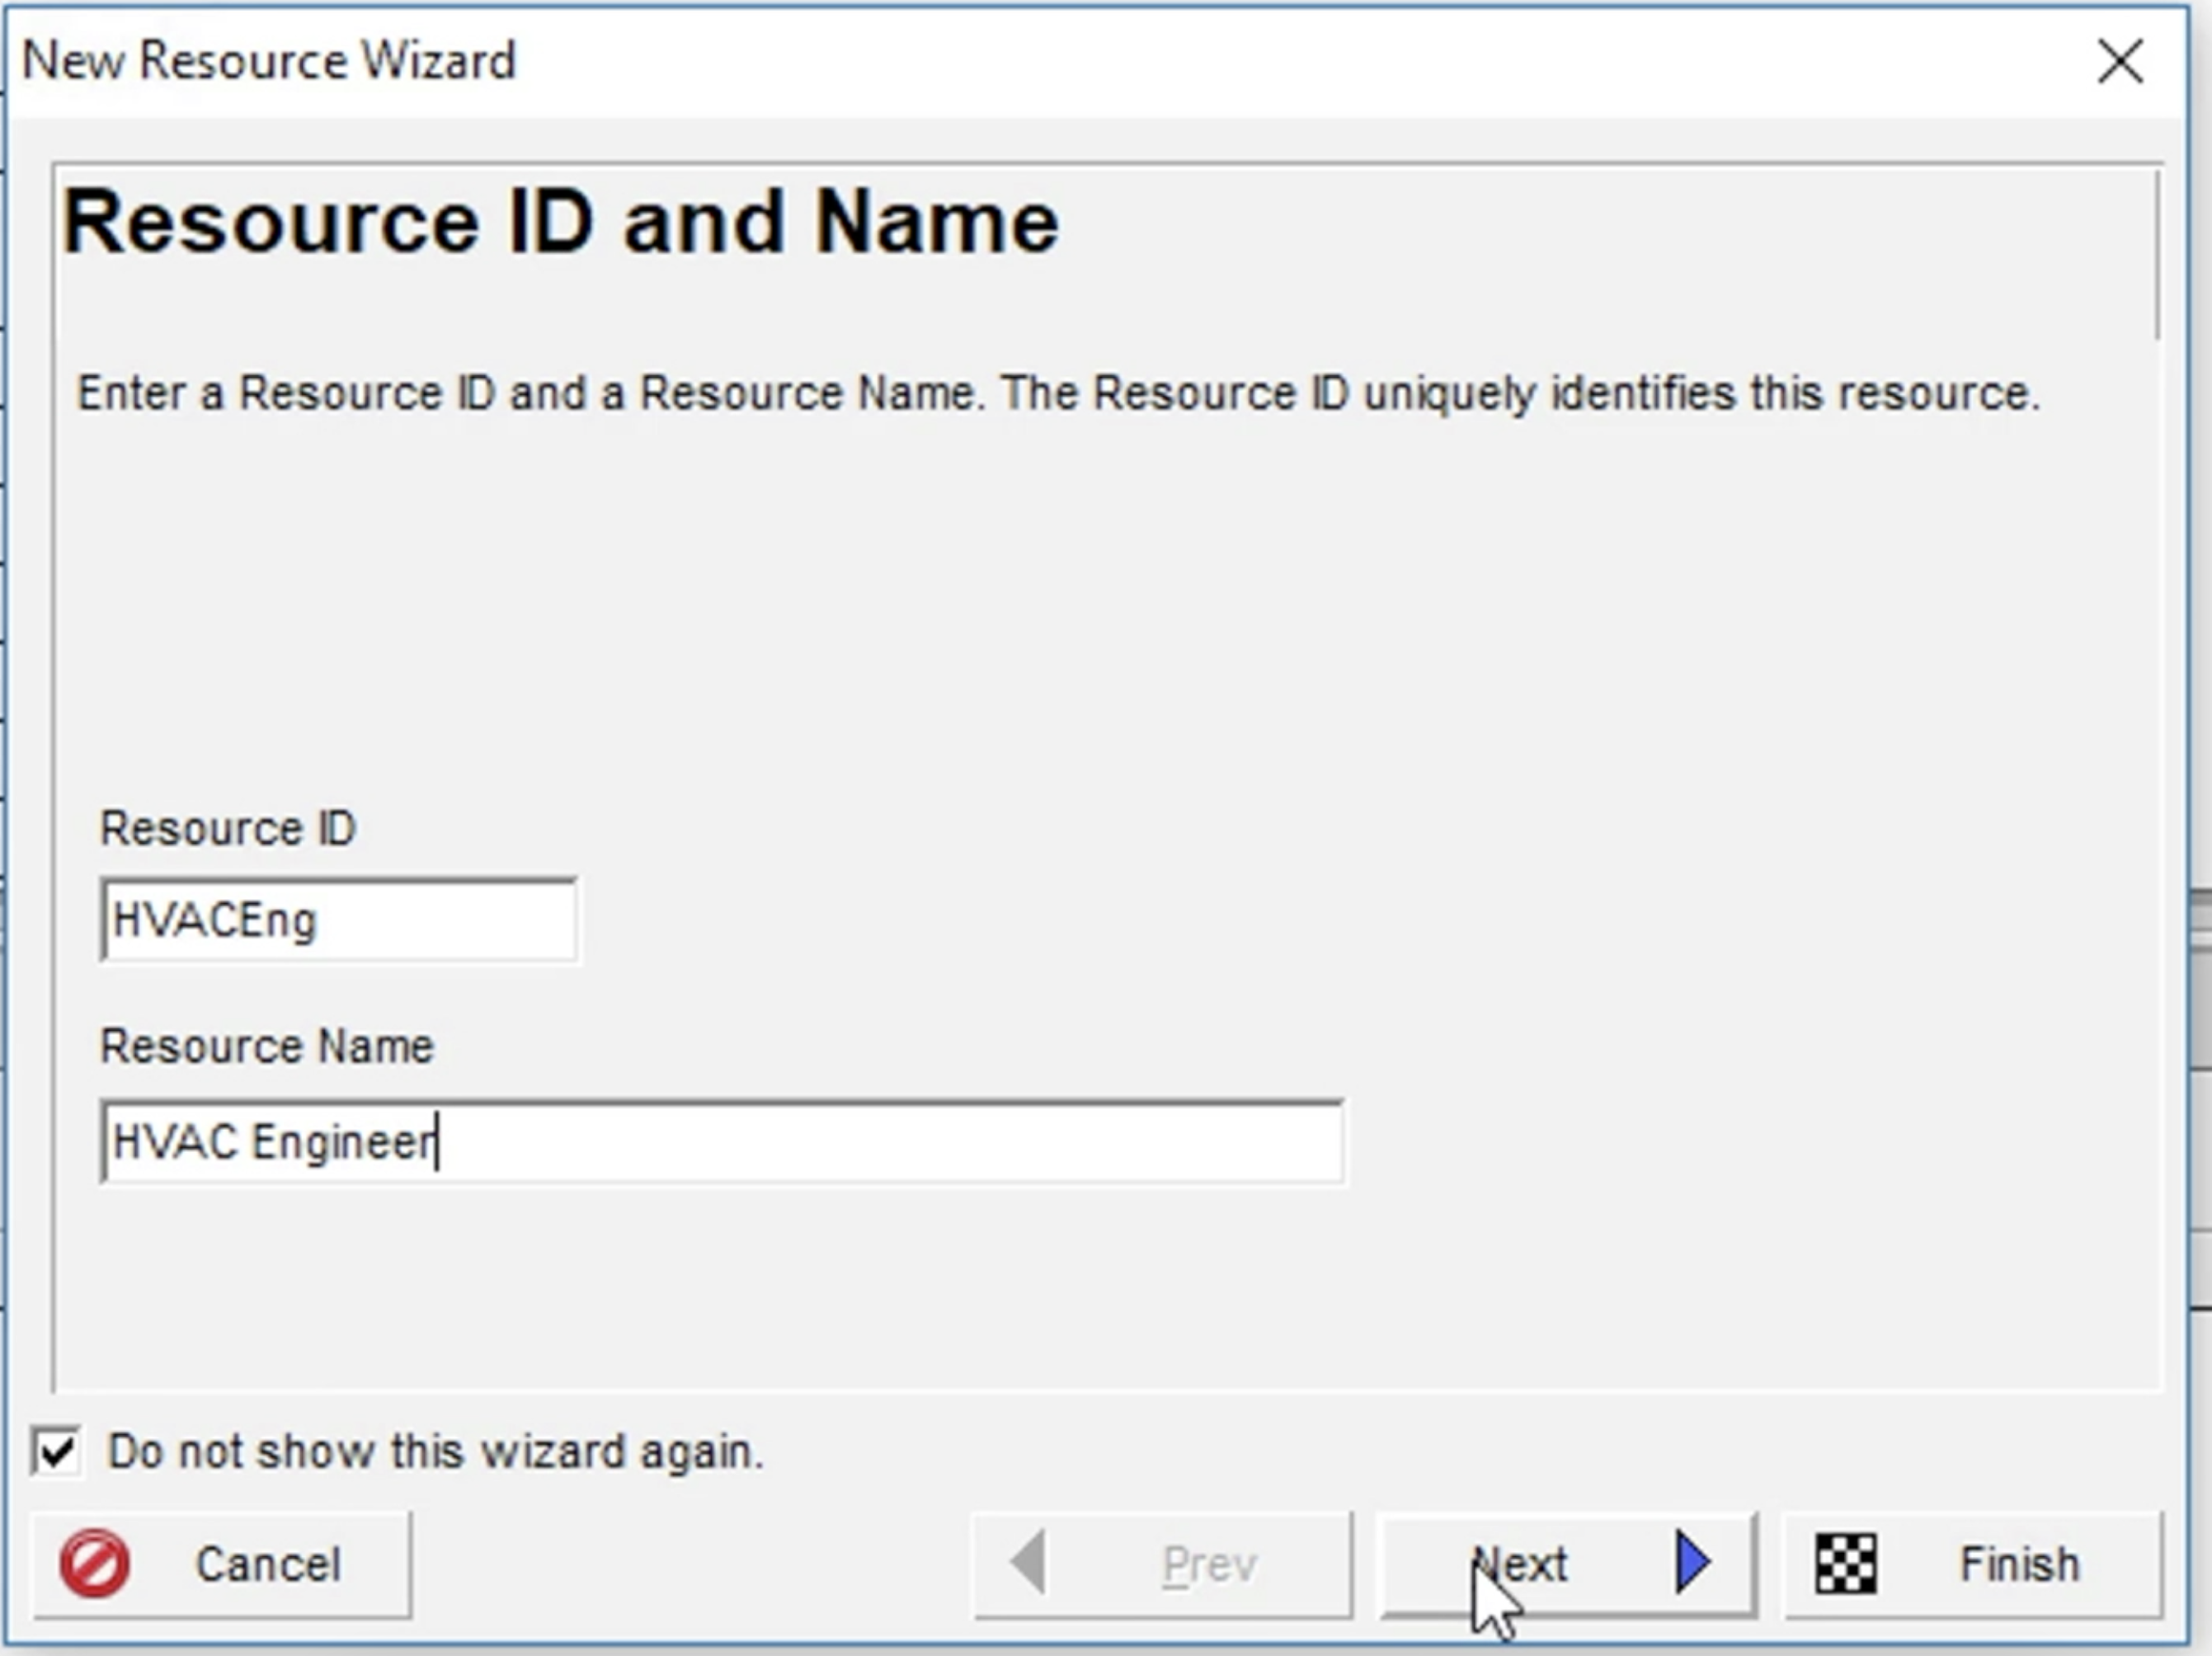 Figure 3
When we click the‘Next’ button we enter the ‘Resource Type’ dialog of the wizard. Primavera P6 defaults to ‘Labor (People)’ and as we are adding a labor resource we just click ‘Next’ as shown below Figure 4.
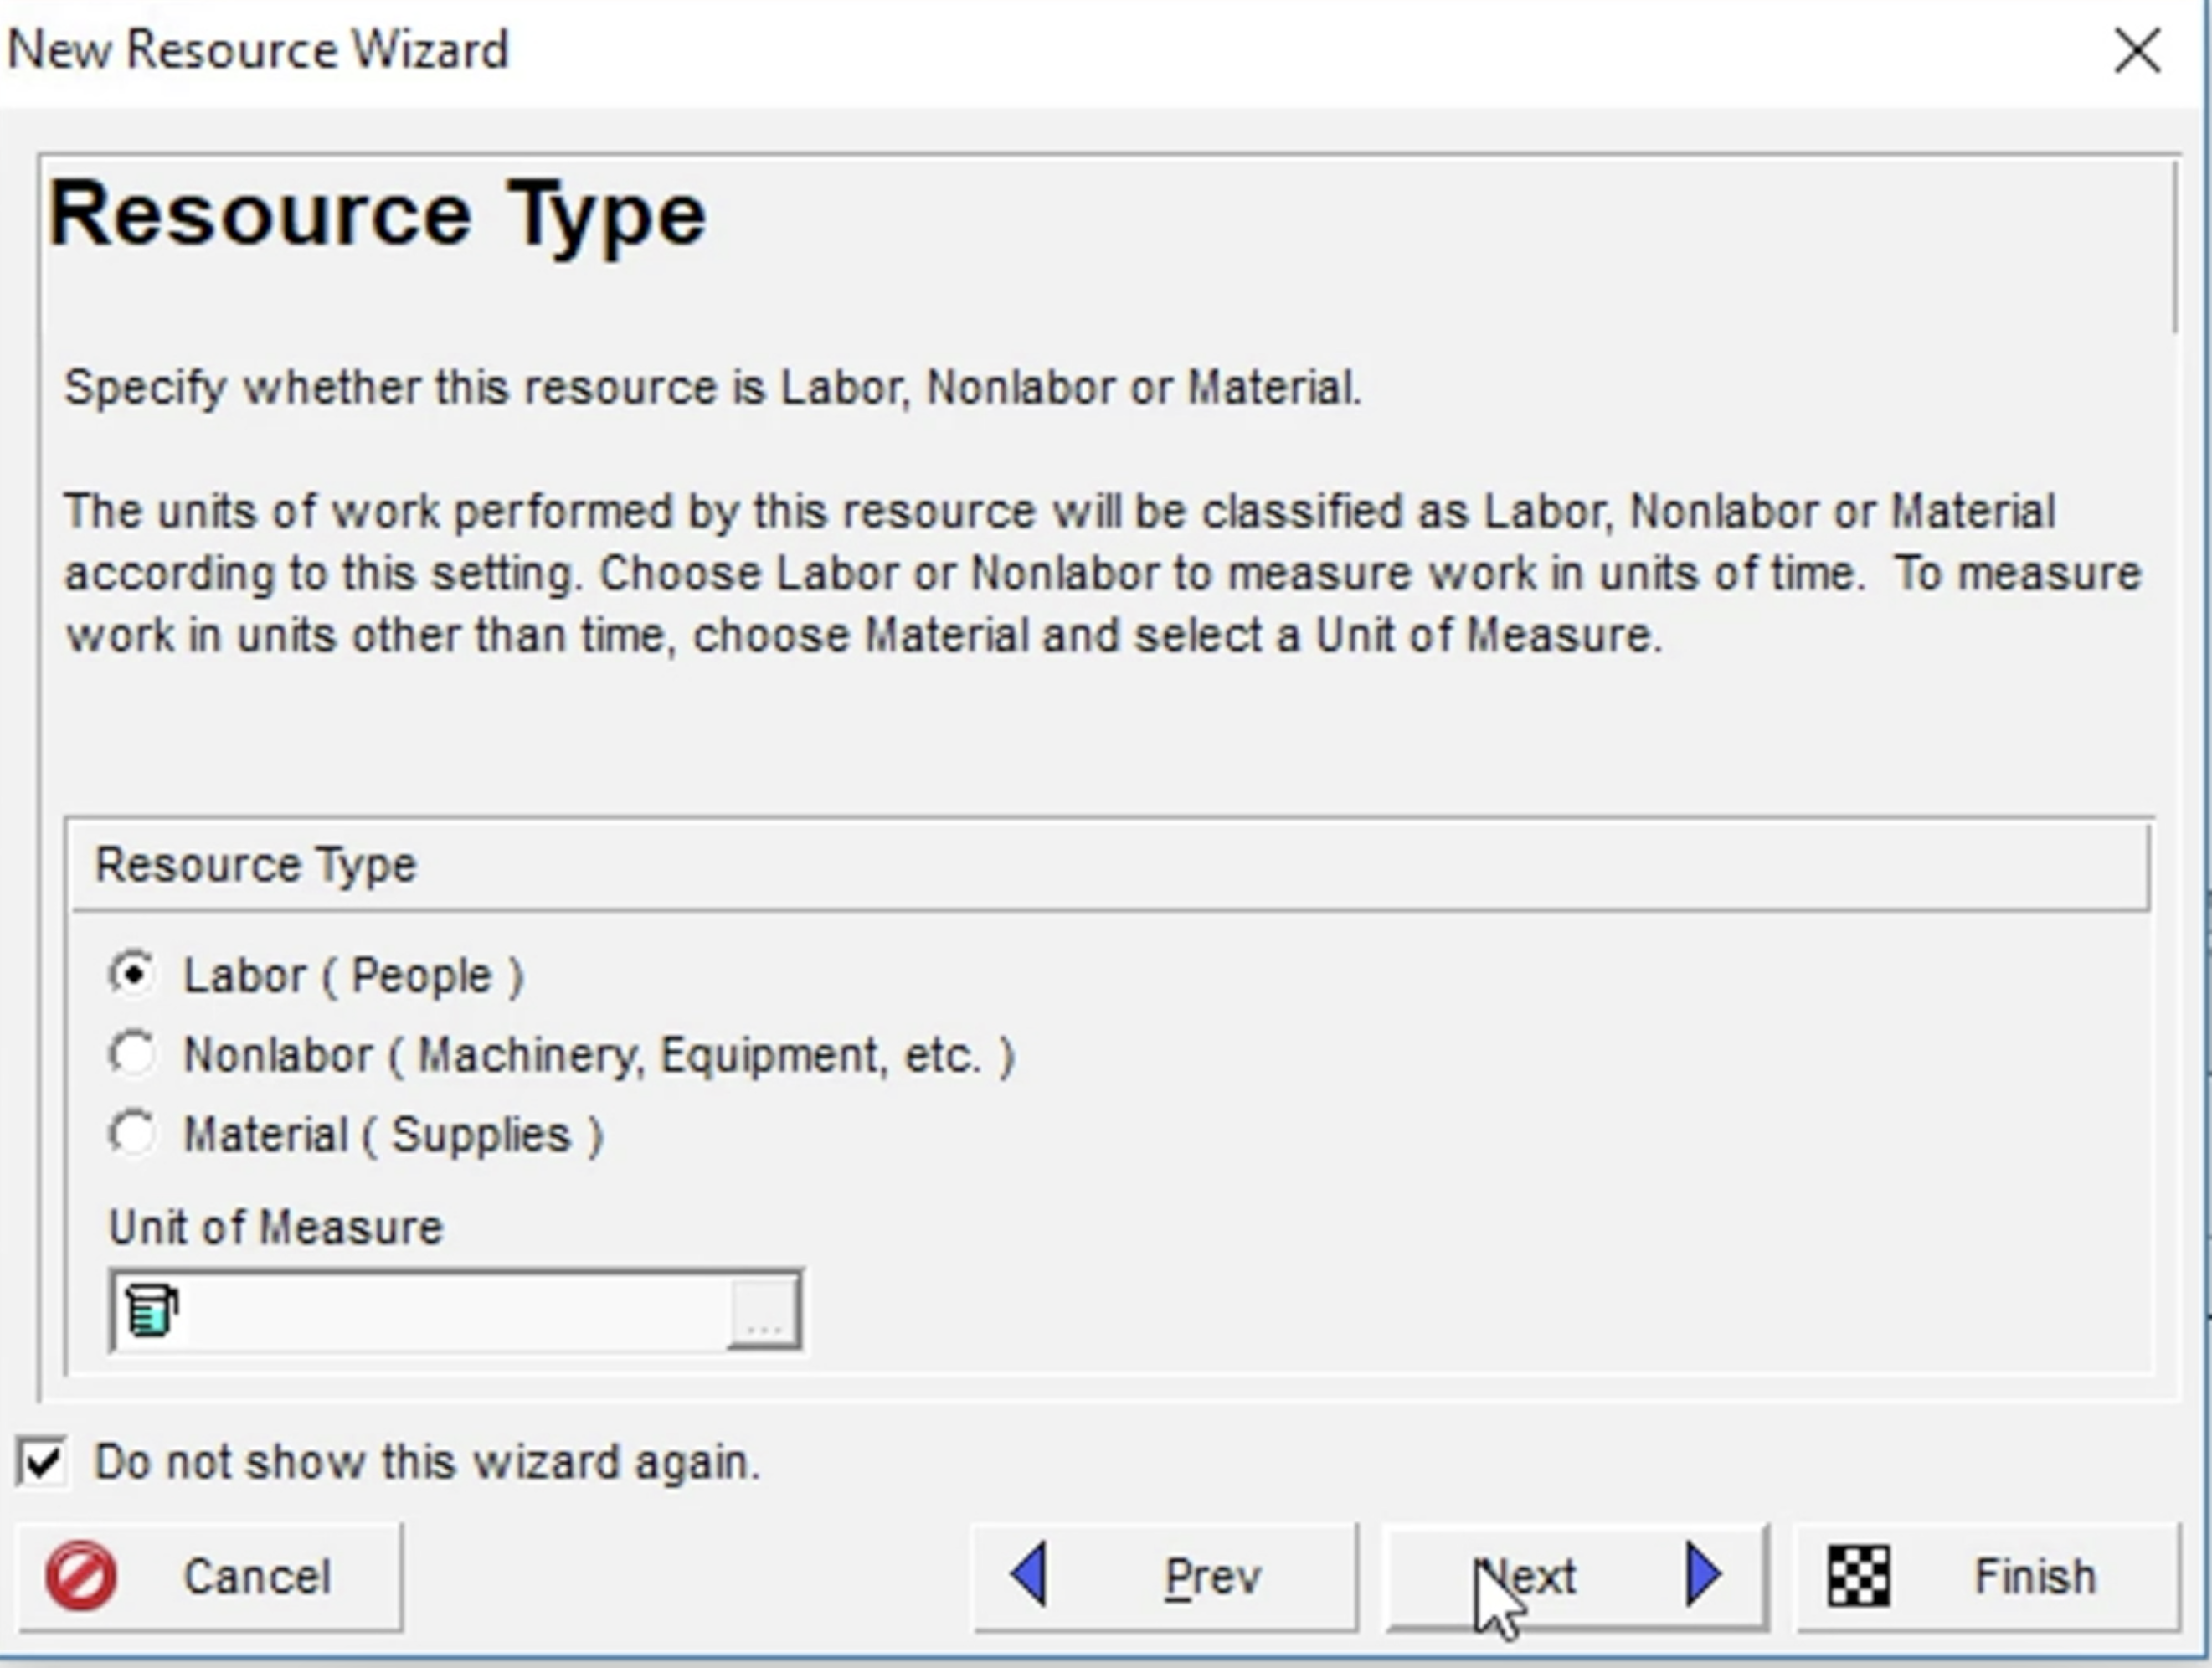 Figure 4
In the next dialog of ‘Units/Time & Prices’, we enter ‘$40.00/h’ in the ‘Price/Unit’ box and leave both the ‘Default Units/Time’ and ‘Max Units/Time’ boxes as ‘8h/d’ as shown below in Figure 5. We have one ‘HVAC Engineer’ who will be available for 8 hours a day.
 Figure 5
We click through the next two wizard dialog pages to the ‘Resource Calendar’, where we choose the default ‘Select an existing calendar’ before clicking ‘Next’ again, as shown below in Figure 6.
 Figure 6
The ‘Calendar Name’ has defaulted to ‘Trades- 5 Day Workweek’. The labor resource has inherited this value from the parent resource (E&C Resources) so we click on the ‘Finish’, as shown in Figure 7.
 Figure 7
Our ‘HVAC Engineer’ resource is created and appears in the Resource Table, below ‘Trades’ as shown in Figure 8.
 Figure 8
By highlighting the ‘HVAC Engineer’ resource in the table area, we can verify its’ settings by reviewing the different tabs in the bottom details area. By selecting the ‘General’ tab we can see that our resource has the correct ‘Resource ID’ and ‘Resource Name’ as shown below in Figure 9.
 Figure 9
By selecting the ‘Details’ tab, we are able to verify that this is a labor resource. On the far left of this screen, we can see that that our resource is following the ‘Trades 5 Day Workweek’ calendar and that the ‘Defaults Units / Time’ is correct of 8 hours per day. Both the ‘Auto Compute Actuals’ and the ‘Calculate costs from units’ options are checked, as shown below in Figure 10.
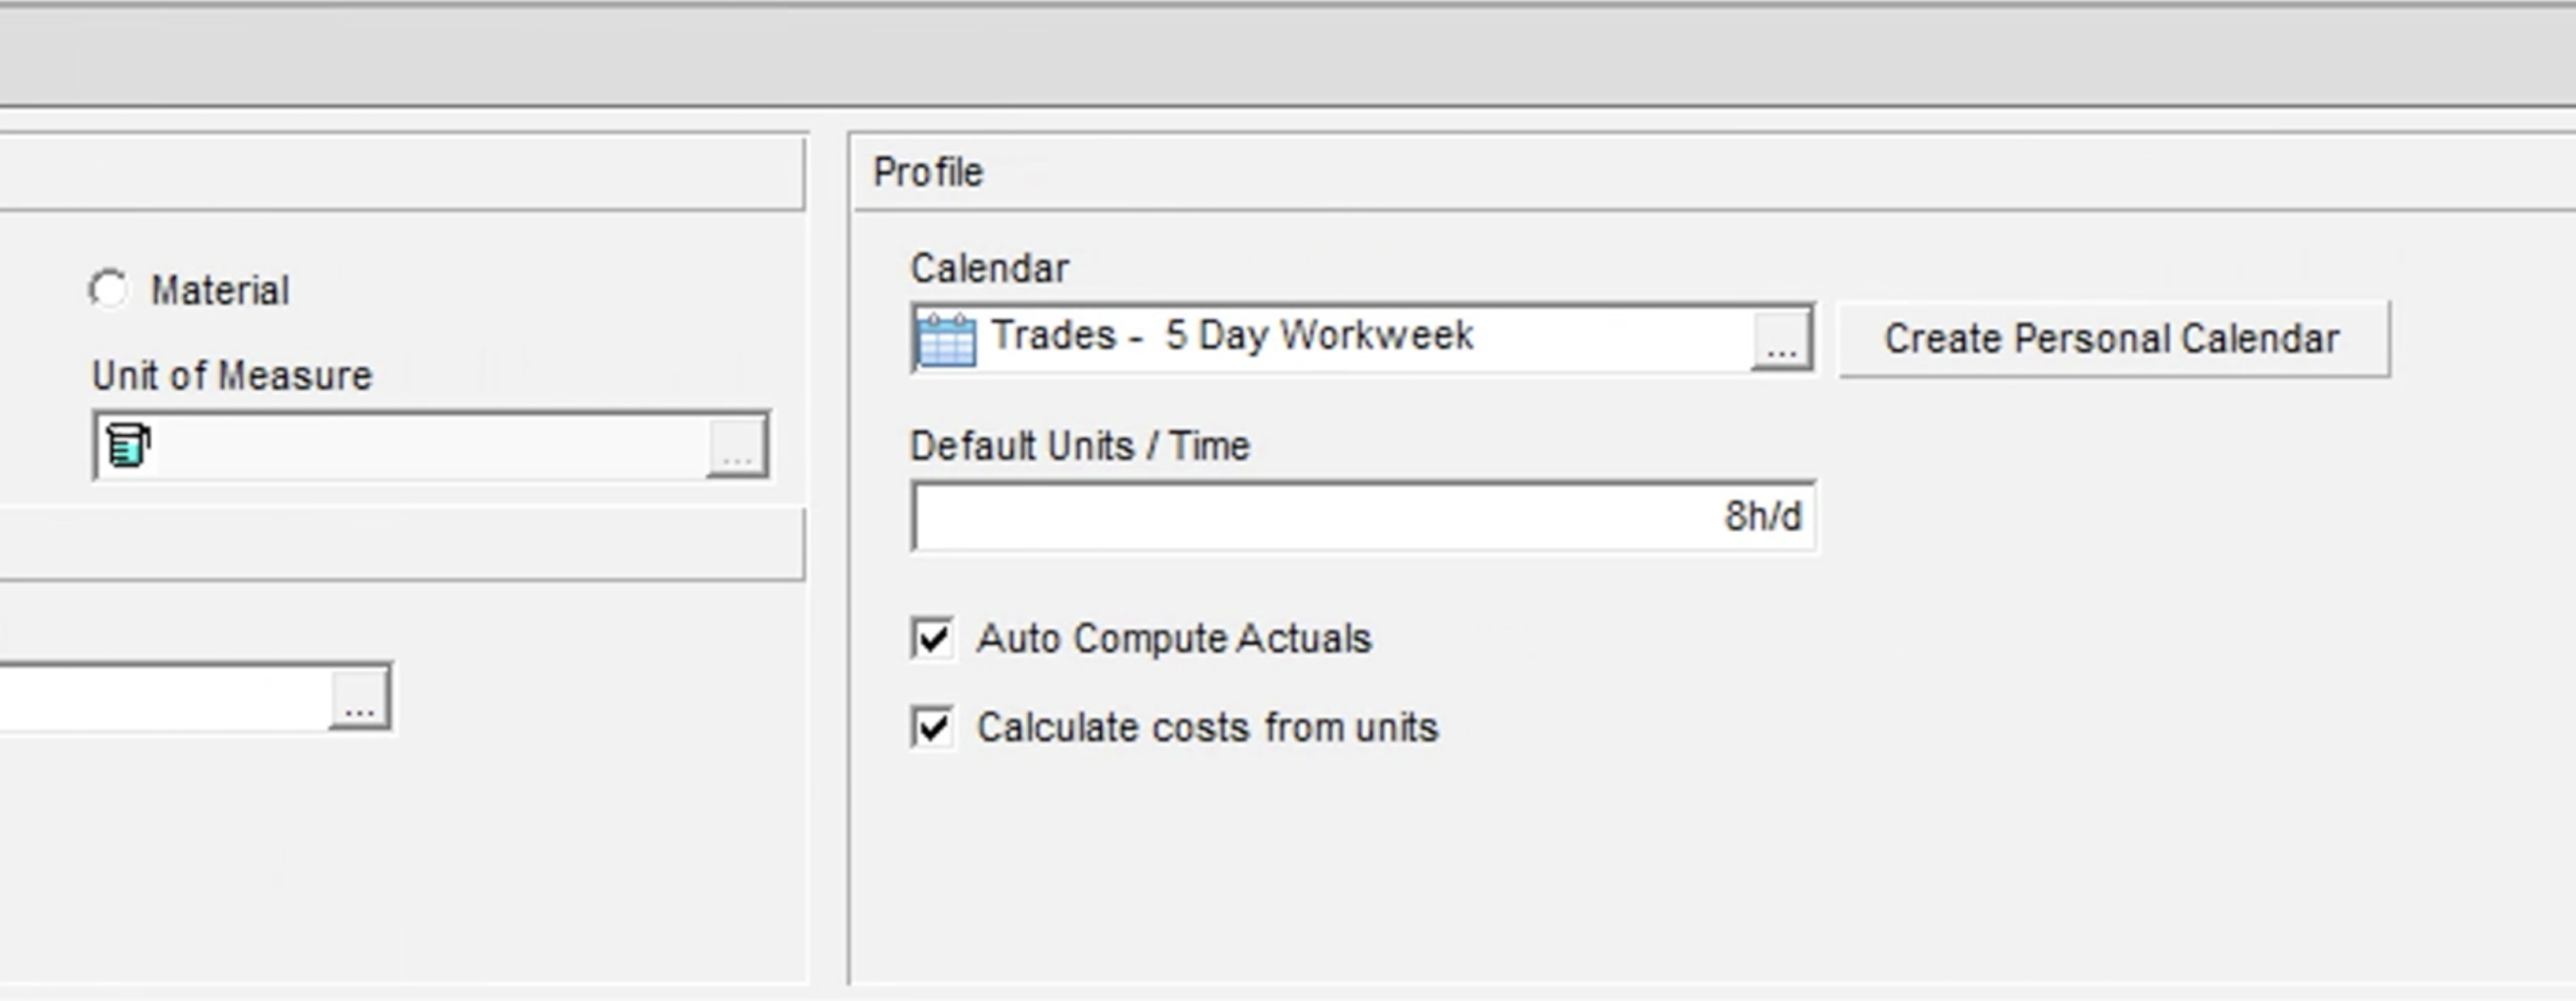 Figure 10
The ‘Units & Prices’ tab confirms that our HVAC resource has 8hrs per day ‘Max Units/Time’. We can also see a standard rate of $40.00 per hour and an effective date for this rate. We anticipate a rate increase in six months for this resource, so we click the ‘ADD’ button at the bottom of this screen, and this adds a row in the table. We enter the date and the new rate in the table, as shown below in Figure 11.
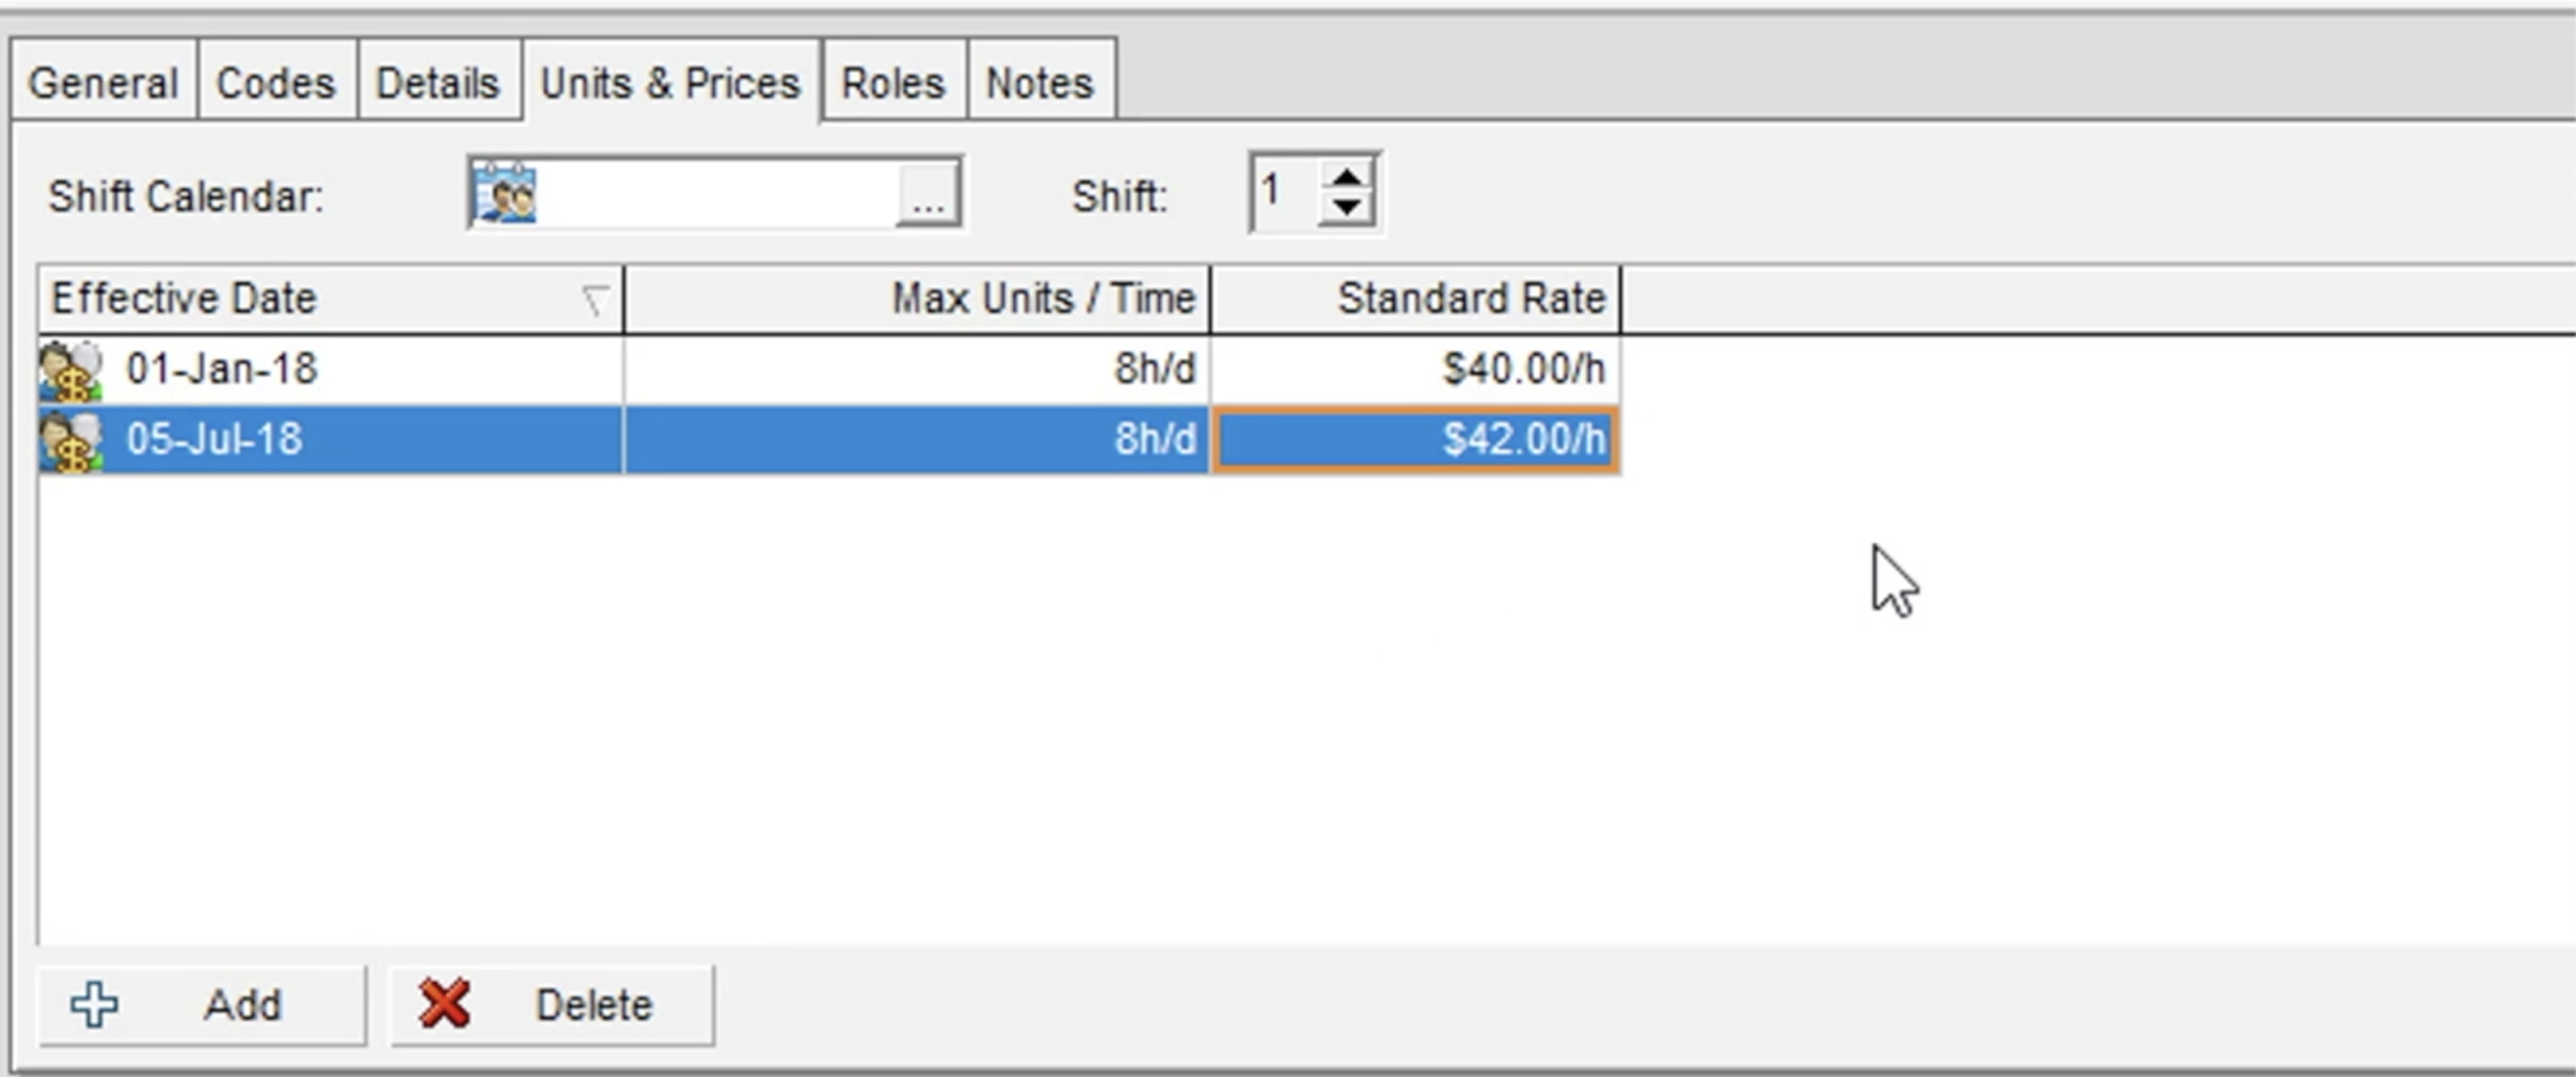 Figure 11
Option 2
We select the parent ‘Trades’ resource and click the ‘Add’ button on the far right of the screen. As we disabled the resource wizard previously in option one, by clicking the ‘Add’ button a new row is added to the table where we can enter the details for our new resource.
Our ‘Resource ID’ is ‘Foreman’ and is our management resource for the entire project, our ‘Resource Name’ is ‘Site Foreman’, as shown below in Figure 12.
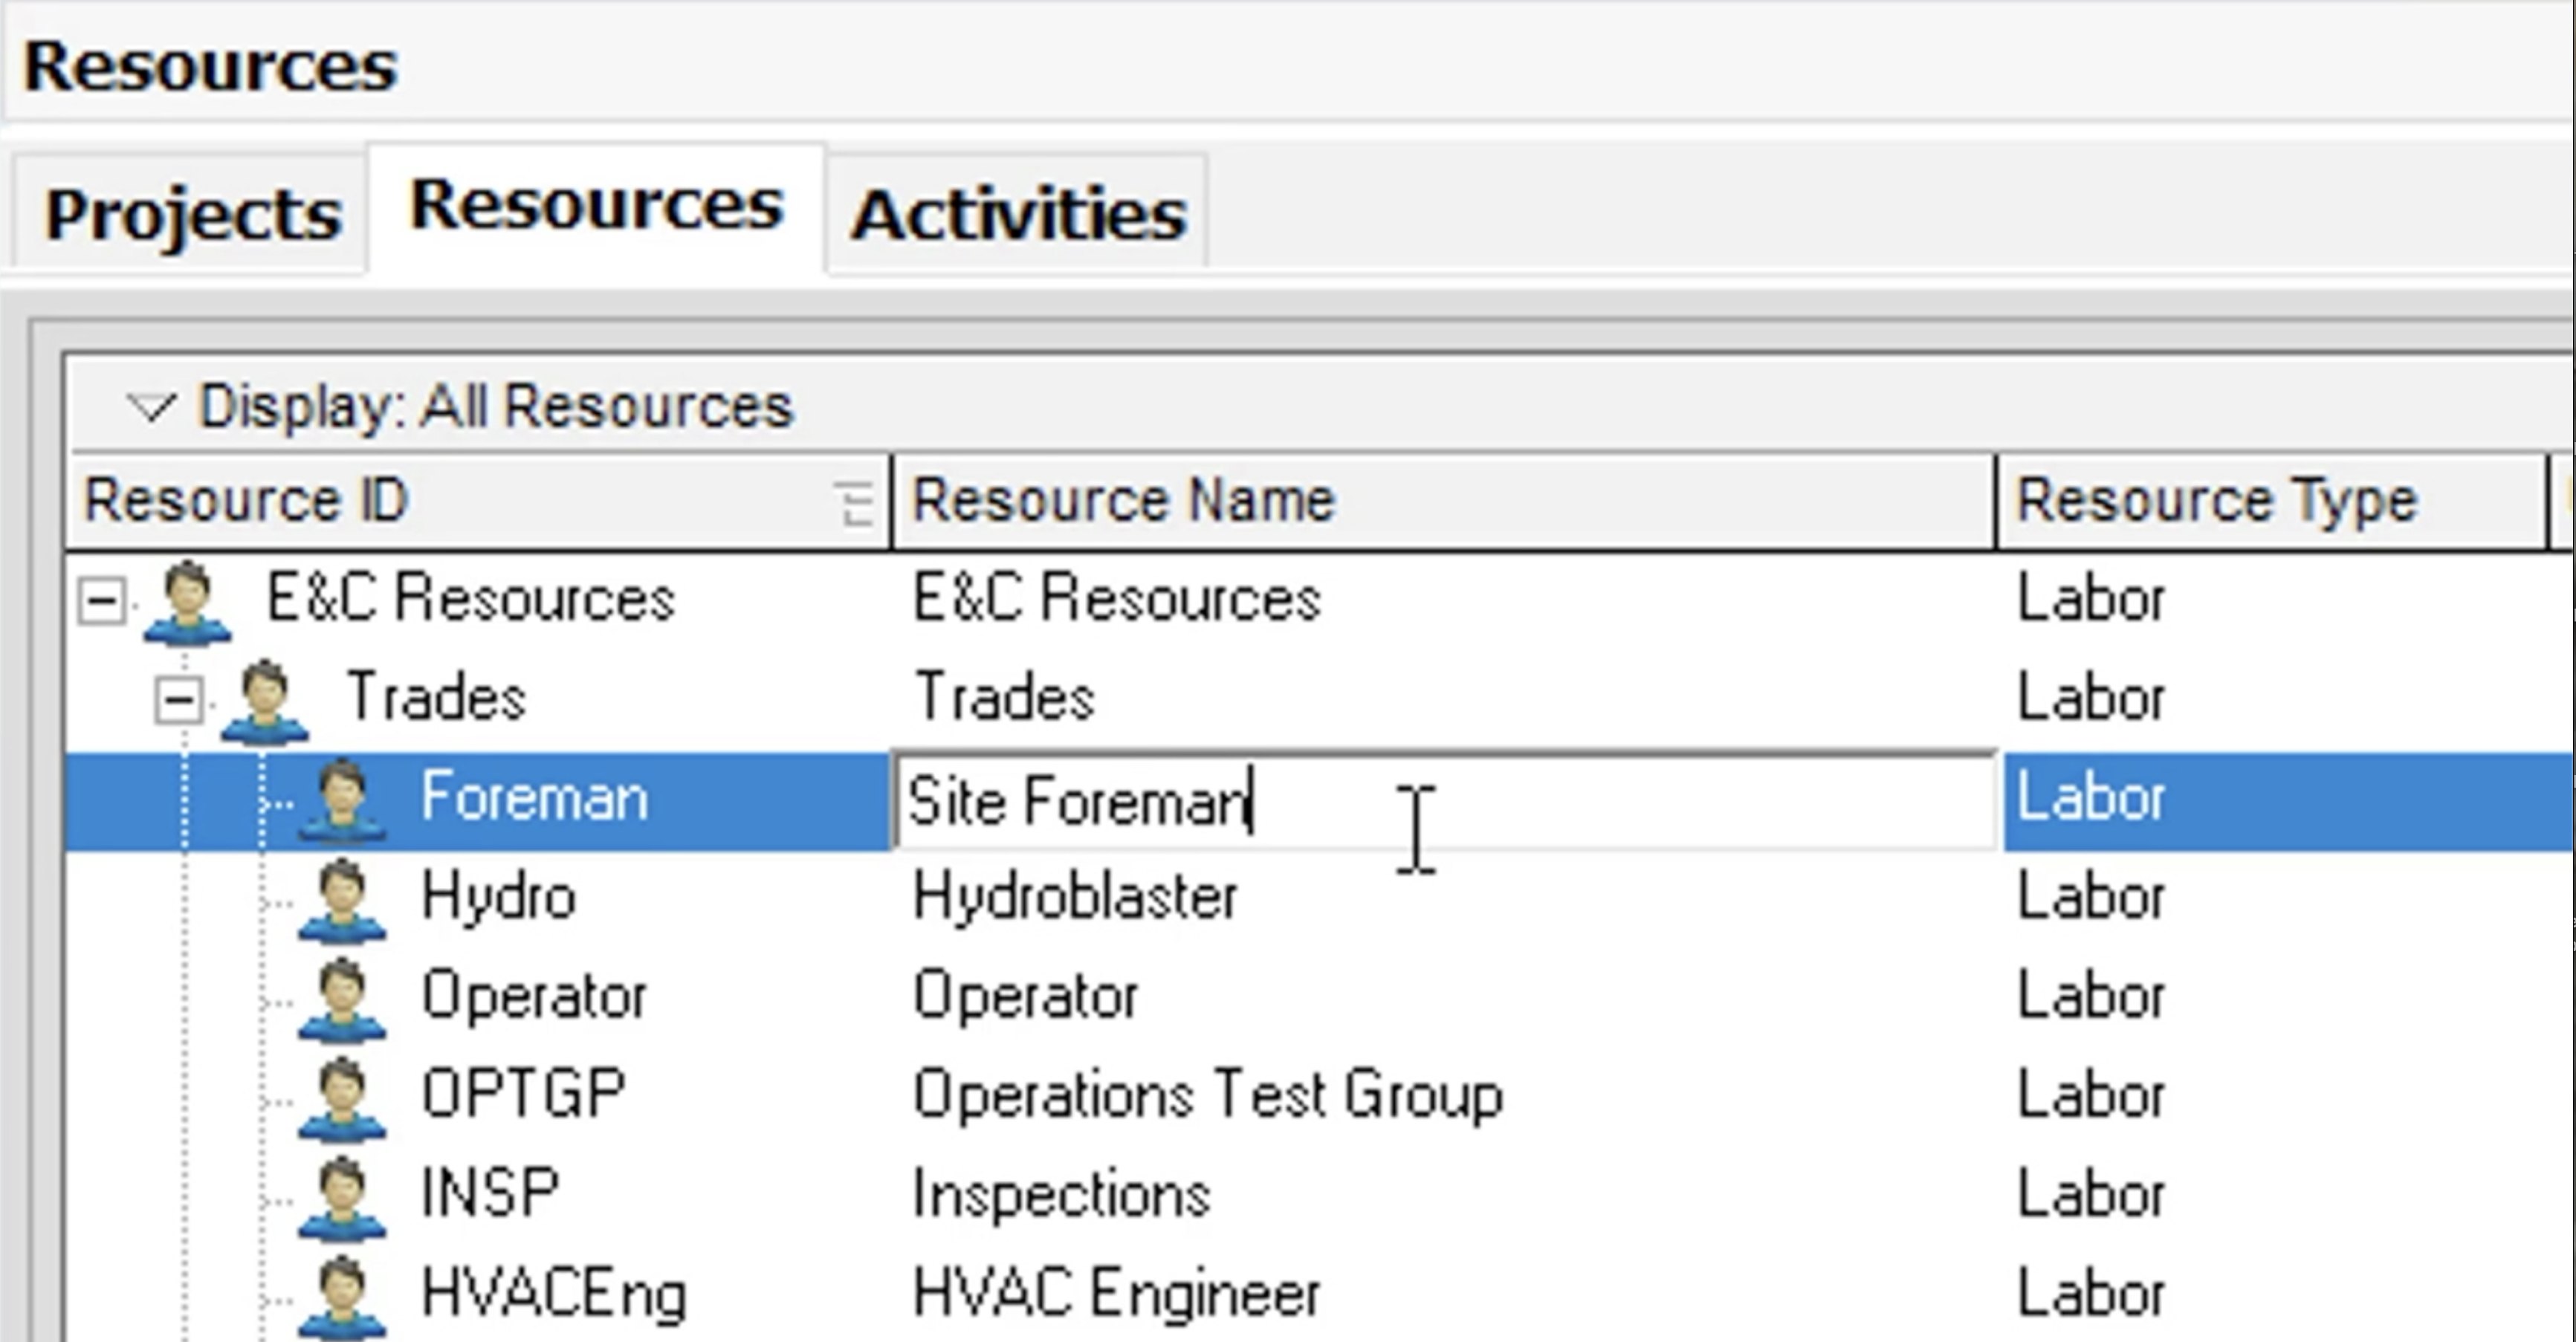 Figure 12
In the bottom details section under the ‘Units & Prices’ tab, we enter 8hr per day ‘Max Units/Time’ with a standard rate of $55.00 per hour as shown below in Figure 13. By reviewing the ‘Details’ tab we verify that Primavera P6 has created the ‘Site Foreman’ as a labor resource and that the ‘Trades 5 Day Workweek’ calendar is also assigned.
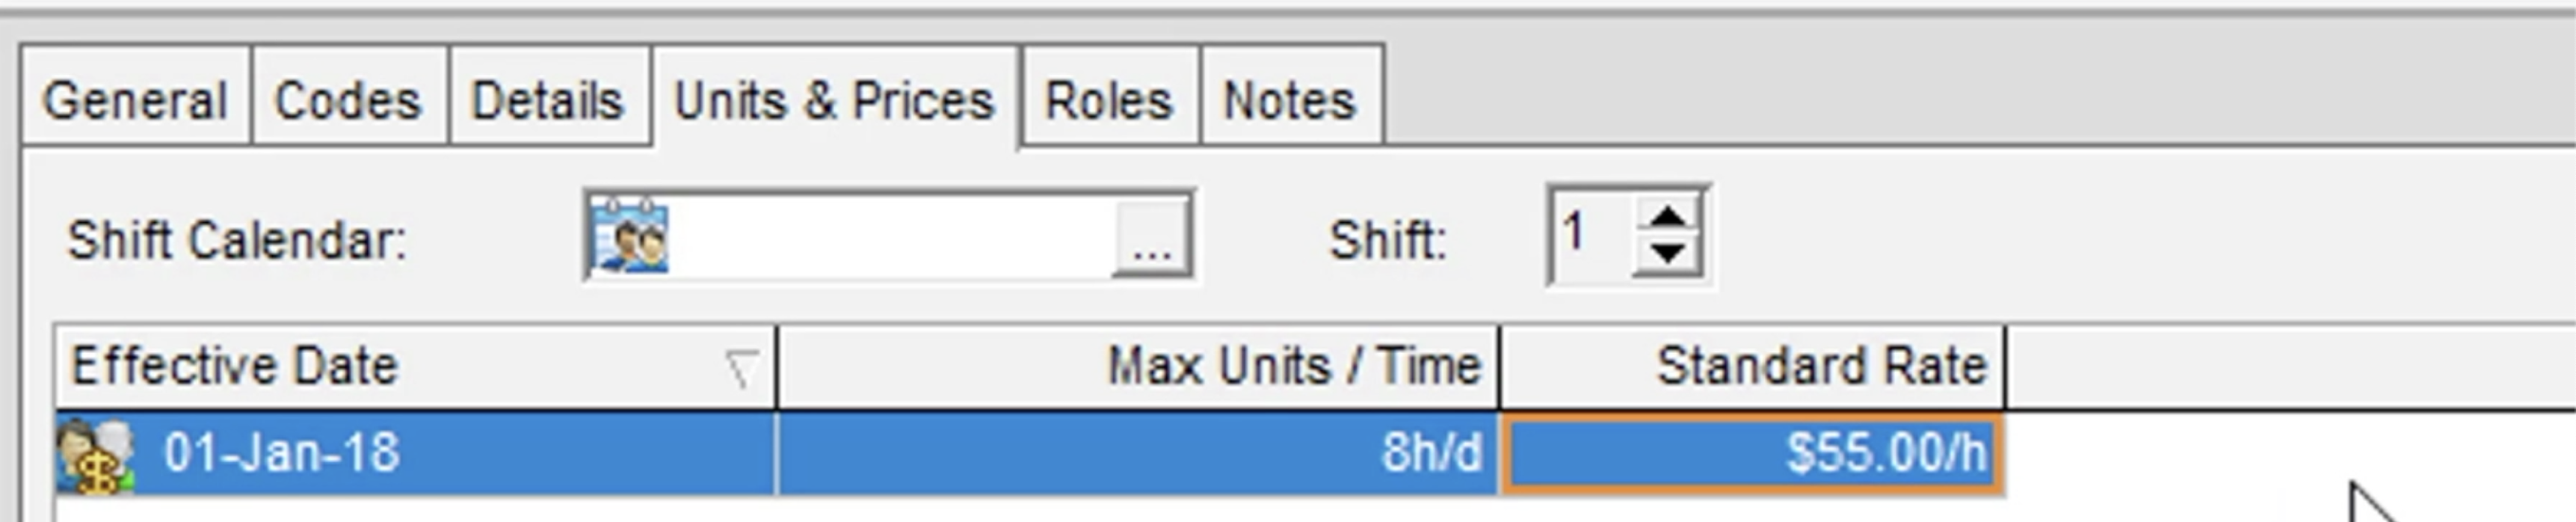 Figure 13
Summary
By following the resource wizard in Primavera P6, you will ensure that all areas of your labor resources are entered; from the Max/Units and Price/Unit as well as assigning an existing calendar. With both options you can verify your resource by checking the different areas in the bottom details screen under the tabs; ‘General’, ‘Codes’, ‘Details’, ‘Units & Prices’ and ‘Roles’.
You can also anticipate rate increases for resources. This forward pricing capability can be useful for acquiring accurate future costs for long term projects and future bids.