 This article looks at some strategies for loading estimated actual costs, sometimes referred to as accruals, into your Deltek Cobra project.
The first question you might asks is “Estimated Actuals”? Isn’t that something of an oxymoron? How can one have an estimated actual cost, surely it’s one or the other, right? For those of you who are new to the world of earned value and project cost analysis, yes this does seem a little odd. It sure did when I first encountered the concept. However, it’s one of those strange accounting things, all related to timing.
Here’s a typical scenario where estimated actual costs would be helpful in keeping your earned value reports realistic.
A contracting company is working on your project. You have their timesheets for the last week of the month, but finance haven’t yet received an invoice from the contractor. So, there’s no evidence of the cost in the actual cost file that will be produced by finance.
However, this is a significant amount of the actual costs for this current reporting period, so based upon the contractor timesheets, you can create a fairly good estimate of what the actual cost will be once it finally invoices. If you don’t enter the estimated actual costs, the earned value metrics for the affected work package(s) will show an unrealistically favorable cost variance: i.e. we did a bunch of work for which we have earned value, but not paid for.
Rather than have that hen come home to roost all over your IPMR format reports, it is perfectly legitimate to enter that estimated actual cost in order to even out the cost variance. After all, you know the bill is coming right? Your just making sure you have accounted for it in the current period.
The trick with estimated actual costs is to keep them separated from the Actual Costs you receive from the financial system. And this is what I’m going to show you right now. It answers the question “How do I keep my estimated actuals separate from my actual actuals?”.
At some point the real actuals will arrive in the ACWP file and I will need to back them out of Cobra to avoid double-dipping and showing a nasty negative cost variance.
The answer of course is Cost Classes; a named classification of a cost in Cobra that you can create as a custom bucket in which to keep your estimated actual costs separate from your ‘actual’ actual costs.
Here’s an overview of the process:
- Create a new ‘actual’ type cost class in Cobra with a meaningful name: i.e. ‘Estimated Actuals’.
- Load estimated actual cost values into that cost class, separately from those in the file provided by your financial system. This can be a manual entry or loaded from a spreadsheet depending on volume of data.
- At the beginning of the next reporting cycle determine if the actual costs for that estimate have indeed been processed, and if so, zero out the estimated actual cost for the current period.
Now let’s look at the keystrokes in Deltek Cobra to get all this done.
Step 1 – Creating an Actual Cost Class in Cobra
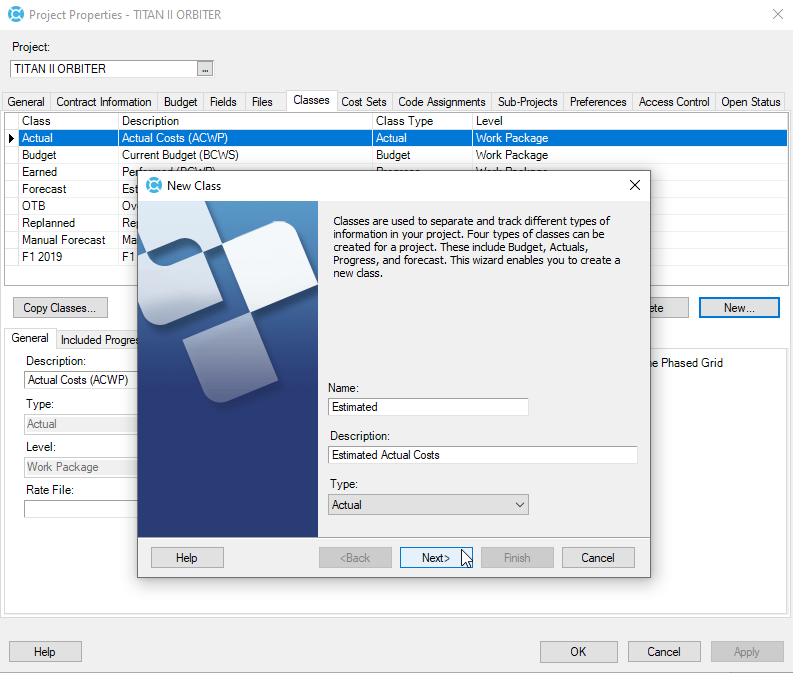
In the Project Properties dialog, you go to the Classes tab and click the New button.
In the wizard shown above, you enter a name for your new cost class and then click the Next button.
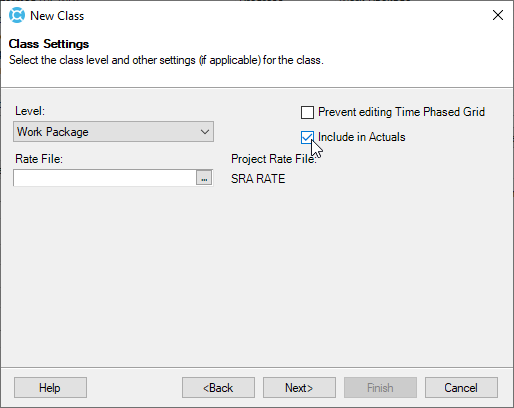
In the class settings, be sure and select the ‘Include in Actuals’ dialog before advancing to the next dialog.

In the Include in Actuals Cost Set dialog, check all the options and also use the add button to include all the budget classes. Once you’ve done all this you can click the Next or the Finish button.
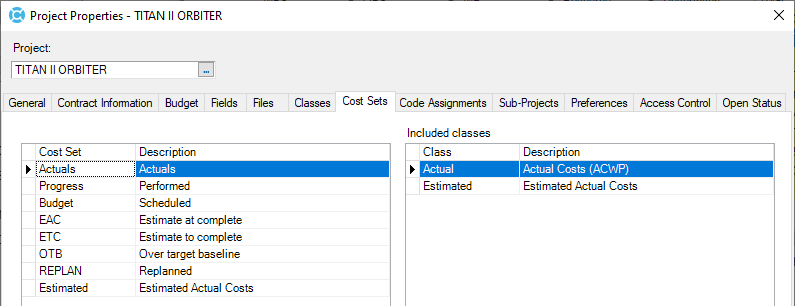
Now go over to the Cost Sets tab and click on the Actuals option. You should see your new estimated class included in the list. This ensures that your IPMR reports will include a total of actual and estimated actual costs.
Step 2 – Loading Estimated Costs into the Project
Having got this in place, you can now use the class to load estimated actuals while keeping them separate from the final actual costs coming out of your finance system.
You have two options for this.
- Load them by hand using the assign resource button
- Load them from a spreadsheet having saved the values in a CSV format
Let’s look at option a) first.
In the project you simply select the work package or control account (depending on the level at which you capture actual costs) and then click on the Assign Resources button in the Edit ribbon.

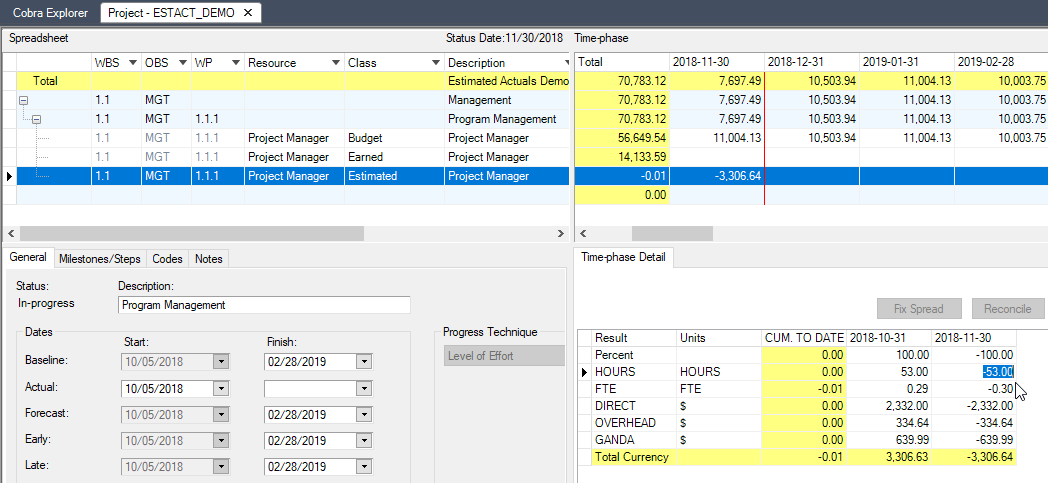
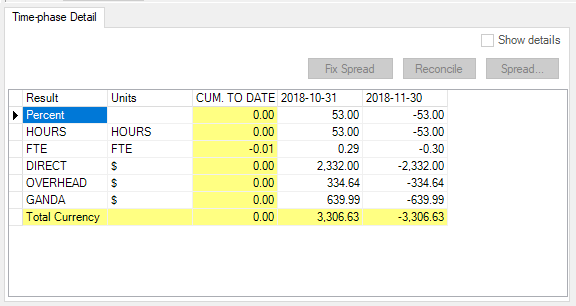
In the resulting dialog, Enter the resource, the class – selecting your new Estimated class – and then the hours or direct cost as appropriate for the period. In this example, we have a timesheet for the engineering contractor for 53 hours. So, we’ll enter that and let Cobra calculate the estimated cost for those hours.
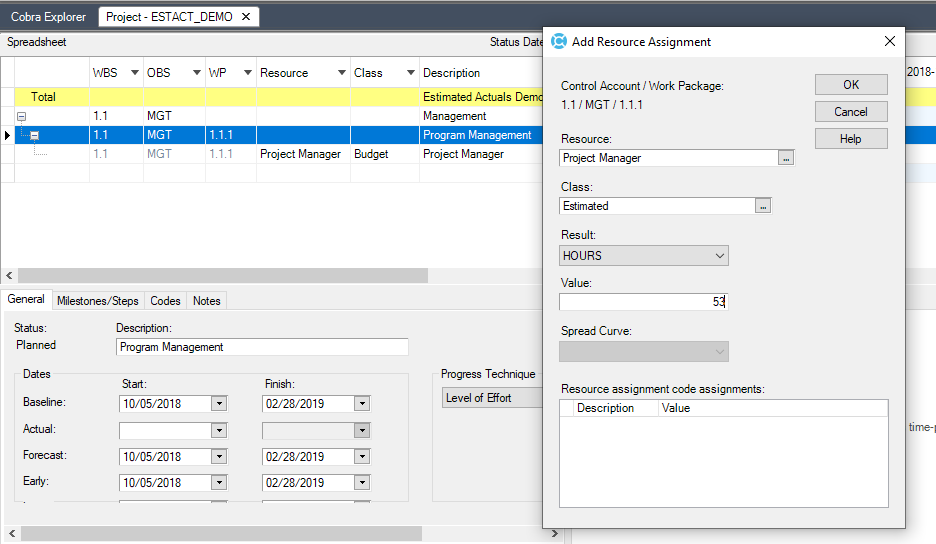
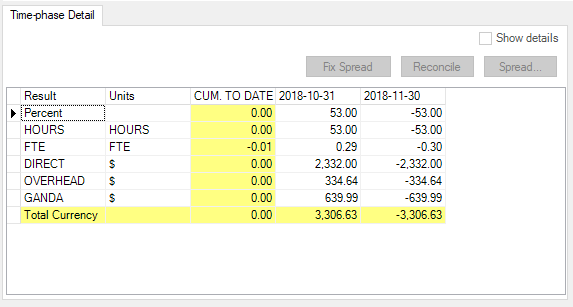
Notice how the system has automatically placed the Estimated actuals into the open period for the project: i.e. October 31st, 2018. The class can also be seen for the engineer as Estimated.
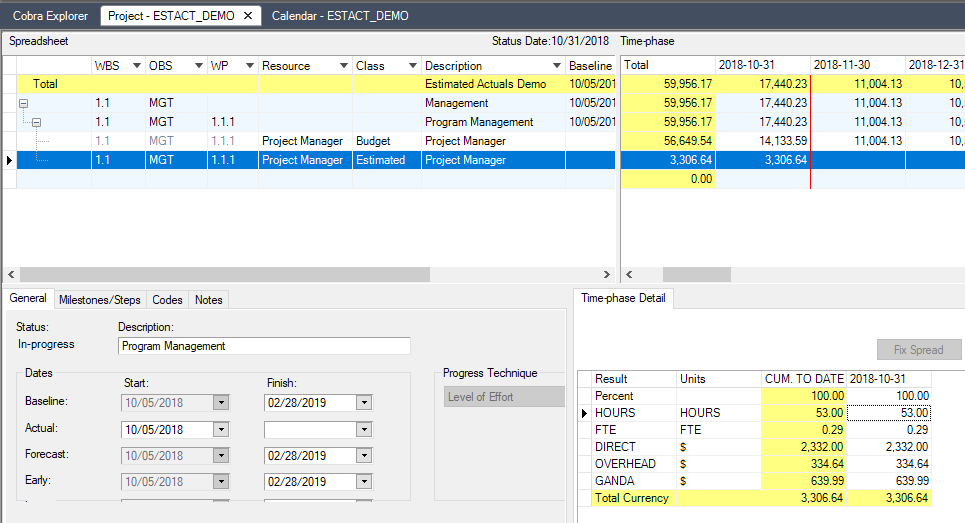
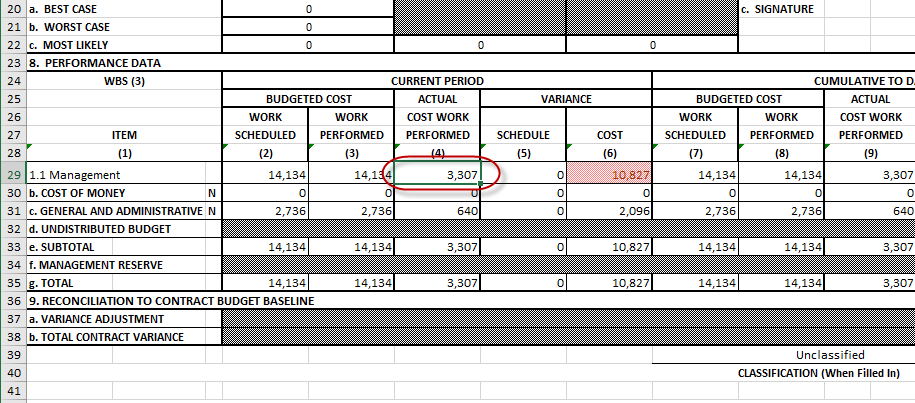
Because the resource assignment used the Estimated cost class, and this is included in the Actuals Cost Set, it will be included in any reports that are run for the project. However, it is in a class of its own so to speak, and therefore can be easily backed out once the final actual costs are posted through the accounting process. You can see the 3.307 in the ACWP column below.
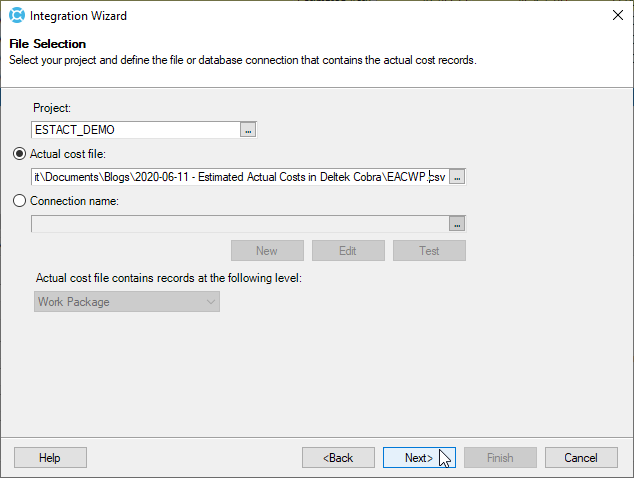
The other way to load estimated actual costs is to use a spreadsheet that has been saved as a .CSV file. Almost all data can now be loaded into Cobra from the .XLSX format, except for actual costs. So, you will have to save any actual or estimated cost files as .CSV files to load them in.
The file method does give you some options that allow you to not only load current estimated costs, but also remove prior period costs.
Here’s some examples of an estimated cost file.
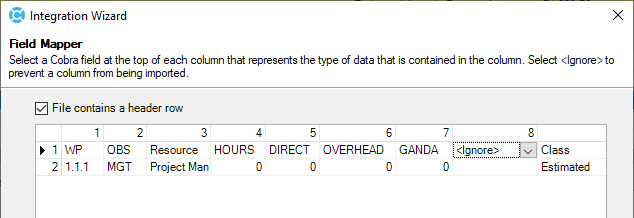
This first one will load the estimated cost as we just saw in the manual example.

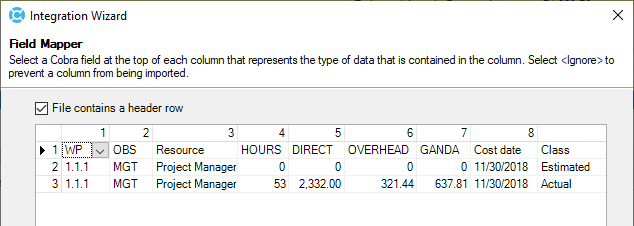
This is how it would look when you load the estimated actual cost using the Actual Cost integration wizard.
And here’s where it gets interesting: if you included a Cost Date and Class column, you will not have to tell Cobra where this data is going. Therefore, use of the Class column means that you could include both actuals and estimated actuals in the same ACWP file. Use of the Cost date column however is totally optional. Without that column, Cobra will simply load the data into the current period.

In the next dialog, you can see that the Class field is inactive. This is because you already told Cobra the class of the record in the Class column. So that saved you making that selection. You will also notice that the only Result not provided in the file was FTE (which is typical of most financial systems) so Cobra wants to know if you what that value calculated. In this demo I’ve checked it.
The next dialog in this loading process wants to know if we are loading period actuals, or cumulative. You can go either way with this. Many folks opt for Period Costs. If you do that, you have to handle the backing out of prior costs differently than if you choose the Cumulative option. Which you choose is entirely up to you and both are legitimate for estimated actuals.
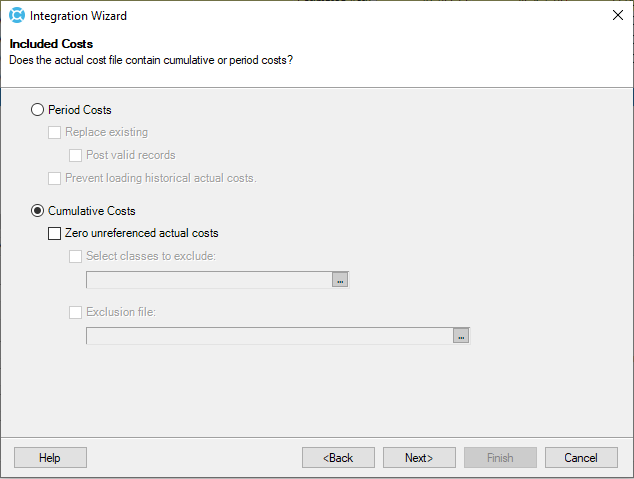
For this demo I’ll just go with the cumulative. As this is our first period anyway, it doesn’t really matter.
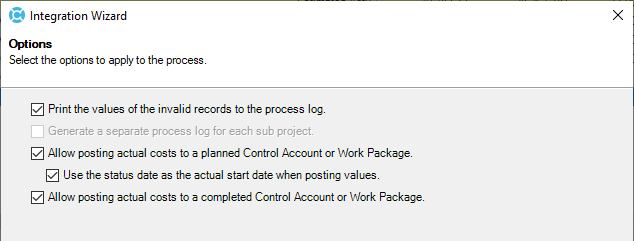
In the Options dialog, I chose all the settings, just so that I don’t end up wrestling with any open or closed work packages, and click the Next button.
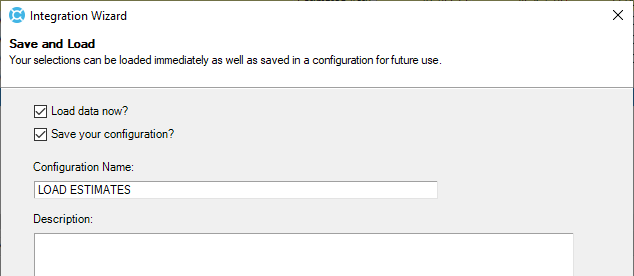
In the Save and Load, I’ll give the configuration a name so I can recycle all this point and click.
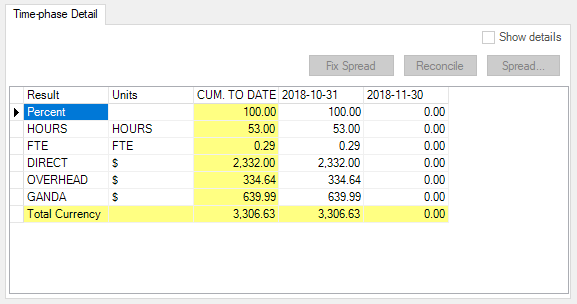
The results of this run are of course identical to the previous manual example. The advantage of the file method is that you can load many records at the same time if you have a large number of estimates.
Step 3 – Backing out Last Month’s Estimated Numbers
Now let’s imagine that it’s the following month, and we know that the final actuals for the project manager have been invoiced, paid, and processed. We have new actuals and new estimates, but we need to reconcile the Estimated actuals class.
You can do this either manually by simply setting the resource to negative 53 hours in the next period (we always make changes in the current period, next in past periods), or you can load the change in via the CSV file.
So, I’ll advanced the calendar in Cobra to the November period. Here’s what it looks like to manually zero out the estimated actual cost.
If we run the IPMR format 1, we can see that this ‘current period adjustment’ has indeed zeroed out the estimated actual cost from the October period. For clarity I haven’t yet run the actual cost import that would be replacing this value with the Actuals class of cost.
 To do this in the file depends on whether you intend to load it as a cumulative actual record, or a current period actual record.
Let’s start with an example of a cumulative estimated cost file that will cancel out a prior period estimated actual cost.
Here’s the estimated actual assignment prior to running the Integration Wizard. Note that the calendar has been advanced to the 11/30/2018 period. Also note that the previous estimated actual record has been set to zero for all values. I’ve also unmapped the date field. Because this will be loaded using the cumulative method, the date will be assumed to be the current period – so I’ve been able to ignore it in the mapper.
 Upon loading the CSV file the results are as follows:
Note how the 11/30 period has been set to negative 53 hours. Because I loaded the estimated actuals as cumulative, Cobra knew to subtract -53 hours in the current period to get the value to become zero. It was seeking to make the cumulative value zero, as the file was instructing it to do.
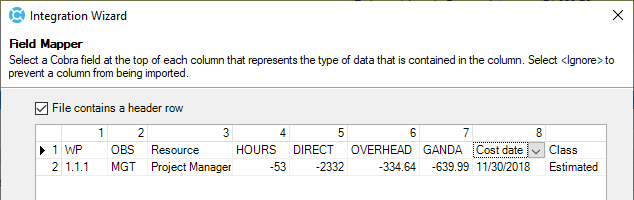
Current period however needs different treatment. Here’s the same example. I’ve reset the example to zero, so that the total for the work package estimates is still at 53 hours.
This time I’ll run the period estimated actuals file through the Integration Wizard. As you can see, I’ve set the period estimated actual cost to negative 53 hours. Simply setting it to zero will not work for period actuals. Note I’ve also used the Cost date column this time, just to make sure that Cobra knows what period the record belongs to (although that is likely redundant in this example).
Now watch what happens when I run the import. And just so you know I’m not cheating; here’s the Period Costs option being set…

And there you have it. The results of the period estimated cost import has the same affect. It has set the hours for the current period to negative 53, which has the same effect of setting the estimated actuals for the work package to zero.
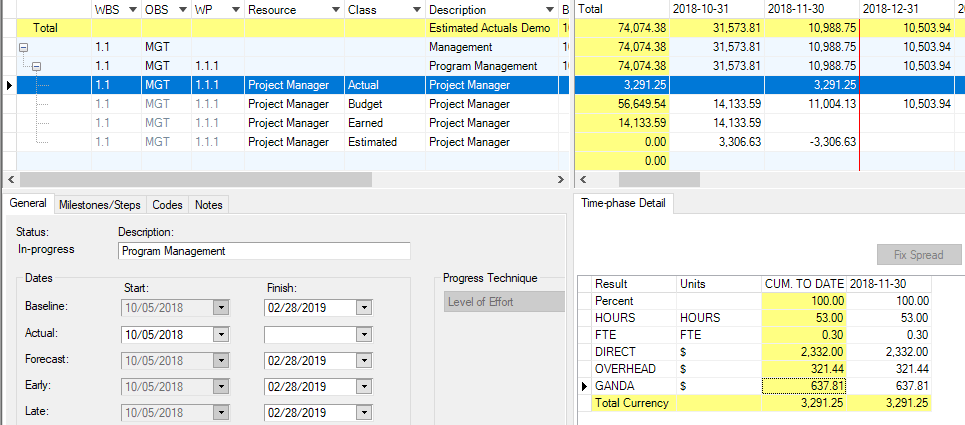
And just for fun, let’s run the example one more time, only this time, we will replace the estimated actual costs with the actual costs for the project manager, which have come back with slightly altered indirect values. In this case note how I’m using the Class column to achieve this update.

The mapping looks like this. It’s an example of how you might load a mixed actual and estimated actual cost file that would self-correct the estimated actuals that have made it through the ledger, and add in any new ones.
The final results below show you how the work package has been corrected with the removal of the estimated actual costs, and the loading of the actual cost with a class of actual.
Summary
This demo has shown you just some of the most common ways to deal with the concept of estimated actuals. In short, we have a lot of flexibility in Deltek Cobra to take a number of different approaches from a simple manual entry to the use of blended actual and estimated cost CSV files.
You can download the files used in this article. You can then load the .CMP file and import the data using the methods shown. These would also act as templates for your own actual and estimated actual cost files.