One of the more sophisticated areas of scheduling is the assignment of resources to the tasks. To do effective resource assignment in Microsoft Project you need to be familiar with the methods for assigning labor, material, and costs. You’ll also need to be familiar with how to balance task durations, work and effort. Once you have assignments, Microsoft Project displays warnings for the over-allocation of labor resources. Labor resources may either be generic or specific people.
This article shows how to assign generic resources to tasks in order to find the total labor cost of the project. It does not discuss the assignment of material or equipment resources. Also, the examples below use the standard 5-day workweek calendar.
Microsoft Project Scenario
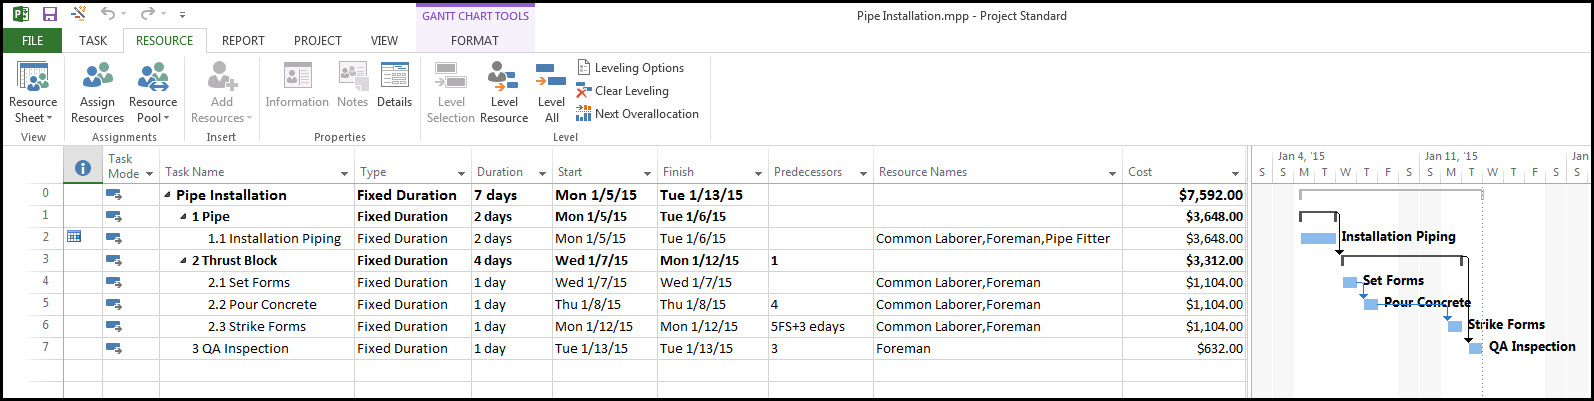
The example project is a pipe and thrust block installation, Figure 1. The tasks are all sequential and have the standard Finish-to-Start relationship. The only exception to the norm is a 3-day cure time delay lag on task 2.2 Pour Concrete. Assigning a cure time lag is discussed in another article entitled “Working Time, Elapsed Time & Lags in Microsoft Project 2013”.

Figure 1

Defining Resources
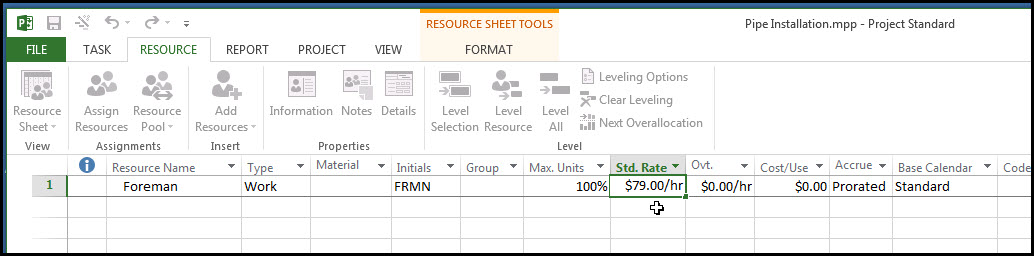
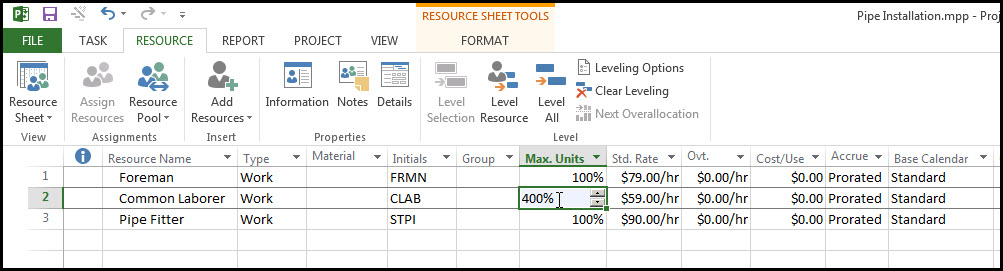
The first step in the resource allocation process is to define the resources. For our example all our resources are generic roles instead of specific employees or team members. To get to the define resource screen select Resource tab > Resource Sheet ribbon > Resource Sheet. To enter a work resource, while in the Resource Sheet view, select Resource tab > Add Resources ribbon > Work Resource. Enter the Standard Rate for the Foreman, Figure 2.
Figure 2

Continue by entering the pertinent information for the common laborer and pipe fitter, Figure 3.
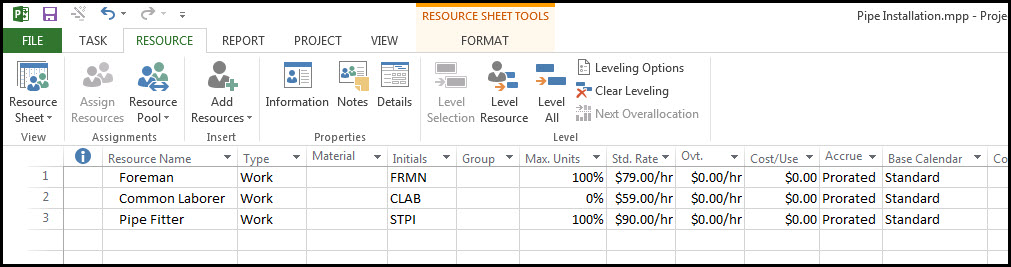
Note that the maximum availability of all our resources is currently 100%. We will come back to this maximum availability later, but for now keep the maximum availability of each resource at 100%.
Figure 3
Assigning Resources
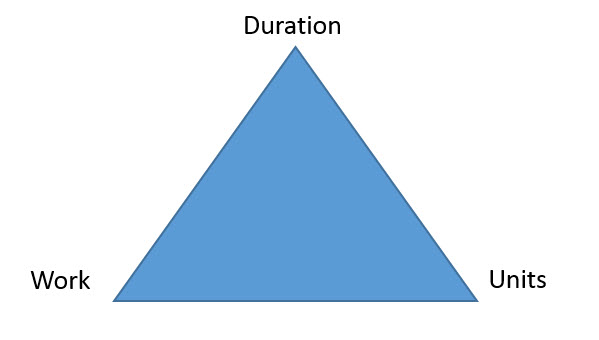
Before we begin our resource assignments we want to make certain that our tasks have the correct Task Type. The Task Type defines which of three variables we can control when assigning resources to tasks. The corners of the duration triangle, shown below, are Duration – Work – Units, Figure 4. Changing one of these values will have an impact on one of the other variables. For example, when you want to increase the work a resource is scheduled to do on a particular task, should the duration reduce or the units (total cost in hours) go up?
Figure 4
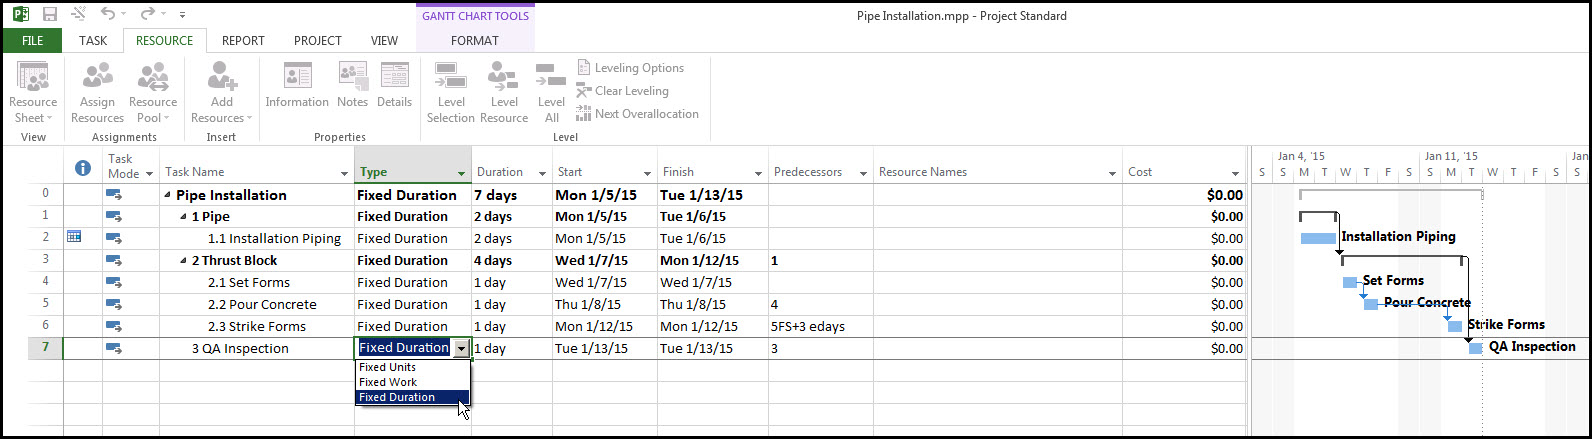
For our example we’ve set the Task Type to Fixed Duration for all tasks, Figure 5.
Figure 5
Duration is fixed because we have determined the task and project duration, which we do not want to change. We will be adding resources to each task by adjusting the Units. So we will compute the cost to perform for each task by fixing the duration, adjusting the Units, and calculating the Work.
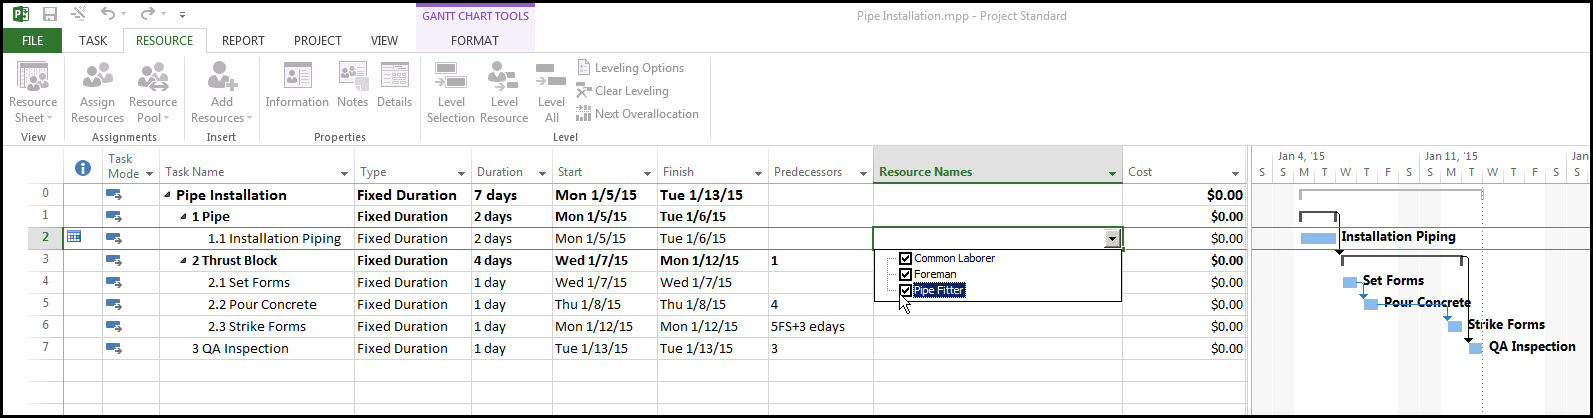
Note that the Resource Names and Cost columns have been added to the tasks view. Now assign your resources to individual tasks. This is done by selecting the Resource Names drop down menu for each task and choosing the corresponding resource, Figure 6.
Figure 6
Each generic resource is assigned to each respective task only once. Assign the resources to the corresponding tasks as in Figure 7.
Figure 7
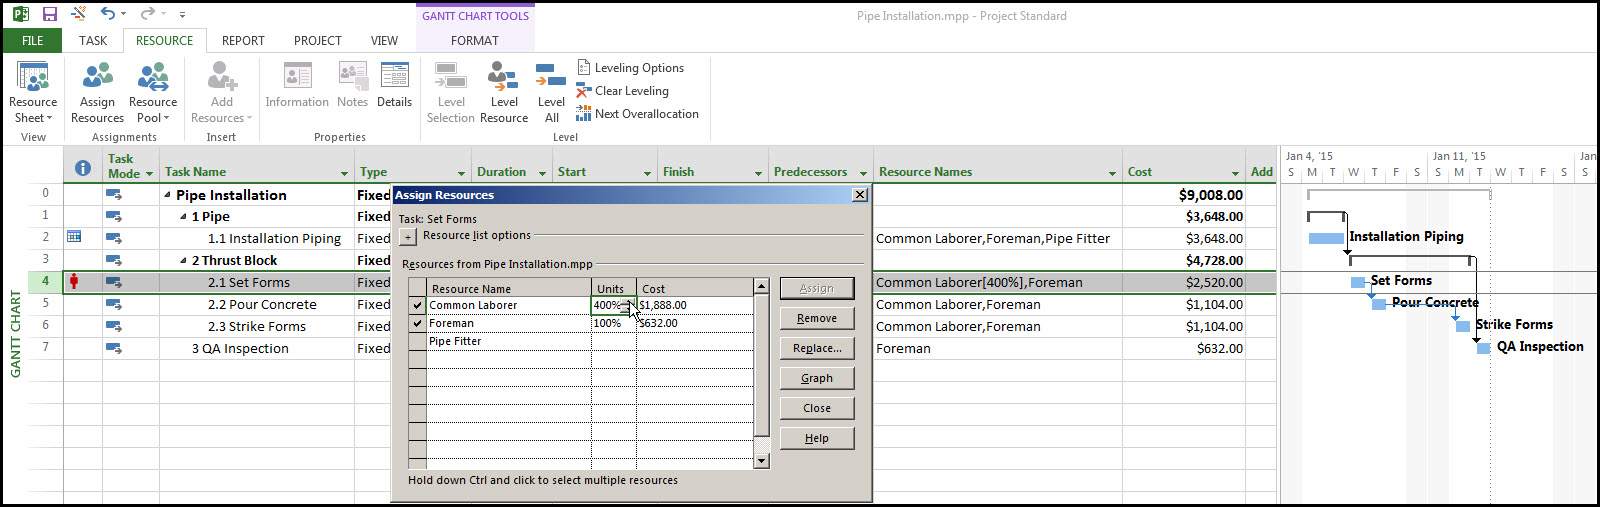
Note for Tasks 2.1 Set Forms and 2.2 Pour Concrete, we want four generic common laborers working on each of these tasks. How can we have four laborers working on a task when we’ve only assigned the common laborer once to each respective task?
Well, this 4-laborer effort on tasks 2.1 and 2.2 is modeled by 1) selecting the task the resource is assigned to and choosing Resource > Assign Resources 2) setting the Units of the Common Laborer to 400% for tasks 2.1, Figure 8.
Figure 8
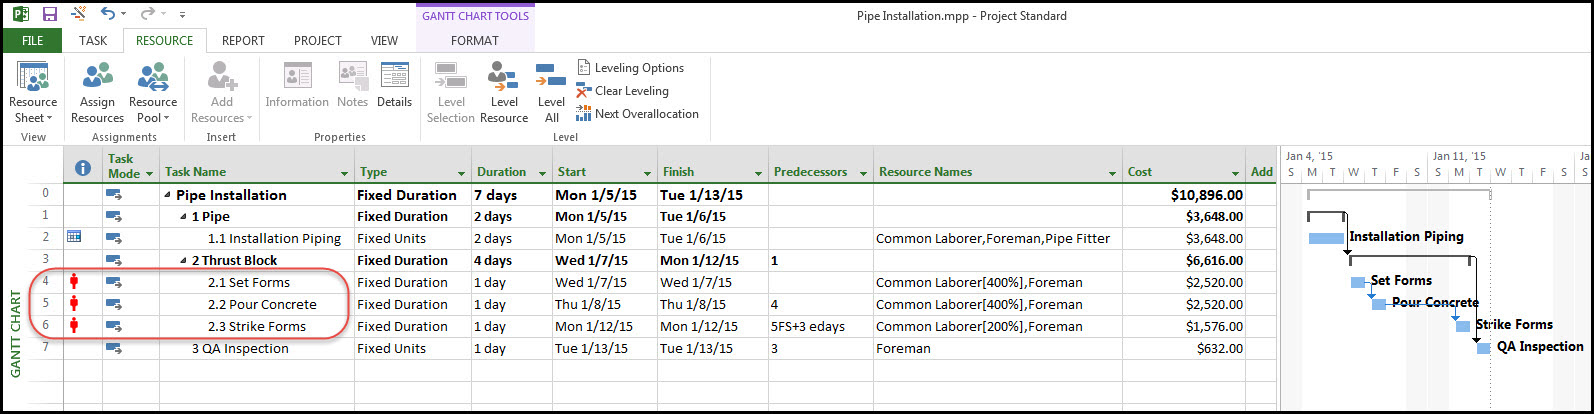
Repeat this process for task 2.2. Then set the Units of the Common Laborer to 200% for task 2.3. Your schedule and associated costs should be as in Figure 9. Note the total cost of the project is $10,896. Also note the resource over allocation warning for tasks 2.1, 2.2, and 2.3.
Figure 9
Resource Allocations
So we now have the budgeted cost for the project, but some of the resources are over allocated, which means the schedule is not realistic. To investigate the over allocation by viewing the allocation graph follow these steps. 1) Select the Resource Graph from the Resource tab > Resource Sheet > Resource Graph menu item. Your resource graph will display the allocation and over allocation. 2) Left-click the legend and select previous until the Common Laborer resource graph appears. It will look as displayed in Figure 10.
Figure 10

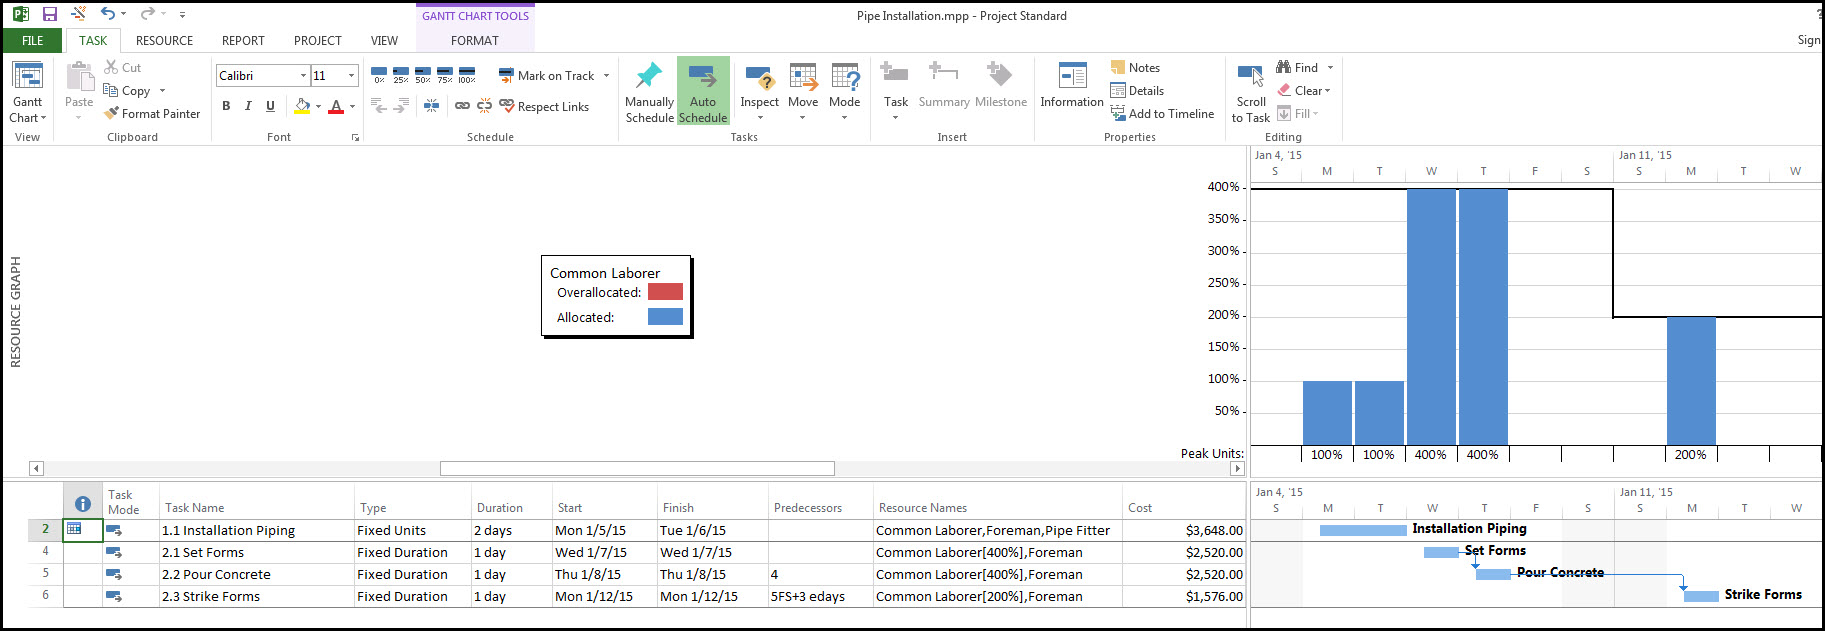
Note the over allocation of the Common Laborer resource on Wednesday, Thursday, and Monday. This may be corrected by simply increasing the Maximum Units of the Common Laborer from 100% to 400% on the Resource Sheet, Figure 11.
Figure 11
Your resulting Resource Graph will be as displayed in Figure 12. Note the allocation line at 400%. This shows that you are under-allocated on Monday, Tuesday, and Monday of the following week.
Figure 12
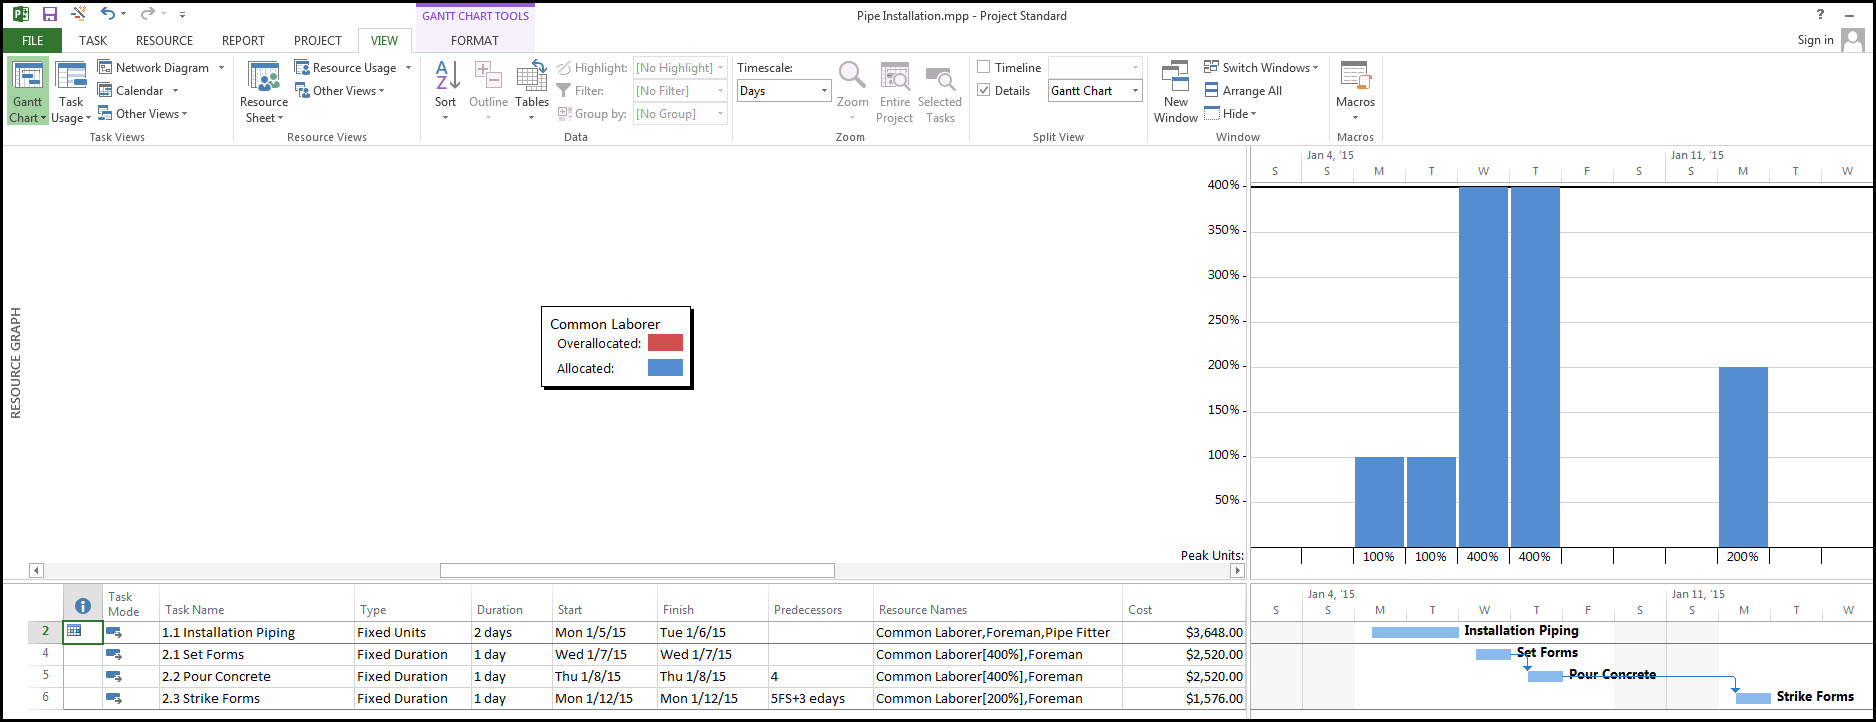
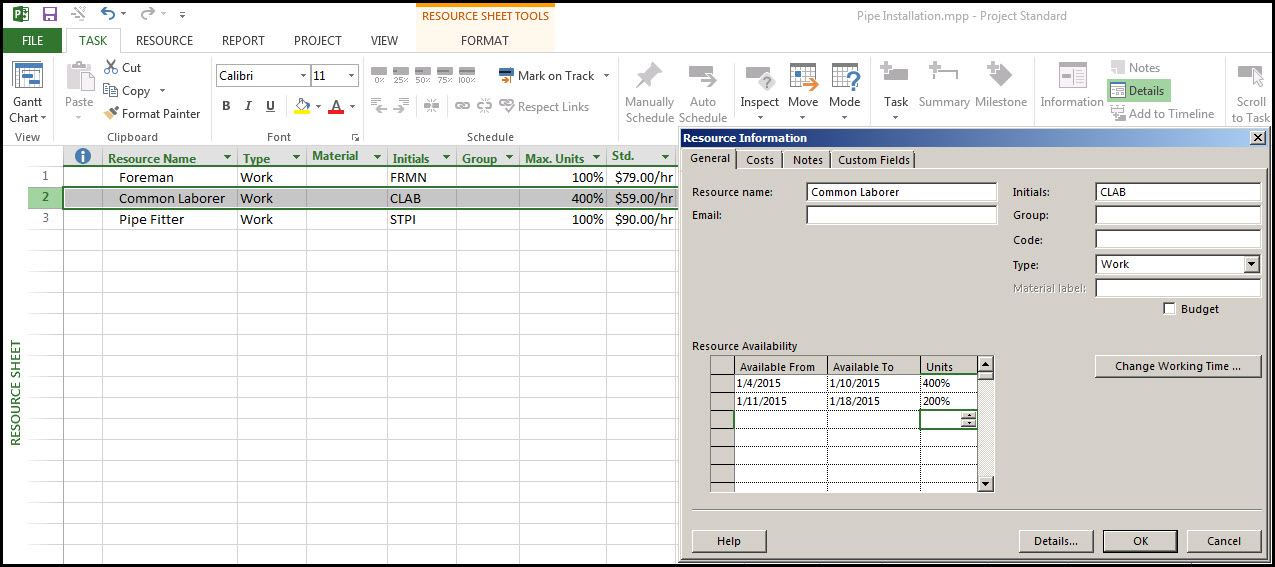
You can change the allocation of resources throughout the week. While in the Resource Sheet view select the Common Laborer, and then select Information. This brings up the Resource Information dialog. Make the availability of the Common Laborer resource for the first week of the project 400% and for the second week 200%, Figure 13.
Figure 13
Then select Resource tab > Resource Sheet ribbon > Resource Graph to display the allocation of the Common Laborer again. Now our Common Laborer is under-allocated on Monday and Tuesday, but exactly allocated for the rest of the project, Figure 14.
Figure 14
Go back to the Resource Sheet view and note that the Common Laborer shows a Maximum Units of 0%, Figure 15. This is the current date’s resource allocation. The first week of January, 2015 the Common Laborer resource will have a Maximum Units of 400%, and on the second week of January, 2015 the Common Laborer resource will have a Maximum Units of 200%.
Figure 15
Finally, we have a realistic schedule and we know the budgeted cost for our project. Our resource allocation graph shows an acceptable distribution of resources.
Approved Budget and Task Type
Assuming your project budget cost is approved, at this point, you may want to change the Task Type from fixed duration to fixed work. Usually, after the budget is approved additional costs cannot be added to a project without changing the contract, which can be a painstakingly tedious process. You have a realistic schedule. In order to complete the project on budget you may have to make minor adjustments to the Durations and Units (daily effort), accordingly. Again, once the budget is approved the cost or Work is fixed and you have more leeway with the Duration and Units variables.
Summary
Microsoft Project 2013 is a powerful tool not only for modeling the project duration, but also for resource allocation analysis and for estimating the project cost. Several generic resources can be assigned to one task by adjusting the Units in the Assign Resources dialog.
The availability of resources throughout the week may be adjusted in the Resource Information dialog. Microsoft Project 2013 will also display the cost of tasks, deliverables, and the project.