How to Backup Primavera P6 Baselines
Many Primavera P6 databases become cluttered with a myriad of items, ranging from old redundant codes to more copies of projects than are ever required in anyone’s lifetime. Whilst updating a project weekly, you may be required to keep a snapshot every time you use the ‘Maintain Baseline’ feature in Primavera P6.
In reality, a whole copy of your project will be added to an already messy P6 database. This unnecessary clutter will eventually slow down the database. How can you keep the database free of clutter whilst still maintaining a historical record of your project status using the baseline snapshot feature in Primavera P6? Let’s take a look at how you can backup Primavera P6 baselines.
In Figure 1 below, we have our construction project which is being updated weekly. As you will notice in the ‘Maintain Baselines’ dialog, over nine weeks we have added nine copies of our entire project progress to the database.
 Figure 1
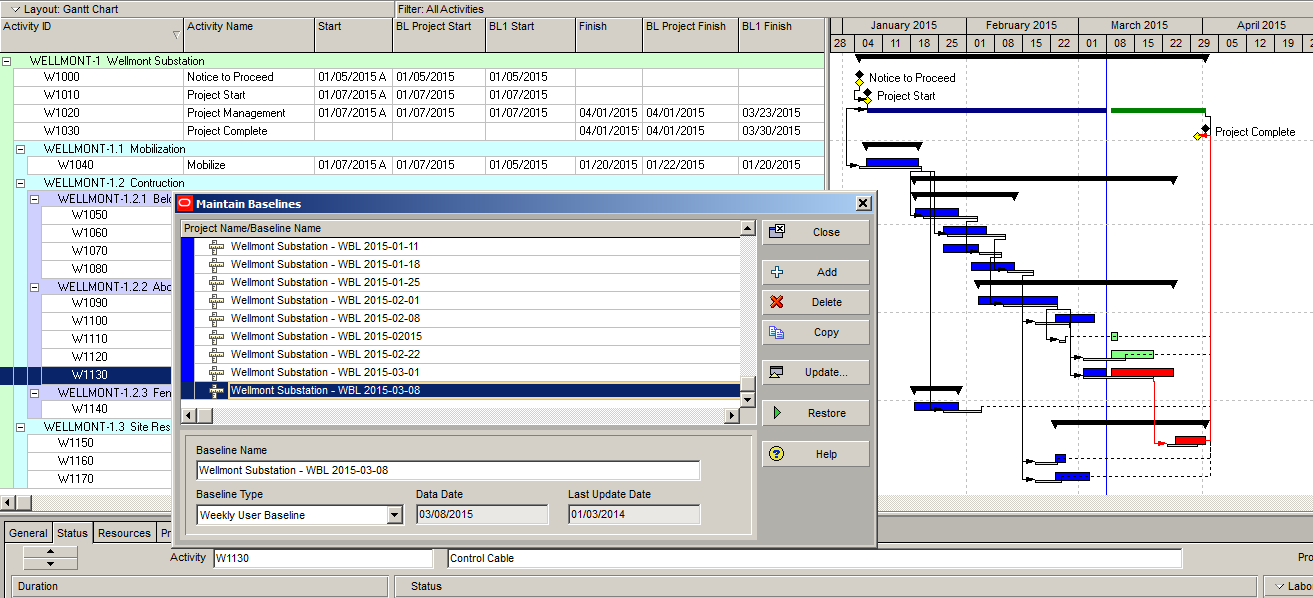
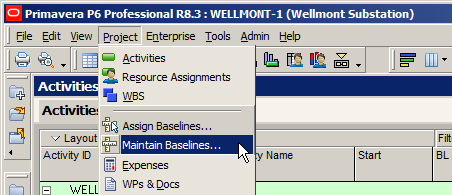
As a rule of thumb when we get to more than 3 baseline snapshots, we can restore the oldest (snapshots) as a project. To restore a baseline, first, we select ‘Maintain Baselines’ from the ‘Projects’ menu, as shown in Figure 2.
Figure 2
Inside the ‘Maintain Baselines’ dialog box we select the oldest baseline from the list and click on the ‘Restore’ button which is on the right-hand side, as shown in Figure 3.
Figure 3

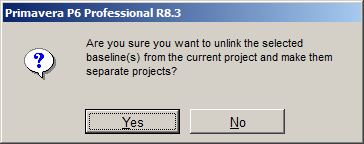
When we click ‘Restore’, we receive a Primavera prompt as shown below in Figure 4.
Figure 4
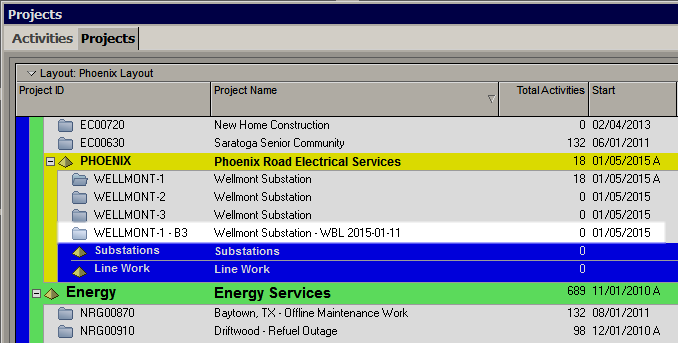
By selecting ‘Yes’ our project moves from ‘Maintain Baselines’ to the respective EPS of the Projects tab, where it is stored as a complete project, as shown below in Figure 5.
Figure 5
If we had a lot of baselines to restore then it could be time-consuming to restore them one by one. It is worth noting that Primavera P6 allows users to restore more than one baseline snapshot project at a time.
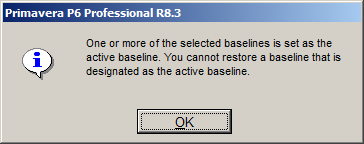
When restoring baselines, users should make sure that they are not assigned to any of the Project, Primary, Secondary or Tertiary baselines in the ‘Assign Baselines’ dialog. If they are when you try and select ‘Restore’ you will receive the prompt shown below in Figure 6.
Figure 6
Don’t worry, all you have to do is return to the Assign Baselines and remove the project from the respective assigned field.
If we return to our construction project, we may have reduced our baselines from the ‘Maintain Baselines’ to three but our projects are still in the database. The next step is to export the projects for backup.
By selecting the File /Export we open each of the restored projects to make an XER copy of our projects, as shown below in Figure 7.
Figure 7
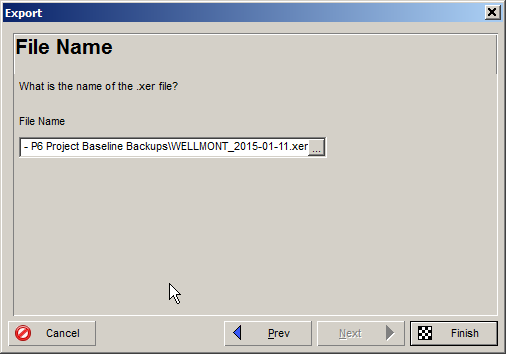
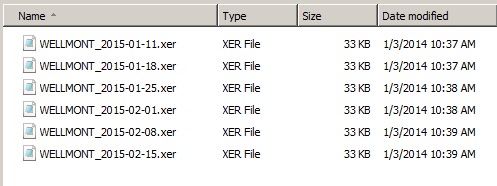
We save our ‘File Name’ with our project name followed by the data date expressed in YYYY-MM-DD. Now our project backup XER files are stored in date order in the backup folder of our server and are easy to locate, as shown below in Figure 8.
Figure 8
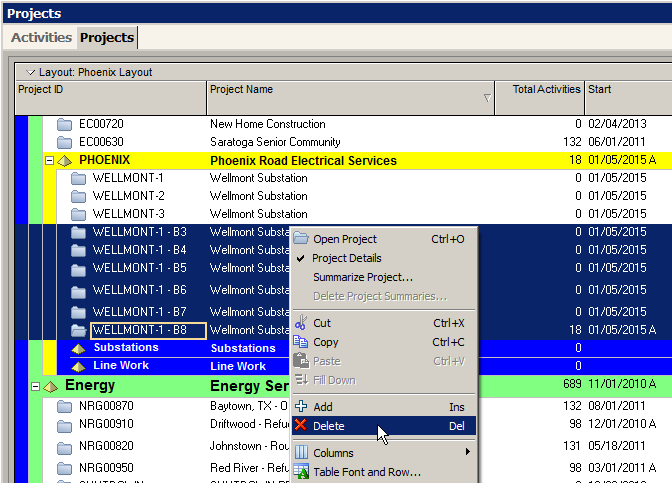
All we need to do now is delete the restored projects. By entering ‘Projects’ in the EPS view, we highlight our restored projects and select delete, as shown below in Figure 9.
Figure 9
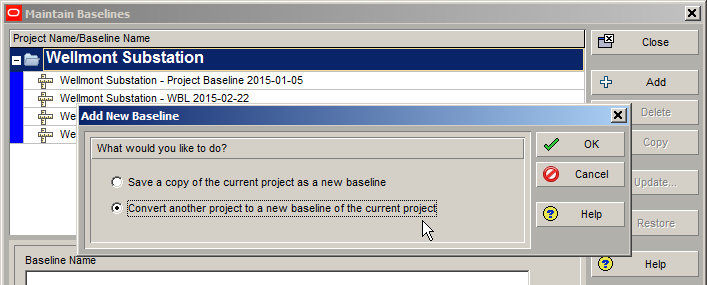
We have de-cluttered our database with our snapshot copies of projects, which will ensure that our system will run smoothly and quickly. If we want to import a project baseline to reattach to a project, we return to ‘Maintain Baselines’ and select the ‘Add’ button. In the ‘Add New Baseline’, we select ‘Convert another project to a new baseline of the current project’ as shown in Figure 10.
Figure 10
Summary
While it’s important to backup Primavera P6 baselines, reducing snapshots of projects is important in keeping the database clear and running smoothly. We recommend that each time you create a new snapshot you should look to restore your oldest baseline. Export them as an XER file using a project name and date format, so that they can be easily located in case you need to reattach one. And finally, delete your restored projects using the EPS view.