Understanding the Commit Changes and Refresh Data features in Primavera P6
If multiple Primavera Professional P6 users are sharing the same database and working on the same project, you will be unable to see your colleagues’ current changes to data straight away, unless they commit changes to the database. Once they have committed their changes to the database, if you refresh the data, this will force Primavera P6 to pull the new data from the database and current data changes which they have made will be revealed.
Most users commit their changes without realizing it because closing down Primavera P6 will automatically commit changes. However, to be sure that you are viewing the latest revisions to the project, it’s a good idea to ‘Commit Changes’ and ‘Refresh Data.’
So how do we ‘Commit Changes’ and ‘Refresh Data’? Let’s take a look.
In our example ‘PIPE INSPECTION & REPAIR -11 Project’, we have made several changes to the data which we want our colleague to view immediately. Therefore, we want to commit changes straight away into the Primavera P6 database. We can do this by clicking the hotkey F10 which is the save button. This will save our data into the database or we can
bring up the ‘Commit Changes’ icon on the interface.
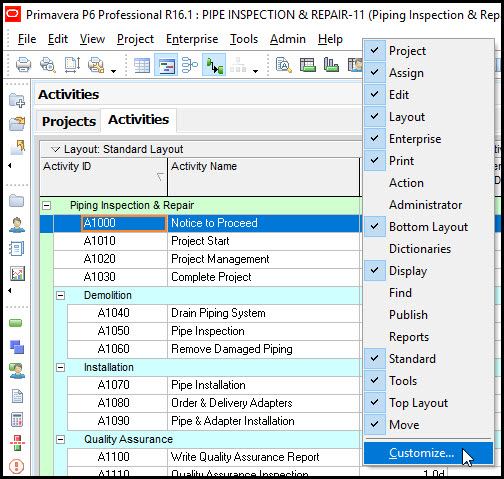
In this example, we are choosing to bring up the icon to save our changes. By right-clicking next to the main menu, a popup box will appear as in Figure 1.
 Figure 1
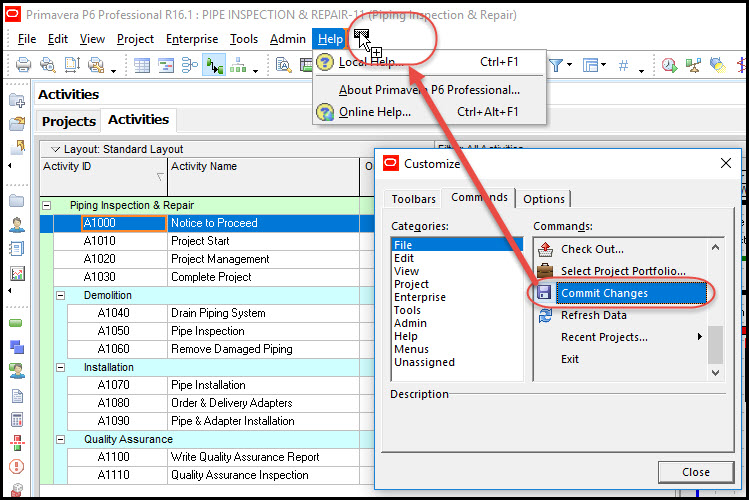
By clicking on ‘Customize’, we will find the ‘Commit Changes’ icon as shown below in Figure 2.
Figure 2
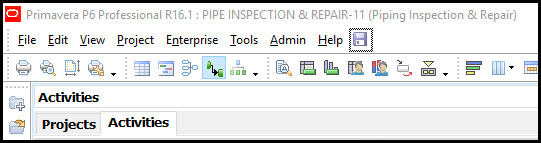
We then click and drag the ‘Commit Changes’ icon and drop it next to the main menu. Our ‘Commit Changes’ icon appears next to the main menu as in Figure 3.
By selecting it we commit our changes to the Primavera P6 database.
Figure 3
Next, we must refresh our screen so that we can see any changes that have been made by the team and have an up-to-date, revised edition of our project schedule.
We can refresh our data by selecting the hotkey F5 or we can bring up the ‘Refresh Data’ icon on the interface. In this case, we choosing to bring up the icon to refresh the data.
Figure 4
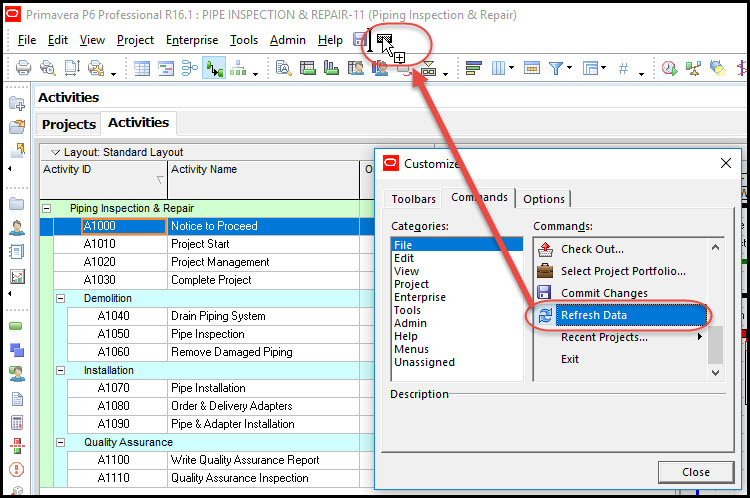
We go back to the customize dialog box as in, Figure 4 above and select the ‘Refresh Data’
And drag the icon and drop it next to the ‘Commit Changes’ icon.
Figure 5
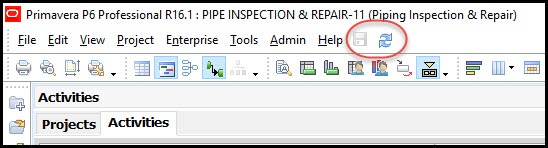
Now both of our icons appear in the main menu for easy access, and we can refresh our data. The Refresh icon is particularly helpful when the tile graphics need a quick refresh. The Commit icon also has value as a save or commit indicator. When changes have been committed this icon is dimmed or “ghosted out”, as is the case in Figure 5 above.
Summary
Users making changes would not lose them because they failed to commit changes, for the simple reason that closing Primavera P6 automatically commits changes. Even if Primavera P6 crashes, data isn’t typically lost. But if you require an up-to-date version of the project schedule, by selecting the Commit icon and Refresh Data icon, any changes are revealed.
Of course, Primavera P6 provides the hotkeys (F10 & F5) for saving and refreshing data and ultimately which method you choose is a personal preference. However, the Commit icon, in particular, may provide more insight into the save status of your project.