Have you ever applied a constraint to an activity, and then wanted to quickly see all the activities that could be adjusted to help make that activity constraint date? If so, then the negative float bar feature in Primavera P6 is a great way to accomplish this.
The activities view has a column that will display the total float of all activities. On large projects, however, the activity view may not provide the level of transparency desired to understand the impact of a constraint on the schedule. This is where the negative float bar becomes helpful. The negative float bar will be displayed underneath all activities that could have a positive or negative effect on meeting the constraint date. In this way you can perceive the outcome of a constraint directly from the Gantt chart, and with greater insight.
This article describes the negative float bar and how to utilize it, so you can easily view all the activities that can be adjusted to have a positive impact on your activity or project constraint.
Let’s first examine the makeup of the negative float bar to make sure we understand its logic. Select the bars icon in the layout tool group at the top of the screen or select View | Bars from the top drop down menu. Scroll down until you see the ‘Neg Float Bar’, and highlight it. The timescale for this bar is ‘Neg Float Bar’. The filter is ‘Negative Float’. Click on ‘Negative Float’ in the Filter column, and up will appear the Filters dialog, and all the currently defined filters.
It is not possible to view a default predefined filter, so to view the Negative Float filter, which is a default filter, copy and paste it to the User Defined filters field. Select modify, and you will see as in Figure 1 that the ‘Neg Float Bar’ defines any activity with Total Float less than 0.0-hour as having a negative float value, which makes logical sense.
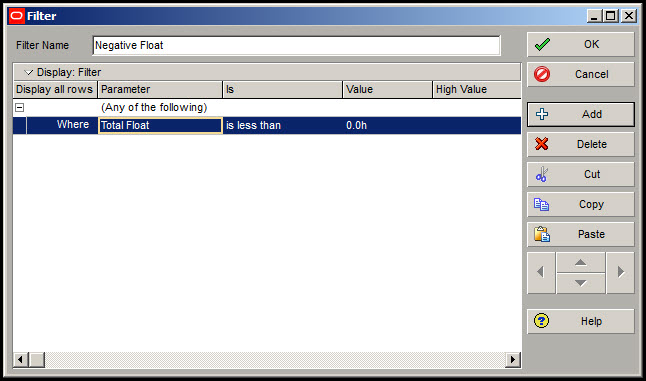 Figure 1
The schedule for this demonstration is displayed in Figure 2.
 Figure 2
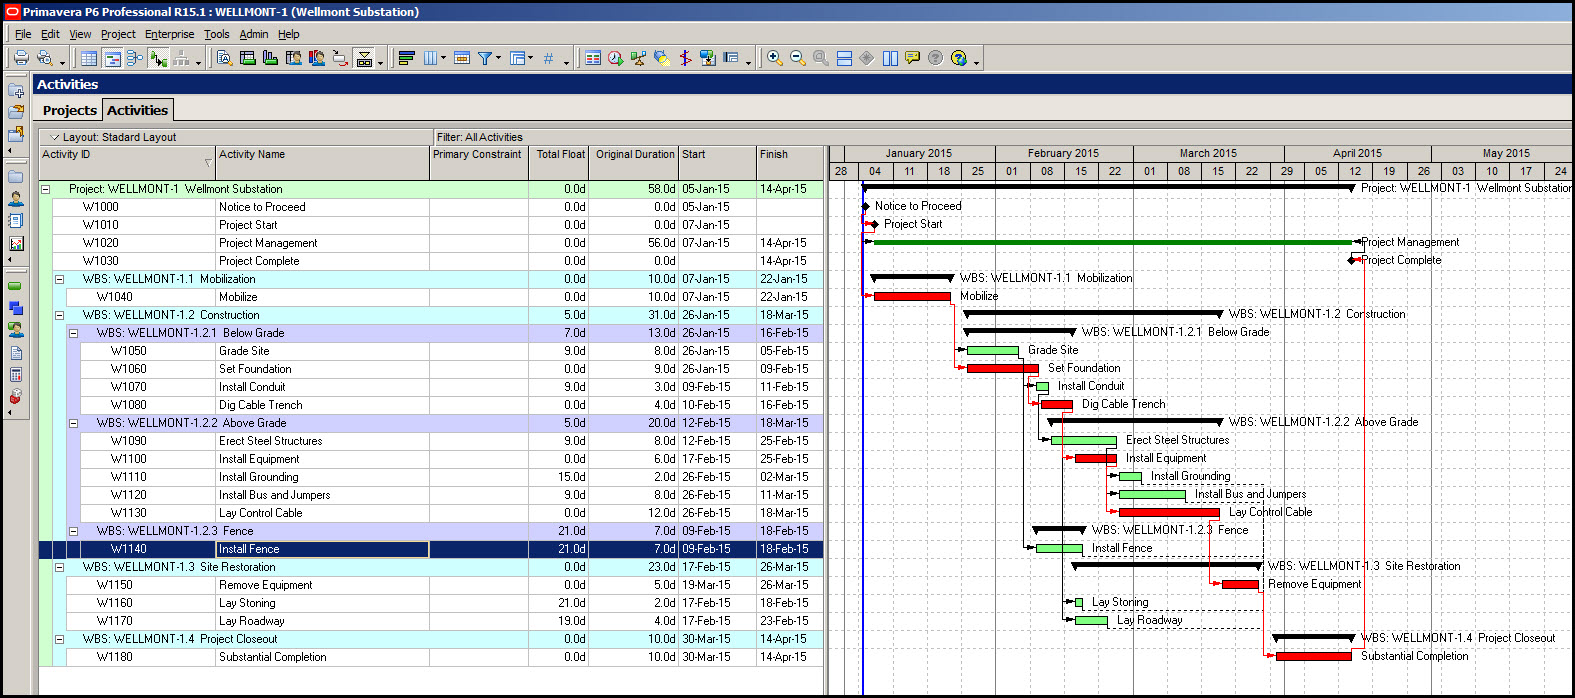
Note that the schedule has both critical and non-critical activities displayed in red and green, respectively. We want to insert a constraint on the Install Fence activity, so that it is performed at an earlier date than the associated activity durations and relationships require.
To apply this constraint we highlight the Install Fence activity, and then select the activities bottom pane status tab. Here set the primary constraint to ‘Finish On or Before’ and also set the corresponding date to 12-Feb-2015. Recalculate the schedule and view the impact of the constraint on the schedule, Figure 3.
Figure 3

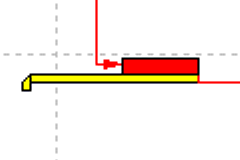
The constraint requires the Install Fence activity to finish no later than the close of business on 12-Feb-2015. This generates 3-days of negative float on ‘Install Fence’. From the Gantt chart, Figure 3, we see from the yellow negative float bars that ‘Grade Site’, Mobilize, ‘Project Start’, and ‘Notice to Proceed’ all have negative float.
Starting any of these activities earlier will help ‘Install Fence’ meet its constraint date. Decreasing the duration of Mobilize, Grade Site, and/or ‘Install Fence’ will also support meeting ‘Install Fence’s’ deadline.
Summary
The negative float bar uses a predefined default filter to highlight all activities that have a total float less than zero on the Gantt chart. This enables you to quickly assess the effect of an activity or project constraint on the schedule. The negative float bar will appear underneath all activities that may have a positive or negative impact on meeting the constraint date. The negative float bar will commence at the close of business on the date specified for the primary constraint.