Before you start diving in and creating a schedule you should first consider what the major deliverables of your project are. Furthermore, you should decompose these deliverables into components in order to create what is known as a Work Breakdown Structure (WBS). This approach of first creating a WBS is known as a top-down scheduling approach.
The first step in scheduling a project is to use the WBS to decompose the project into its major deliverables, i.e. major product or service components. After the creation of the WBS you then think about the tasks required to make those component deliverables. The order of these efforts is important to ensure your project is product and customer focused. The top-down scheduling approach first considers the deliverables in the WBS.
This article discusses the WBS, and demonstrates how to use a top-down scheduling approach to create a simple WBS in Microsoft Project 2013 first and before insertion of defined tasks.
Top-Down Approach
The top-down scheduling approach recognizes the importance of the project management team keeping their “eye on the ball” throughout the project life cycle. This means that you maintain a focus on the end product or service, which is the whole purpose of the project. The WBS helps you maintain this focus on the product. At its heart, the WBS is a deliverable-oriented decomposition of the project into smaller components. So the WBS focuses on the deliverables, and it is simply a breakdown of all the components making up the product in an organized fashion. In the top-down approach you create the WBS first, so that the tasks on the project schedule flow from the WBS, and not the other way around.
Microsoft Project is sometimes viewed as a bottom-up scheduling approach where you insert tasks first and then organize these tasks underneath summary tasks using the Indent feature. These summary tasks are the elements of the WBS in Microsoft Project, and they are typically described by nouns and adjectives. They also are highlighted in bold in Microsoft Project. Anything below the summary tasks are the activities or tasks required to produce the WBS elements. And they generally are described by verbs.
Because the creation of these summary tasks requires first the insertion of a task underneath each one, it appears that Microsoft Project is more suited to a bottom-up scheduling approach. However, it is possible to insert each summary task around one undefined default task. After insertion of all summary tasks or WBS elements by this method, it is then possible to go back and define these default tasks and insert additional tasks until all the tasks required for each summary task (or WBS element) are fully entered and defined. Microsoft Project’s ease of task insertion makes it possible to later insert additional tasks underneath each summary task. In this way we can directly use Microsoft Project for a top-down WBS approach instead of having to resort to using a whiteboard for definition of the WBS.
Example WBS
Before creating a WBS in Microsoft Project 2013 let’s take a look at a diagram of our example WBS. Figure 1 displays an example WBS for a Piping Repair and Improvement project.
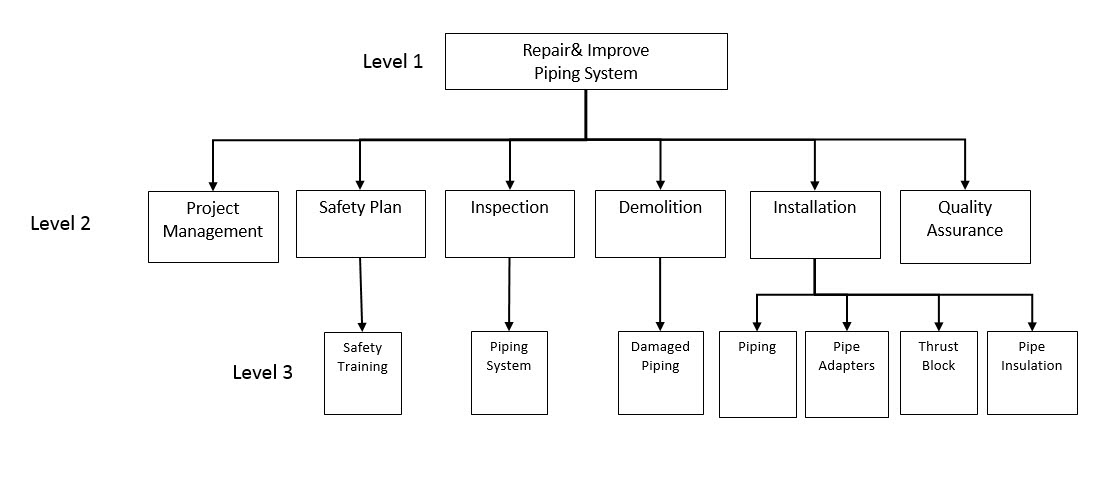 Figure 1
As you can see in Figure 1 the Piping Repair and Improvement project is broken down in an orderly fashion into smaller components. The ideal WBS breaks down the deliverables into bite sized chunks suitable for the application of the corresponding work tasks. These bit sized deliverables are known as the work package. It is not uncommon for the WBS to go several levels down before reaching the work package level. For the simplicity of illustration our example WBS only goes down to level three.
Top-down Approach in Microsoft Project
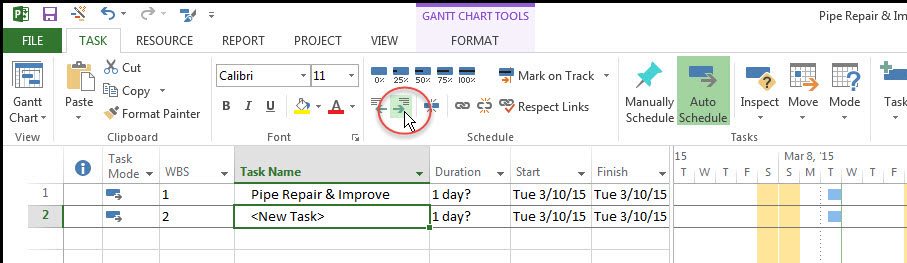
We begin our Microsoft Project WBS creation by the insertion of two default tasks. Select the Task tab, Insert ribbon group, and Task icon, Figure 2, twice to insert two default tasks.
 Figure 2

Now in the first row type in the project name Pipe Repair & Improve, Figure 3.
Figure 3

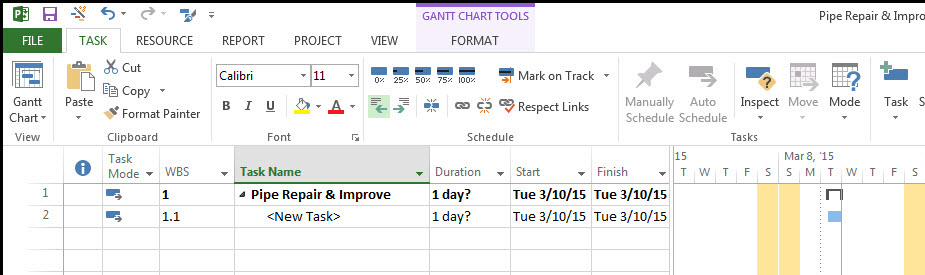
To make Pipe Repair & Improve a summary task, and, therefore, a WBS element highlight row 2 (<New Task>) and select the Task tab, Schedule ribbon group, and Indent icon, Figure 4.
Figure 4
Now we have our first WBS element defined; the summary task Pipe Repair & Improve displayed in Figure 5.
Figure 5
Note the WBS column, which describes the level of each summary task, and, therefore the level of each WBS element. It also lists the levels below the summary tasks. But as noted above only the summary tasks are in bold, and should be considered a part of the WBS.
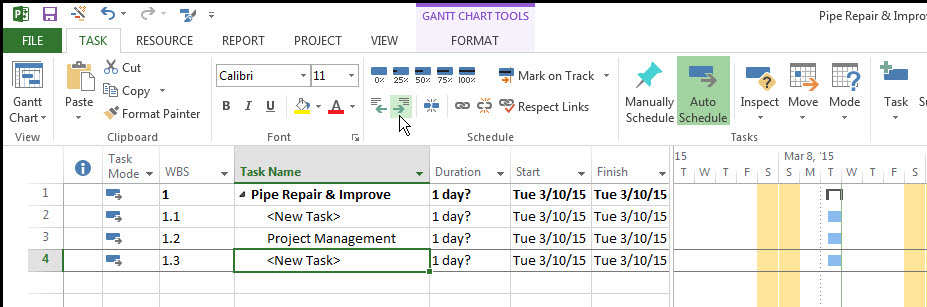
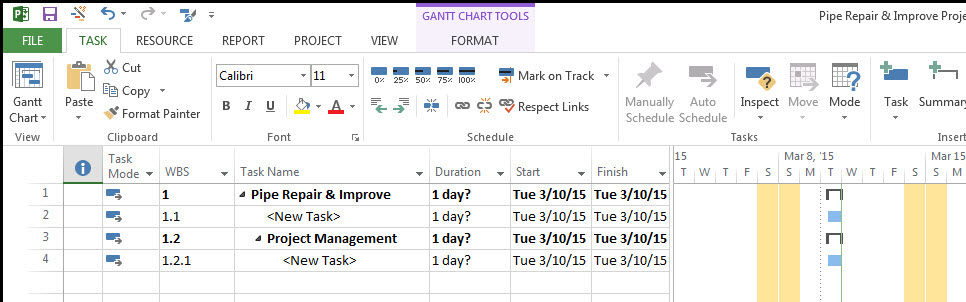
Insert two additional default tasks and name the top one Project Management, Figure 6.
Figure 6
Indent the second task, and Project Management becomes WBS element 1.2, Figure 7, and, therefore, falls underneath WBS element 1, Pipe Repair & Improve.
Figure 7
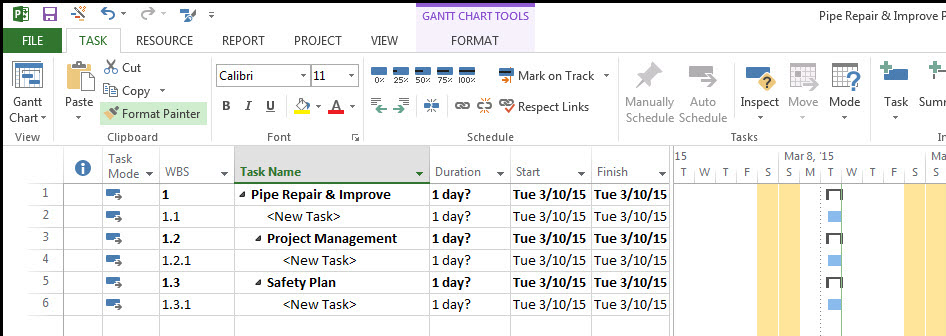
Again, for the next WBS element insert two tasks. Type in Safety Plan as the WBS element name, and indent the default (<New Task>) to make Safety Plan a summary task. Now you need to outdent Safety Plan one time, Figure 8.
Figure 8

This is so that it falls in line with Project Management on level two of our WBS, Figure 9.
Figure 9
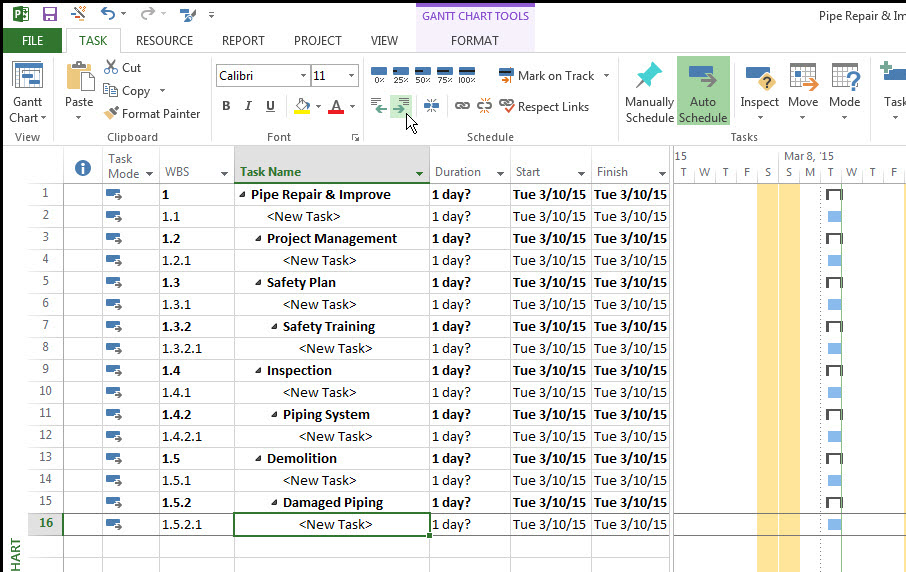
Add the next WBS element and summary task, Safety Training, Figure 10.
Figure 10

This WBS element, 1.3.2, falls underneath Safety Plan, so it does not need to be outdented. Now insert WBS elements 1.5, Demolition, and 1.5.2, Damaged Piping, Figure 11.
Figure 11
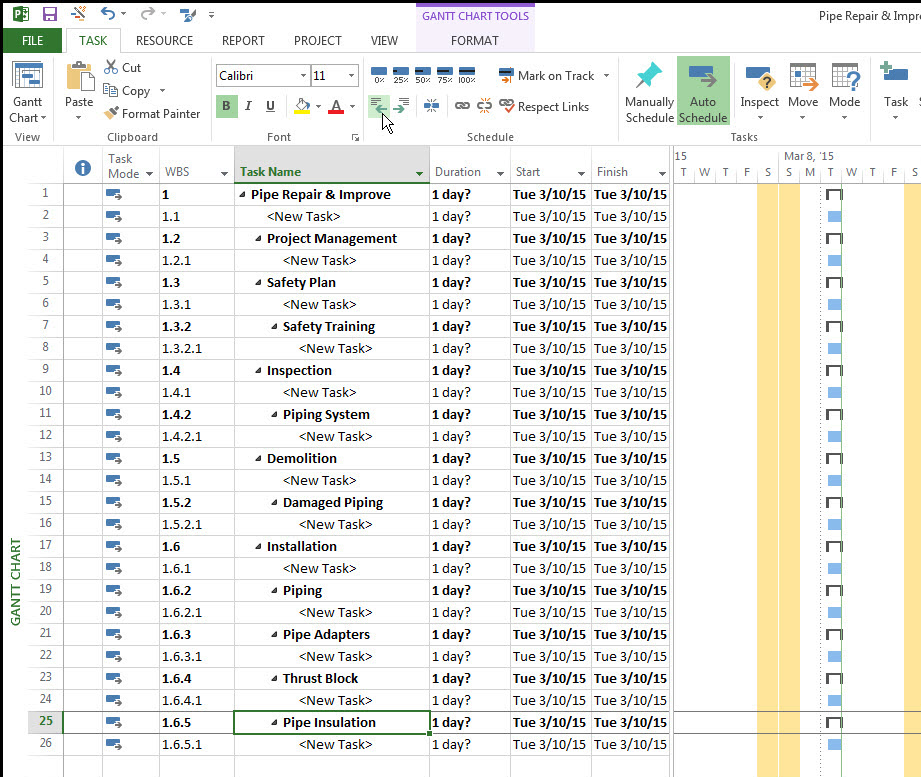
Add the Installation WBS elements, and indent and outdent as appropriate, Figure 12.
Figure 12
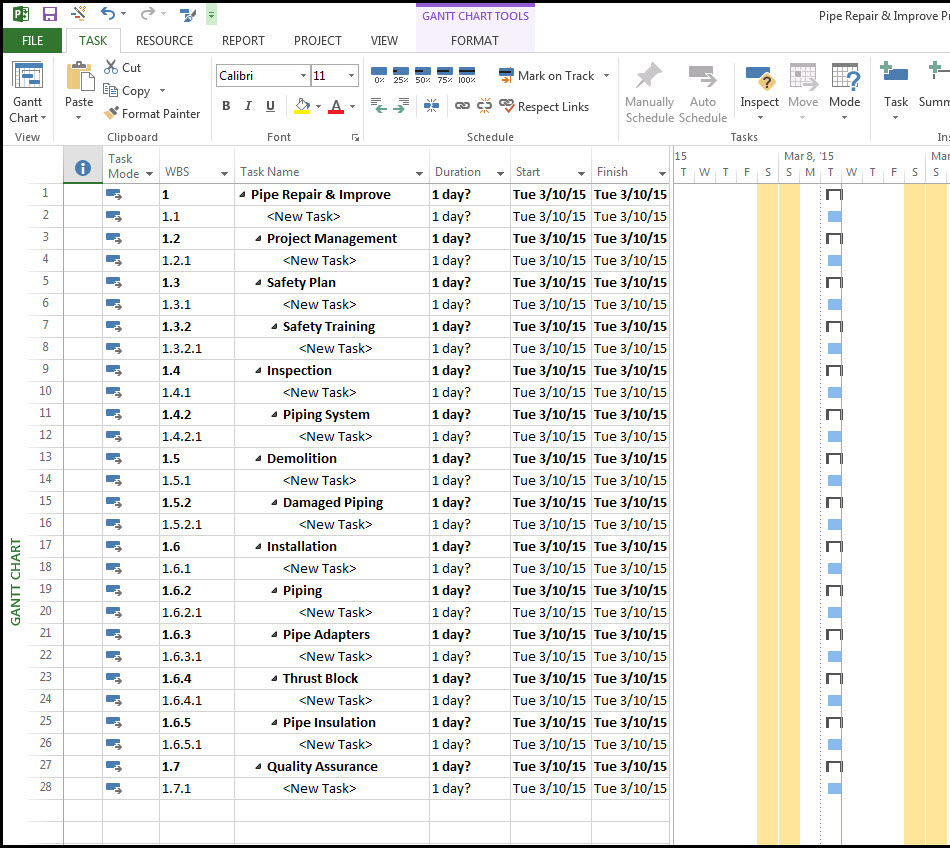
Finally, add the Quality Assurance WBS element 1.7 to complete the WBS for the Pipe Repair & Improve project, Figure 13.
Figure 13
Schedule Tasks
To enter the schedule work you simply need to define the tasks below the summary tasks, and insert additional tasks, as appropriate, to describe all the work required to deliver each WBS element or work package.
Summary
Scheduling in Microsoft Project is sometimes considered a bottom-up approach, where you enter tasks and then organize these tasks around summary tasks. But Microsoft Project’s ease of task insertion makes it suitable for first defining summary tasks or WBS elements and then later adding activities or tasks to clearly demonstrate how to produce these WBS element deliverables.
So whether your preference is for a bottom-up task directed approach or top-down deliverable directed approach Microsoft Project 2013 is a tool that is suitable for both methods.