Ten Six offers a Microsoft Project to Primavera P6 conversion and schedule maintenance service. We help companies who typically use Microsoft Project, but have a contractual need to provide their schedule data in Primavera P6 format.In short, companies can affordably outsource their P6 scheduling to Ten Six, when hiring a full time P6 expert is not practical.
This article looks at some of the key points our customers should be aware of before submitting a Microsoft Project schedule to Ten Six for conversion. We recommend you download the more detailed copy of our Microsoft Project Conversion Guidelines PDF document here to help you in preparing your Microsoft Project schedule.
As you might expect, there is a lot more to the conversion process than simply moving data. And, because Microsoft Project has a very different architecture to Primavera P6, the schedule reports you get back from Primavera P6 may not be organized exactly the same. There are also things that Microsoft Project does that are incompatible with Primavera P6, such as differences in milestone types, linking and permitting blank rows to name a few. The following article highlights the key differences and things to avoid when preparing your Microsoft Project schedule.
Background
Our experienced associates have developed a process for conversion that addresses a range of common compatibility issues that occur when a schedule is loaded into Primavera P6 from Microsoft Project. Various features between Primavera P6 and Microsoft Project are not entirely compatible and therefore certain steps must be taken to correct for these differences, if a good facsimile of the Microsoft Project schedule is to be returned. That said, there are also items that need to be correctly setup in the Microsoft Project file by the customer, particularly concerning the way the indent structure of the schedule has been entered.
The following guidelines will help you in preparing your Microsoft Project schedule data for the conversion process.
Guidelines Introduction
Because there are fundamental differences between the Microsoft Project and Primavera P6 systems, there are some points you need to be aware of before you submit your schedule for conversion.
Please take a few minutes to read through this article. It will help the conversion go smoothly and more importantly, help you understand the data you see in Primavera P6 when the process is completed.
Preparing your Microsoft Project Schedule for Conversion
Items to avoid in your schedule:
1 – Avoid Blank Rows
Avoid blank rows or blank task names in your schedule. These cause errors during conversion. If you have blank rows, please delete these before submitting the schedule file for conversion.
2 – Turn off the Project Summary Bar
Avoid using the ‘Project Summary Task’ in the schedule. This creates an unnecessary duplicate WBS element at the top of the converted Primavera P6 schedule. Primavera uses the project as the equivalent of the Project Summary bar at the top of the WBS structure: this makes the Project Summary Task redundant.
If in use, the Project Summary Task should be turned off before saving and sending the MPP file.

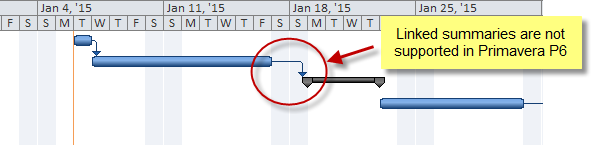
3 – Avoid Links on Summary Tasks
Although you cannot create links between tasks and summaries, Microsoft Project will retain some links between tasks and summaries when tasks are indented.
This scenario means that summary tasks are incorrectly driving the start dates of other tasks. During conversion, summary tasks in Microsoft Project become WBS elements in P6. Primavera P6 doesn’t support links to WBS elements, so such links must be removed before conversion can take place. If summary task links are present in the Microsoft Project schedule, the start date for the linked activity will be incorrect if the summary was the driving predecessor.
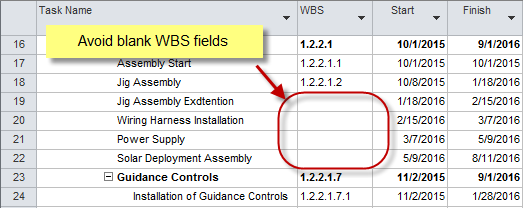
4 – Avoid Blank WBS Fields
Microsoft Project generates WBS codes based upon task indentation hierarchy. However, in some circumstances, it leaves blank fields. Blank WBS fields will generate errors during conversion. Please verify that your WBS field is fully populated before submitting your schedule.
Understand Differences in Data Grouping and Sorting
A major difference between Microsoft Project and Primavera P6 is the way in which the tasks and summaries are sorted and displayed. Please look carefully at the following examples to understand what to expect when you receive your Primavera P6 schedule report.
Use Correct Indent Structures
While Microsoft Project uses indenting to define summary tasks and describe the Work Breakdown Structure (WBS), Primavera P6 uses WBS elements to control and display indentation. Therefore Primavera P6 will faithfully display tasks to the order of the WBS, which may not necessarily be in the order of task IDs as they appear in Microsoft Project.
For example, Microsoft Project lets you order tasks at different levels of indentation below a single summary bar. However, P6 will move the higher-level tasks to the appropriate WBS element, thus placing them in a different order on the schedule. To understand why this happens, take a look at these examples:
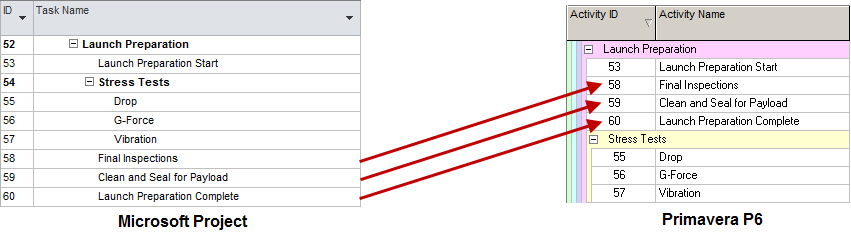
In this example, Microsoft Project is displaying tasks 58, 59 & 60 below the Stress Tests summary. However, because they are out-dented, they are in fact at a higher level of the WBS than 55, 56 & 57. Therefore they actually belong to the Launch Preparation summary WBS (52).
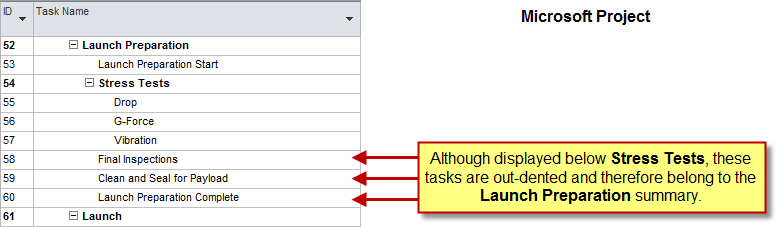
When this file is converted, Primavera P6 will correctly load these tasks directly under the Launch Preparation WBS element, moving them above the Stress Tests element as shown in the following figure; regardless of their task IDs.
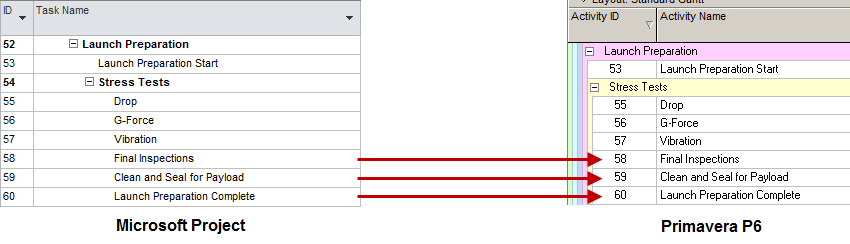
The above figure demonstrates that Primavera P6 will order the tasks to the WBS structure based entirely upon their level of indentation in Microsoft Project. Primavera P6 has placed the tasks that belong to Launch Preparation below that WBS element; precisely as the Microsoft Project indentation described, but not how it was originally displayed.
For larger projects, with deeper levels of indentation, this can have a profound effect on the overall layout of the schedule. Therefore you should inspect your Microsoft Project schedule to make sure that the order of the tasks, and their indentation, are true to the WBS structure, not in conflict with it as we saw in the previous figure. The following example demonstrates correct indentation options.
Aligning your Indent Structures
If you wish for Primavera P6 to display your tasks exactly as they are in Microsoft Project, you will need to make sure that indentation of tasks is correct below each of the summary tasks.
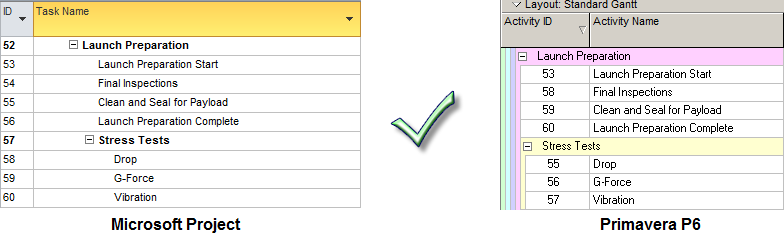
For example, if tasks 58, 59 & 60 (figure below) are part of the Stress Tests WBS element; then they should to be indented to the same level as tasks 55, 56 & 57.
If however, the tasks are truly part of the Launch Preparation WBS element, you should to move them under that element in Microsoft Project. This will eliminate the display differences and arguably would be a more correct representation of the schedule in Microsoft Project as well as in Primavera P6.
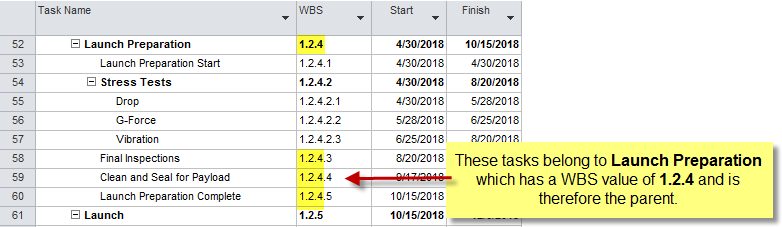
To be certain of a task’s position in the hierarchy in Microsoft Project, the WBS field can be opened. These code values show the true hierarchy created by indentation and make it easy to spot tasks that are higher in the structure, but lower down in the sort order. P6 will group tasks exactly by these codes, not by the Microsoft Project sort in order.
Understand Milestone Differences
Unlike Microsoft Project, Primavera P6 has two milestone types; Start Milestones and Finish Milestones. When logic allows, Start Milestones will automatically schedule at the beginning of the calendar working day, and Finish Milestones will schedule to the end of the calendar working day.
When the Microsoft Project schedule is converted to Primavera P6, all Microsoft Project milestones are loaded as Start Milestones.
This means that the dates for some of these P6 Start Milestones may be a day later than the date in Microsoft Project because P6 places them at the start of the following day, instead of the end of the previous day. Thus, part of the conversion service is to manually identify all milestones that should be Finish Milestones and changing them accordingly to achieve correct dates. The following example shows how milestone types affect the P6 schedule.
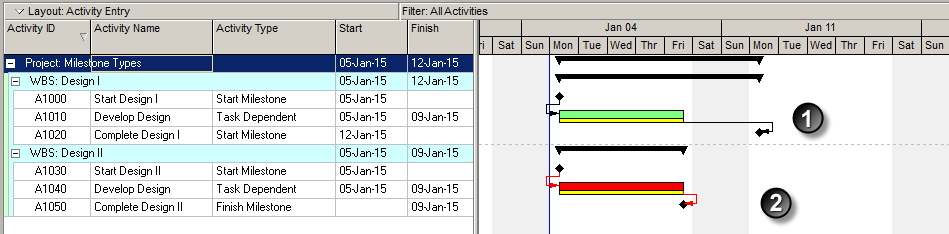
Above:
Item 1 – Start milestones – all milestones from Microsoft Project arrive in P6 as Start Milestones. This can cause them to schedule to the start of the next working day, rather than on the date scheduled in Microsoft Project. As you can see with the Complete Design I start milestone above, it has moved incorrectly to the following Monday.
Item 2 – Manually corrected milestone type – the Complete Design I Milestone has been manually changed to a Finish Milestone to correct the conversion default. This has placed the milestone on the intended date.
Action Required: Unambiguous milestone task names
Please verify that all your milestone task names clearly identify a starting or finishing even. This will help our consultants understand what the milestone represents and to manually adjust its type correctly.
Summary
Neither Microsoft Project or Primavera P6 are incorrect in their approaches to displaying a WBS. In the end, it’s just what you are used to using and how the basic philosophies of the tools differ in that respect. Now that we have outlined these differences, it should be easier to understand how the tools differ in their approach to sorting and grouping data. Microsoft Project is putting more emphasis on the order that tasks were created and the order of task IDs, while Primavera P6 is putting more emphasis on the WBS’s ownership of those tasks. Which is better or more correct is simply a matter of opinion.